
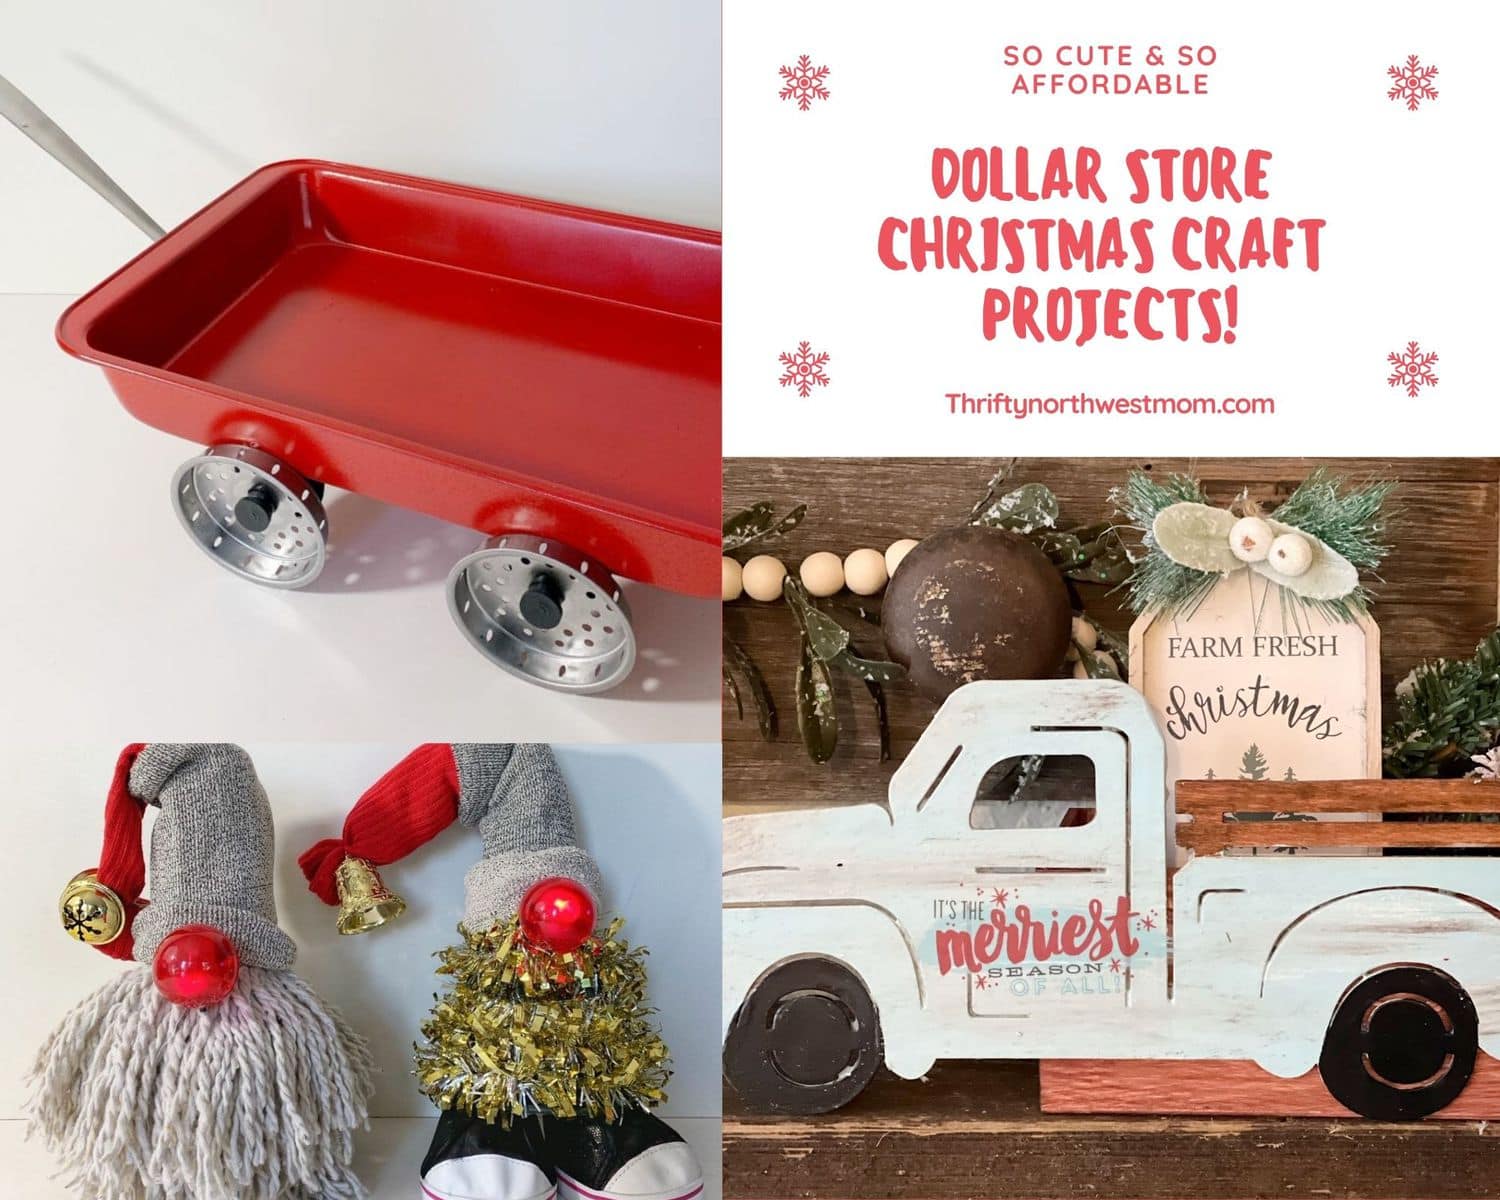
Dollar Store Christmas Crafts – DIY Holiday Decor – Make With Dollar Store Items
This post may contain affiliate links and I may be compensated for this post. Please read our disclosure policy here.

Dollar Store Christmas Crafts – DIY Holiday Decor – Make With Dollar Store Items
DIY Holiday Decor Items You Can Make With Dollar Store Items – Make DIY holiday decor on a budget without it looking like it!
Are you looking for DIY holiday decor items you can make, that are adorable, and won’t break the bank? Check out these Dollar Store Christmas Craft ideas, to show how you can use Dollar store items to make decor that does not look like it was made for just a few dollars! If you were to buy these items at craft fairs, they would cost a lot more than a few dollars! The idea of sharing this, is not to provide detailed step by step instructions for each project, but to get you thinking creatively about how many really cool things you can make for your home, that will fit your style. We have shared what we used, but head to your local dollar store, and use the basic concept, and put your own personal spin on them, so they fit in with your decor. You can also check out their holiday catalog here to get an idea of what you might find in the store at your local Dollar Tree, and plan ahead.
Plus, check out lots more year round DIY Dollar Tree Craft Ideas too!
We have the Dollar Tree store in our region, so this is where we got all of our dollar store supplies from. We wanted to share it early, as all of these items are currently out at our local Dollar Tree, so it is a great time to start scouting for supplies if you want to make any of the projects.
Many of these are projects you can google, and get more ideas on how to do them. You can change the colors, or other parts of these projects so they fit into whatever the decor theme you have going on at your house for the holidays. There are so many things you can do to make a beautiful home, without a huge budget. Here are some of my favorites, that we have made this year.
And if you love to craft, you might want to check out this offer for a Premium One Year Membership to Craftsy for just $2.49 (gives you access to tons of crafty classes to learn new skills)!

Dollar Store Red Truck Christmas Craft – So Fun to Make & So Cute!
Cost to make: $5-$6 + Paint & Glue

This was my favorite Christmas craft to make this year. You can get creative with these and decide how much you want to decorate them, or how little. They are fun for holiday craft parties too. We share full instructions on how to make these here.
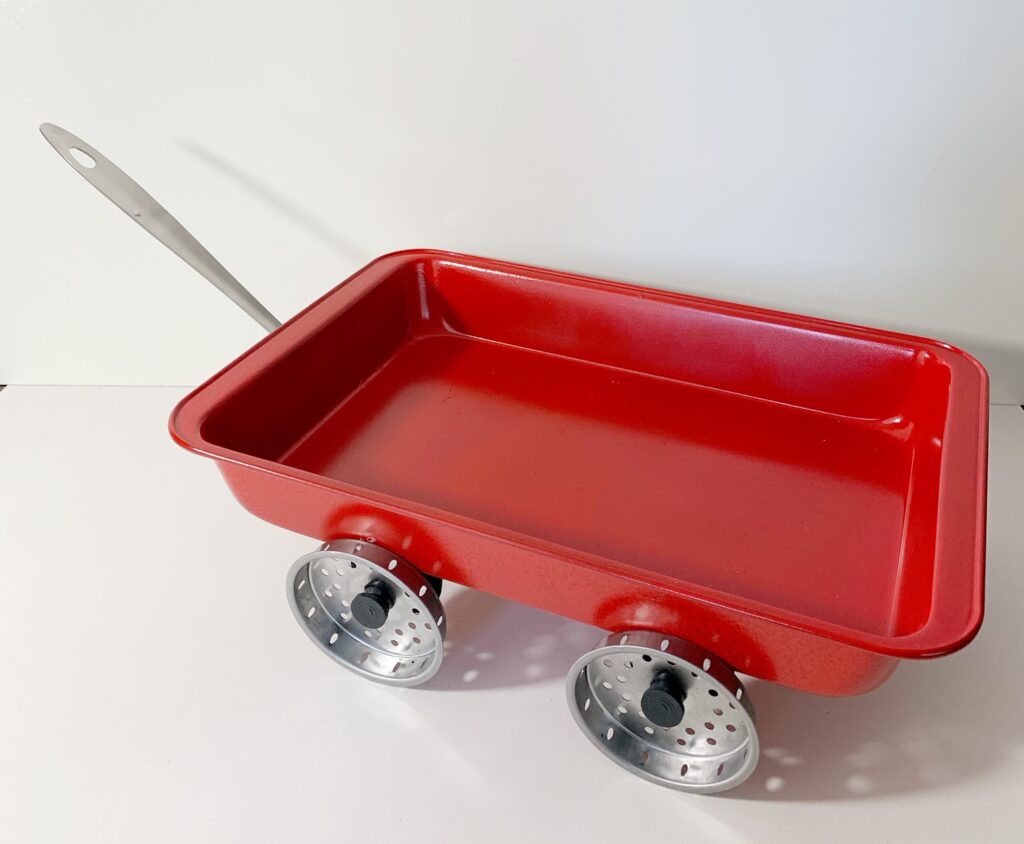
Dollar Tree Red Wagon Project (Cake Pan Wagon)
Cost to make: $6 + Paint & Glue
This project is so easy and shows off so cute. You can buy one of the Dollar Store Christmas Trees and put it up in the wagon and decorate it to use as a centerpiece or in front of a fireplace.
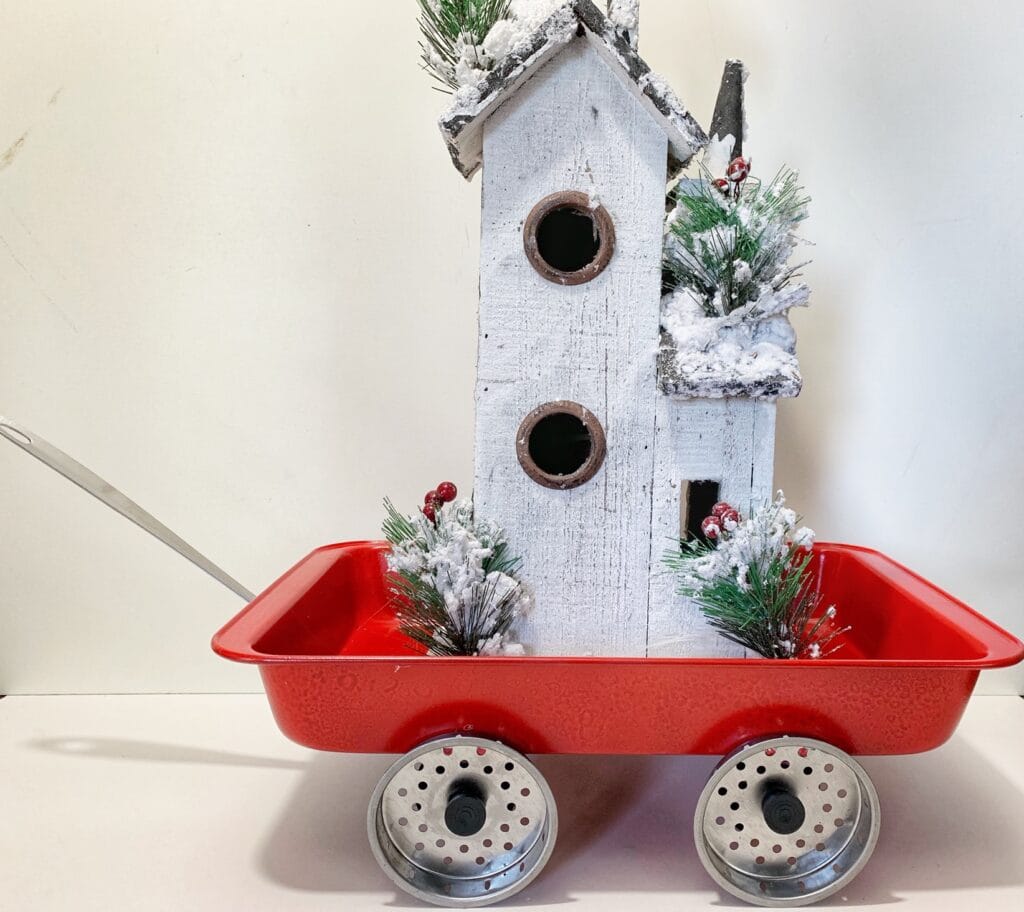
You can really use it to display any kind of Christmas decor. Or display snacks in it, or just leave it as is as a conversation starter. One thing that is really fun about this one, is that it is made out of items you would find in your kitchen. I plan to use mine to hold snacks for a Christmas party I am throwing.
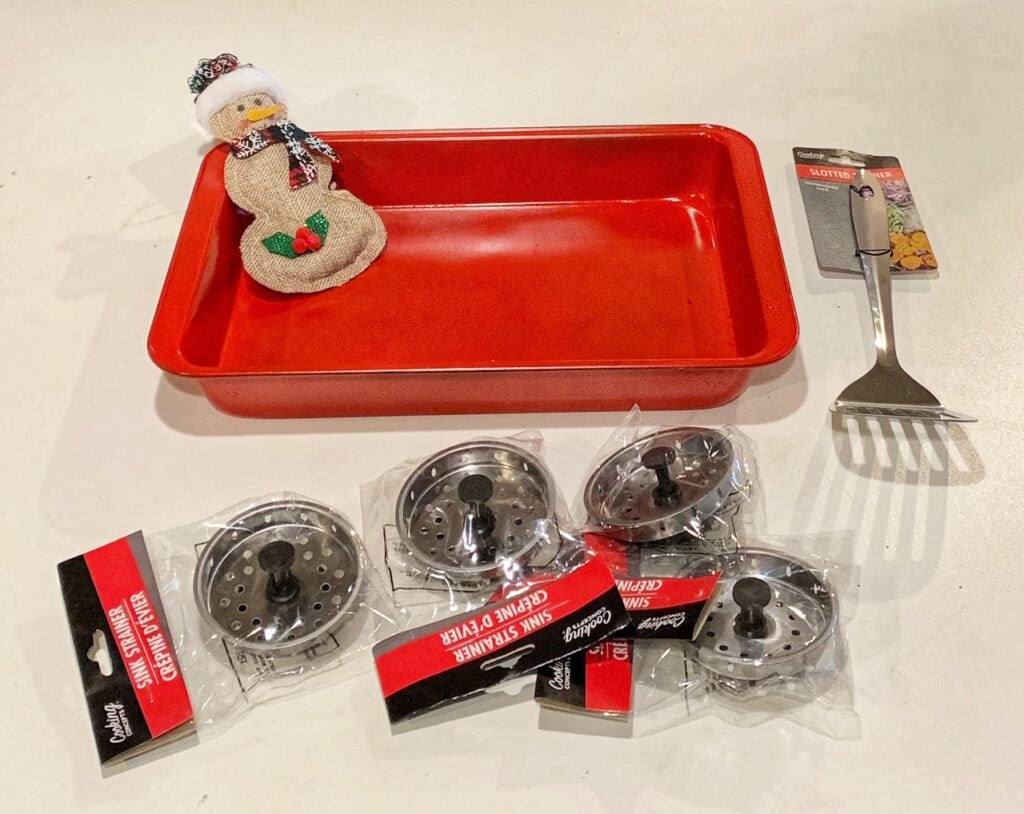
To put together your own wagon you will need:
- One metal cake pan (we forgot to take the picture before painting it red – oops)!
- One spatula
- We used 4 kitchen sink strainers (I have also seen people use mason jar lids painted with a magnet in the middle)
- Red paint
- Glue
We got all of the items needed for this project at the dollar store, except the can of red spray paint. We used hot glue to put our wagon together, but if you want to put anything too heavy in it you will want to use something like gorilla glue, or an epoxy, to make it more sturdy. Paint your cake pan, let it dry, and then put it all together with glue. It is really that simple!
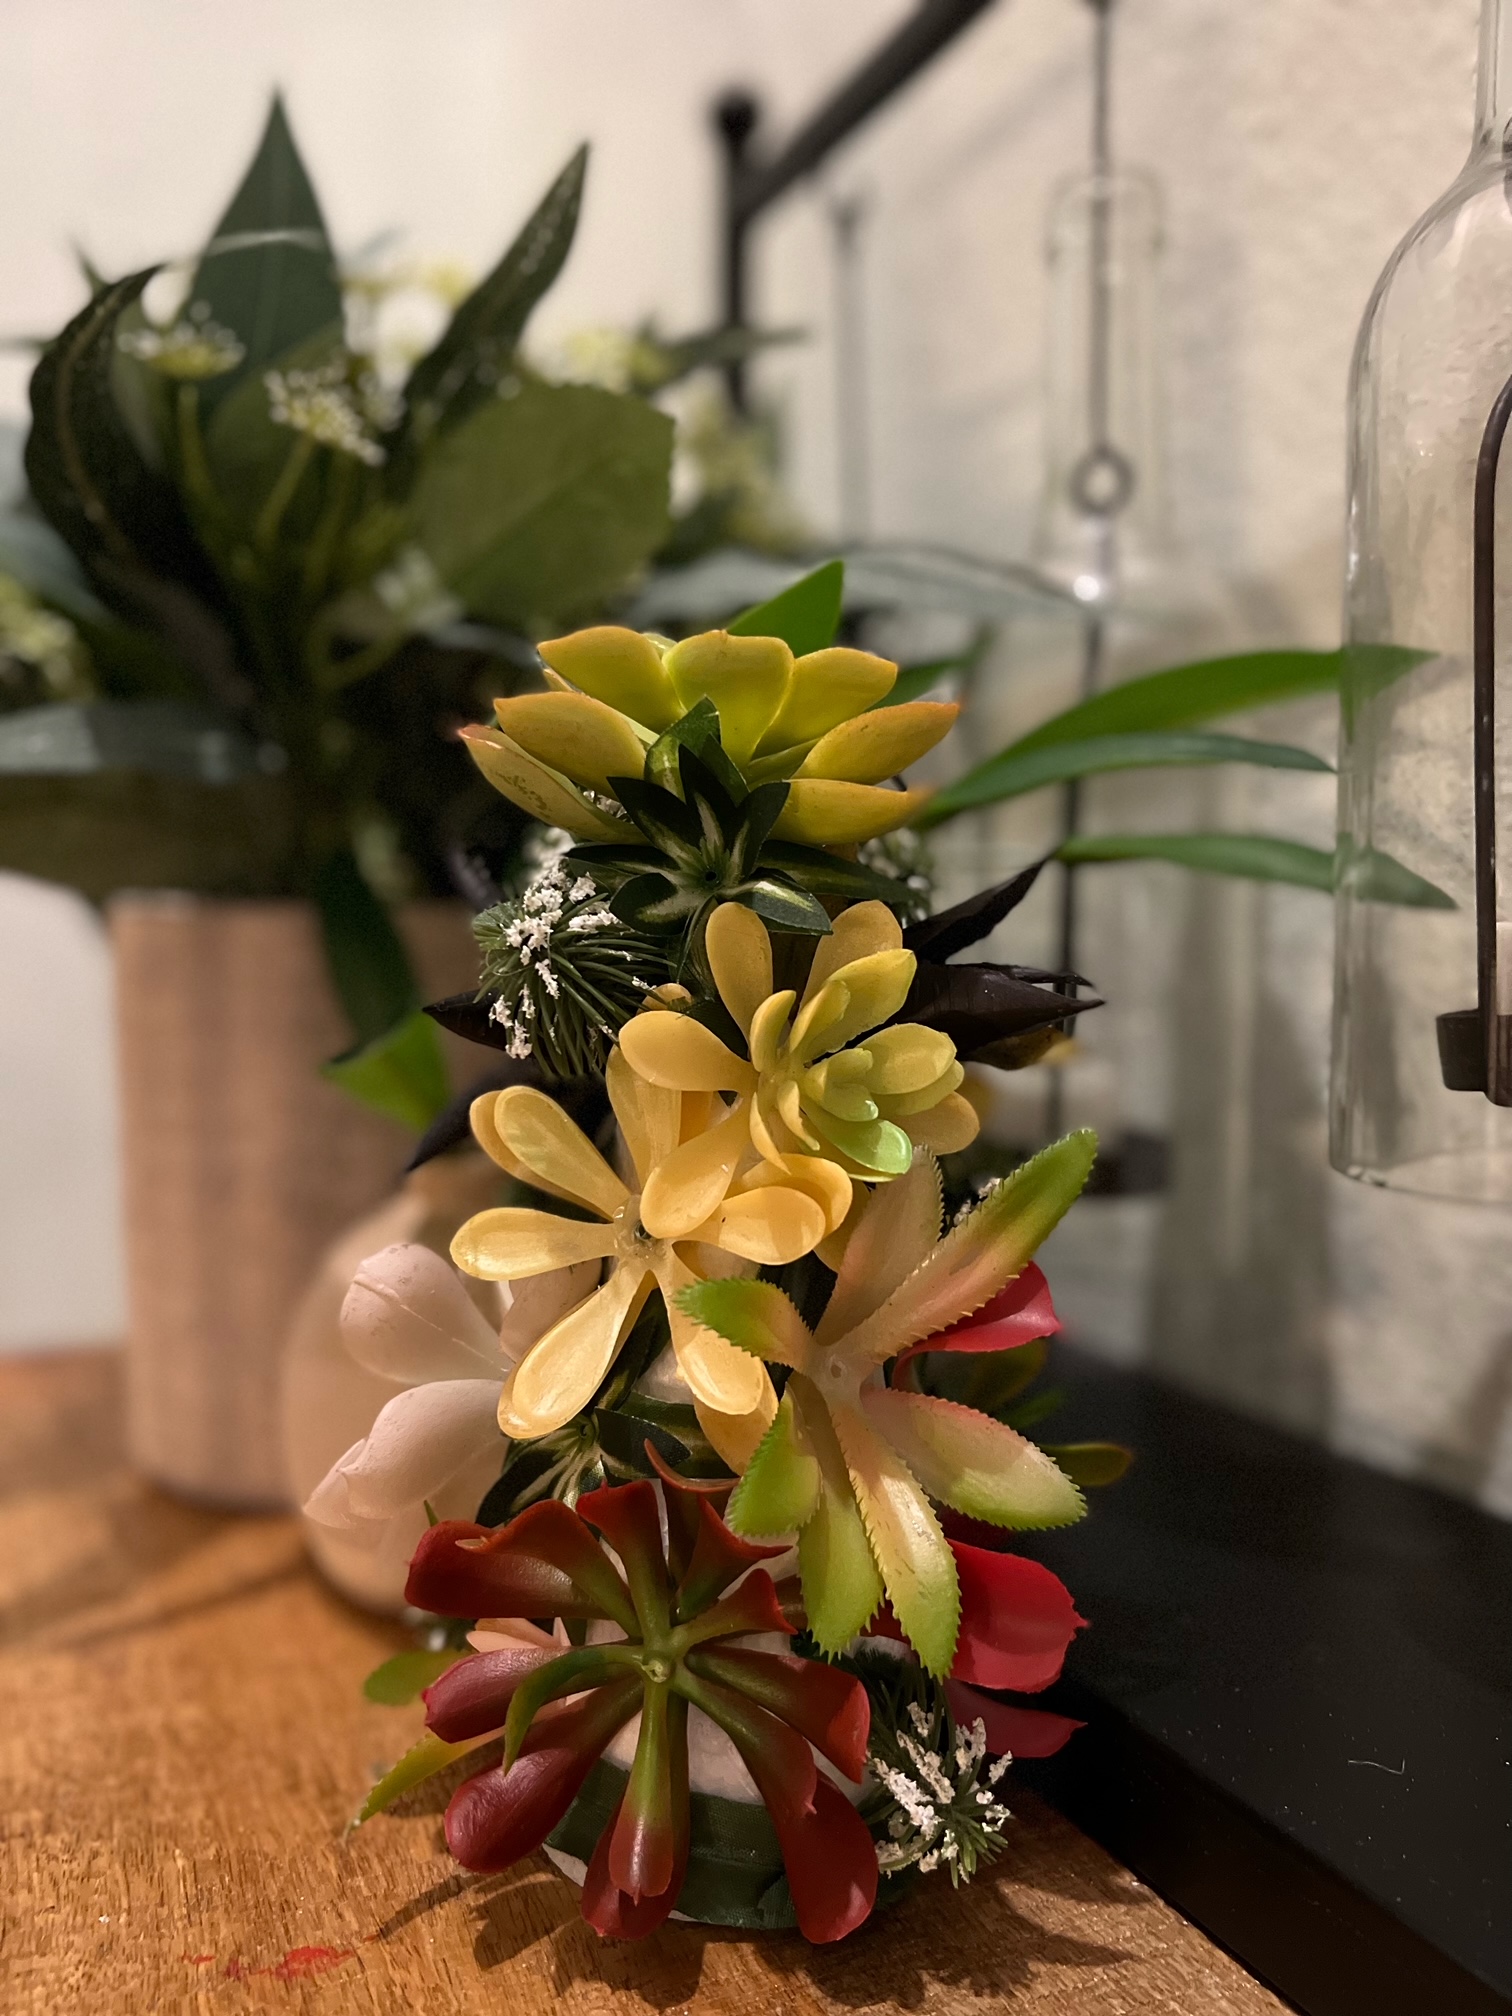
Succulent Christmas Trees
This is one of my favorite ones, but it was a little more than some of the other options here (around $10 per tree). It is one of my favorite holiday decorations though, and I had lots of fun making them. Find all the information on how to make these succulent Christmas trees here.
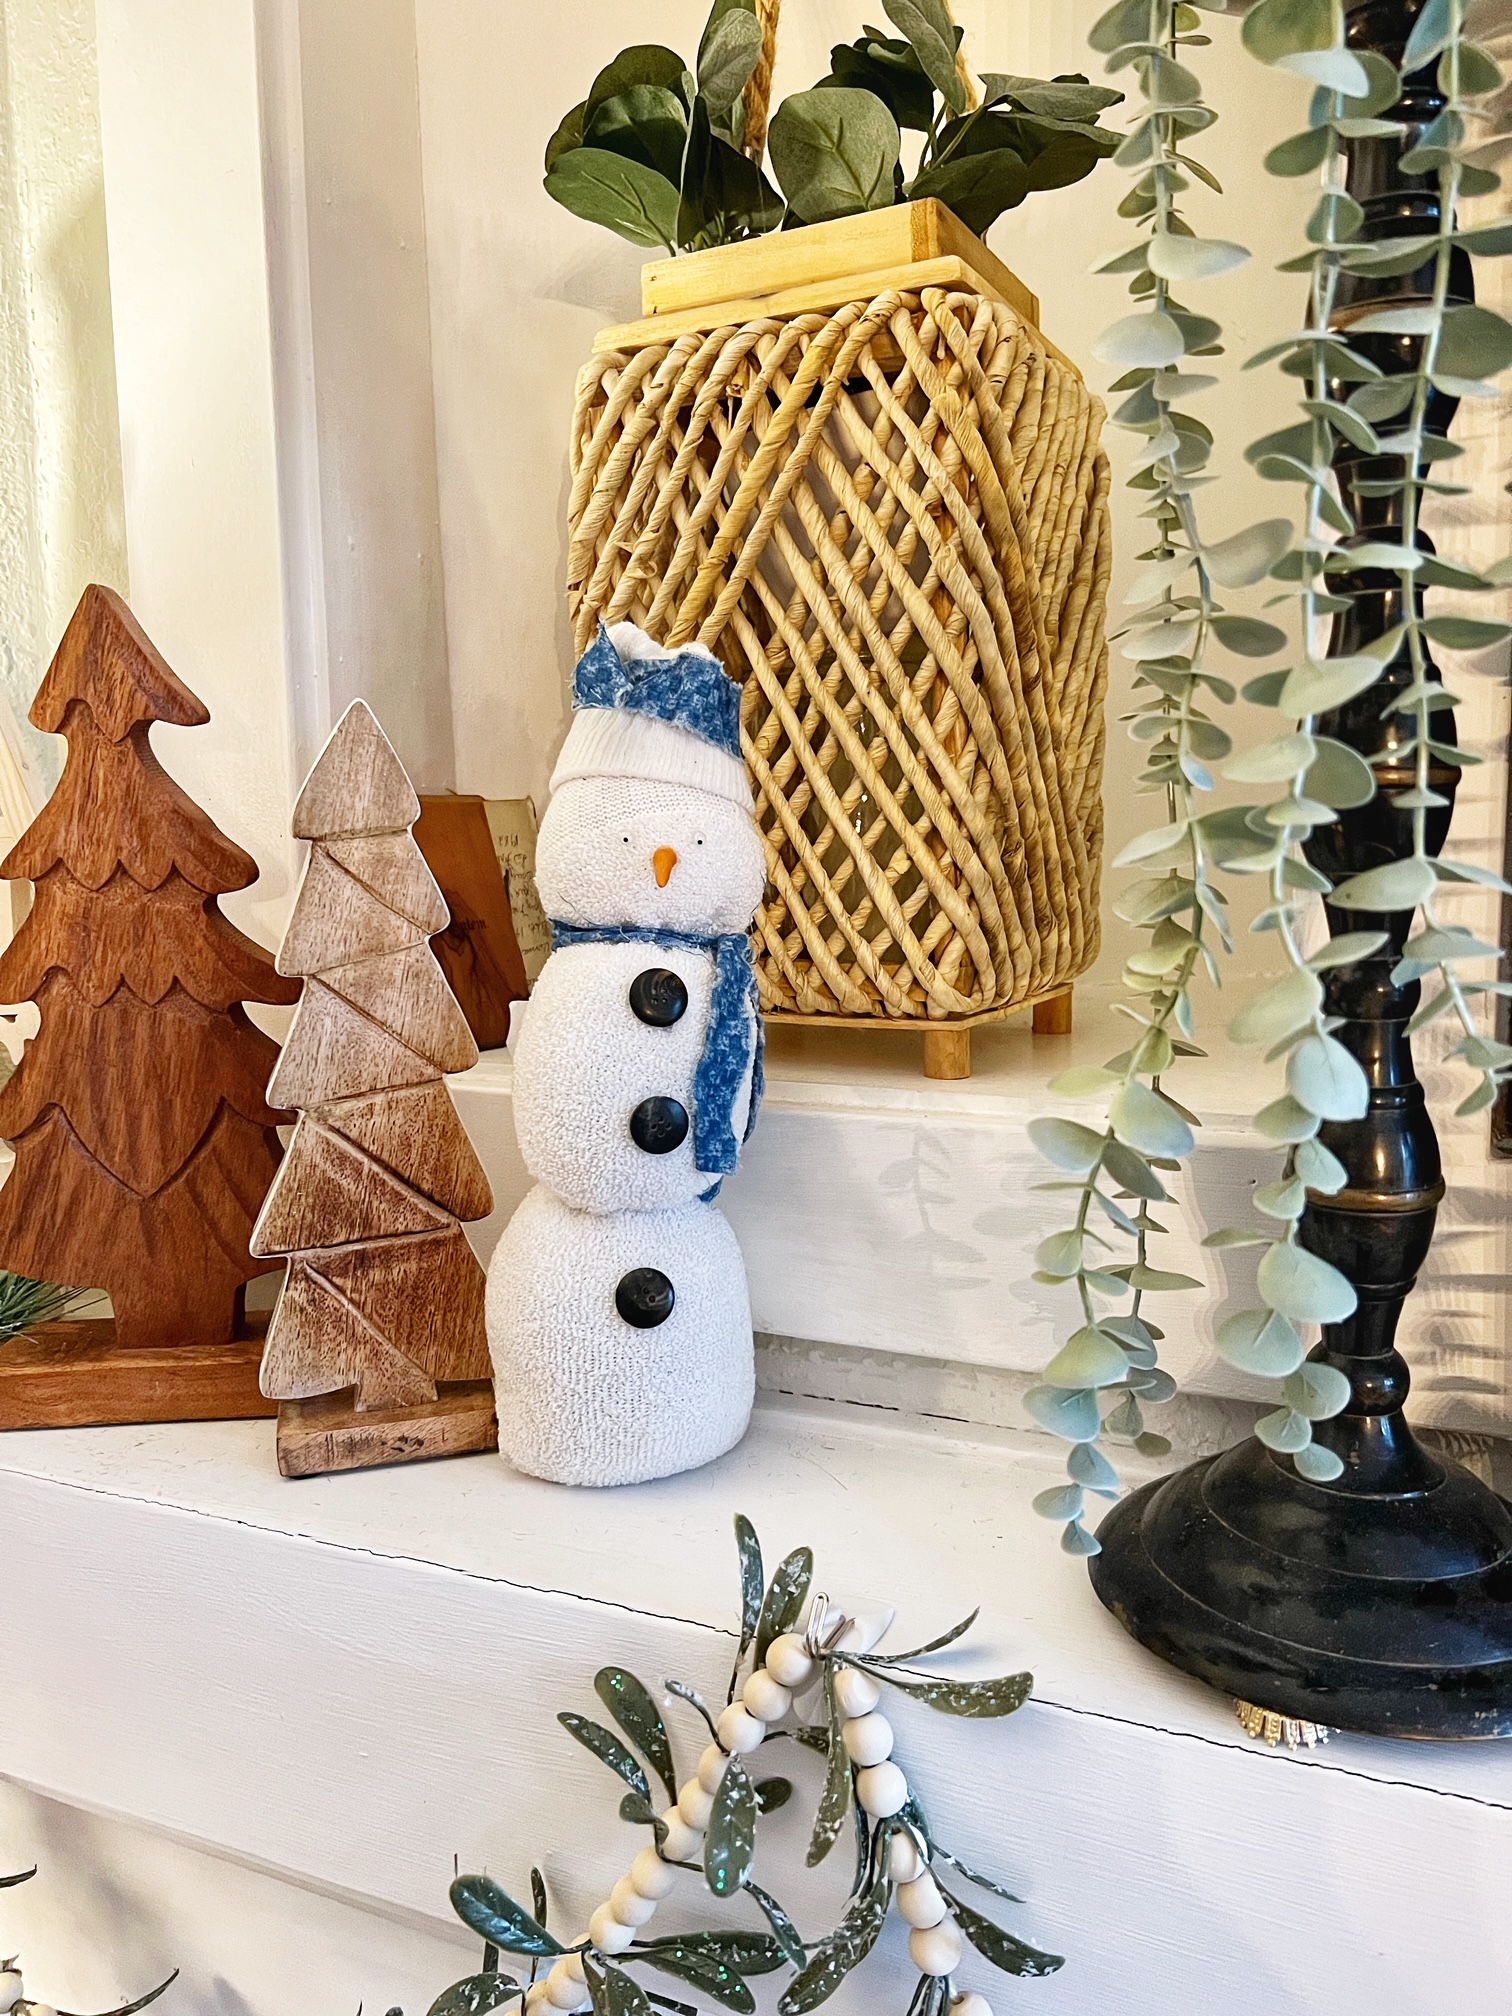
Dollar Tree Sock Snowman
This is one of my favorite all time Christmas crafts. This sock snowman is precious to me as my son made it for me when he was in elementary school. I love that this project is fun for both kids and adults. It is simple to do, and you can make it as fancy or as rustic as you want.
Mop Head Gnomes Or Christmas Tree Gnomes
Cost to make: $3 to $8 depending on which version and how you embellish it.
This project takes a little more patience and time, but was one of my favorites. The Christmas tree gnome will be the most affordable version, but my personal favorite was the mop head gnome. It was simple to make, just required a bit of patience. You will need a floral cone, which I found at Walmart (you can get them online here too). Next you cut off the string from the mop, and then fold it in half and glue it to your cone. Spend some time unraveling them all when you are done with that, and add the sock and nose, and you have a super cute Gnome to hang out around your home. You can google how to videos on this too, if you need more details.
Plus, we have more ideas of fun No Sew Gnomes you can make here too.
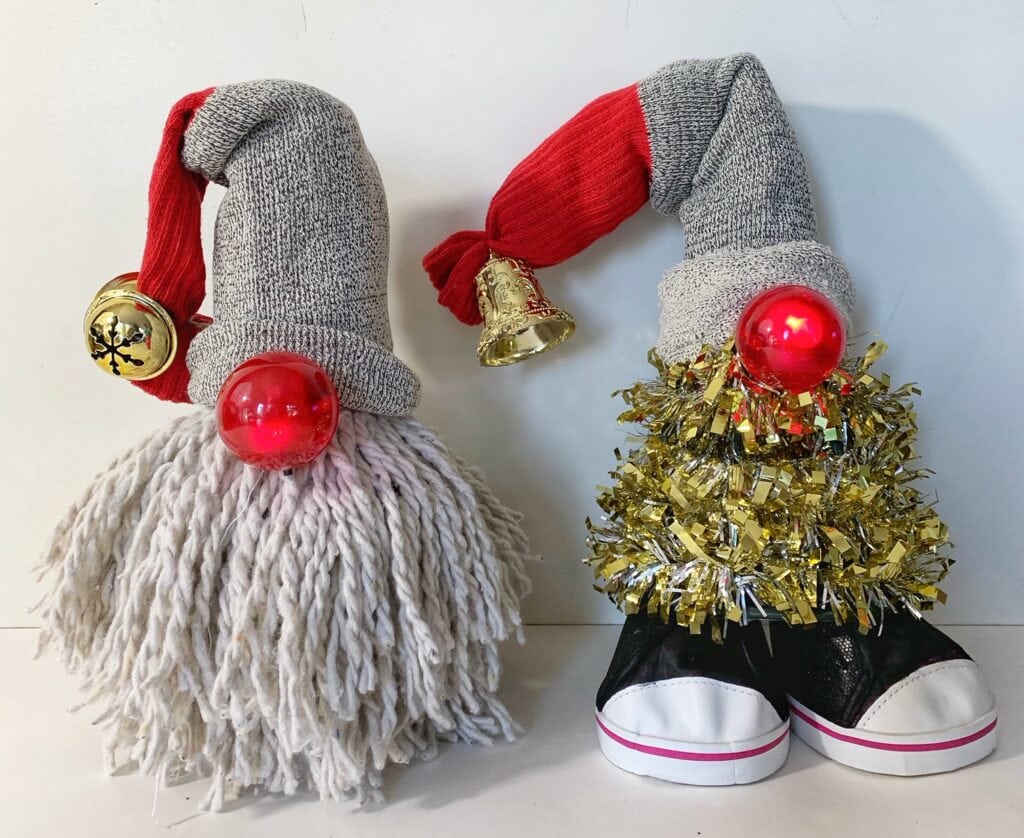
The Christmas Tree Gnome, is super simple, and just a few dollars to make. We just put the red nose around half way down the tree, then added the second sock from the pair we bought to the top of him. We used an old pair of Build a Bear shoes to add a little more character to this version.
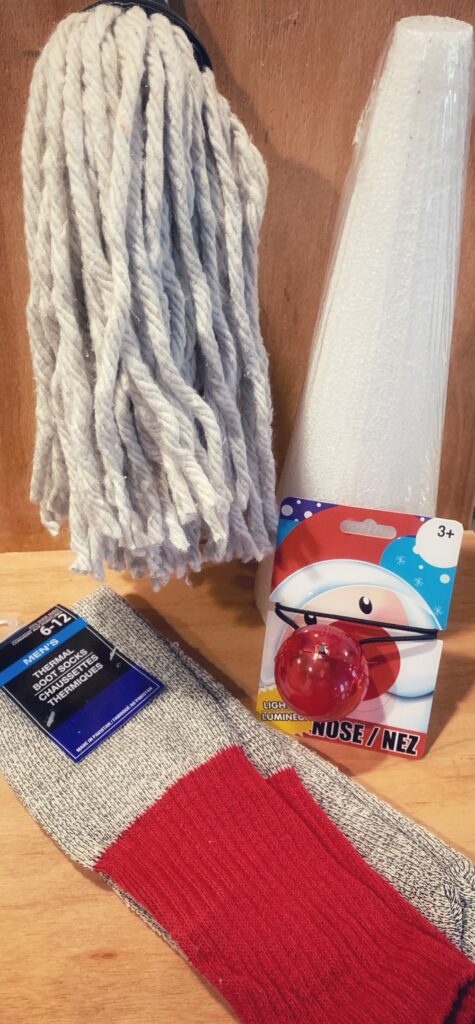
To put together your own Gnome you will need:
Mop Head Gnome –
- 1 mop
- Red Nose (or you can use a wooden bead, ping pong ball or anything that will look like a nose)
- 1 sock
- Shoes (optional) – we used an old pair of build a bear shoes that we had (they were pink, we just painted them black).
- Any kind of embellishments you might want for hat (optional)
- Hot Glue
Christmas Tree Gnome –
- One of the cone shaped tinsel Christmas Trees
- Red Nose (or you can use a wooden bead, ping pong ball or anything that will look like a nose)
- 1 sock
- Shoes (optional) – we used an old pair of build a bear shoes that we had (they were pink, we just painted them black).
- Any kind of embellishments you might want for hat (optional)
We found all of the items needed for this one at the dollar store (except the floral foam cone for the mop head Gnome)
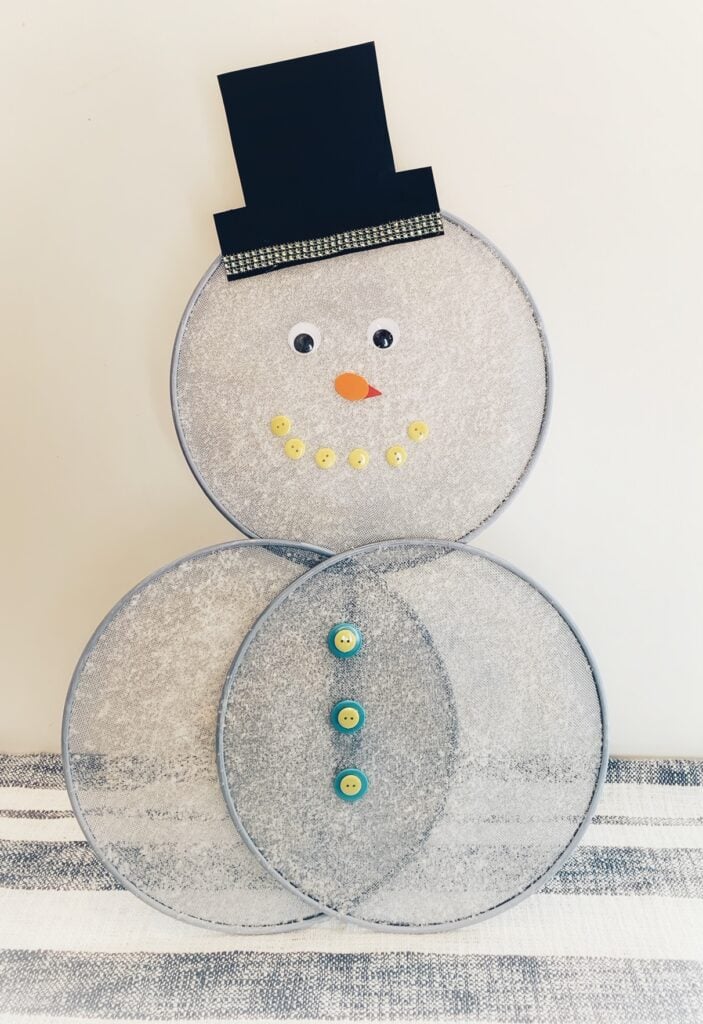
Splatter Screen Snowman
Cost to make: $5 – plus optional embellishments
This project is really simple, and it turns out so cute. The spatter screen pumpkins where all over the internet this Fall, and this is sure to be a popular craft for the holiday season. It is a great one to do with kids because it is so simple. I am gifting my snowman to a family members, so I used a blue tint to go with her decor, but you can do it all white, silver, gold or cover it in fabric too.
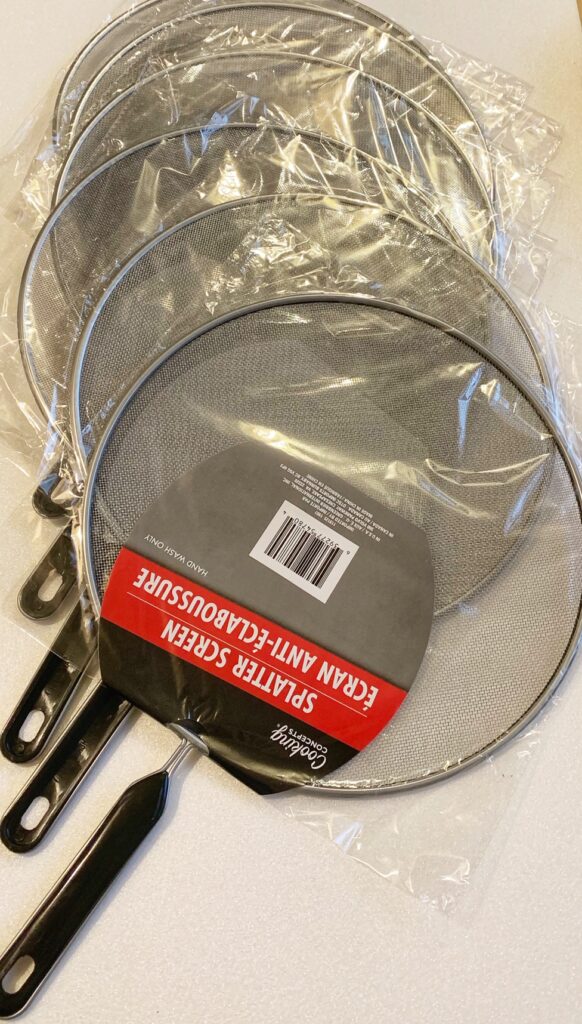
To put together your own Splatter Screen Snowman you will need:
- Three splatter screens for each snowman
- Thin gauge wire to put it together
- Paint
I also grabbed some Googly Eyes (and then used paper and buttons I had at home for the rest, but you could use paper for all of it (the hat, eyes, nose, buttons, etc). I did add some embellishments to mine, that are completely optional, and where just things I had around the house already (like fake snow, and a ribbon scarf).
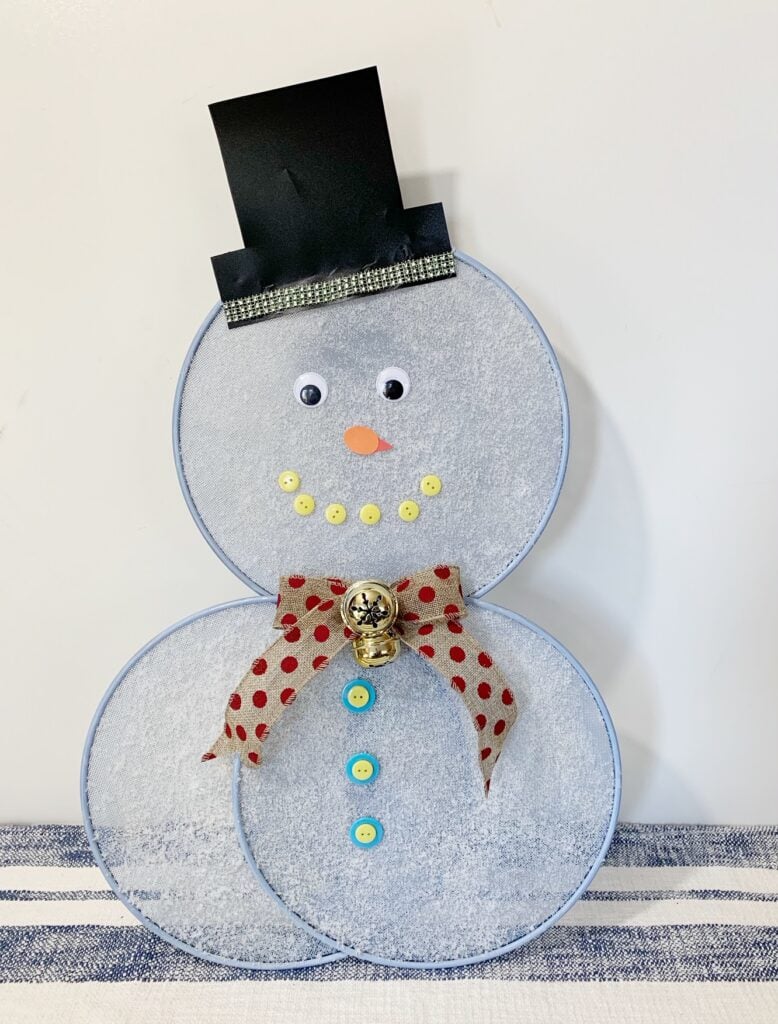
You can decorate your splatter screen with just paint (spray paint is the easiest way to do it, but you can use acrylics, chalk paint, or any other paints you have on hand or find at the dollar store. I added a little fake snow to mine (but that is completely optional), by spraying adhesive on it after I painted it, then sprinkling the fake snow on, and letting it dry.
Once it is all dry, bend back the handles on two of the splatter screens to make a stand, and use a thin gauge wire to attach them all together. Then add the last splatter screen to the top as the head (with the handle facing down (this just helps stabilize it) and attach that with a thin gauge wire too.
You can google splatter screen projects for more ideas. You can make gingerbread men, pumpkins and more with these $1 screens and some paint.
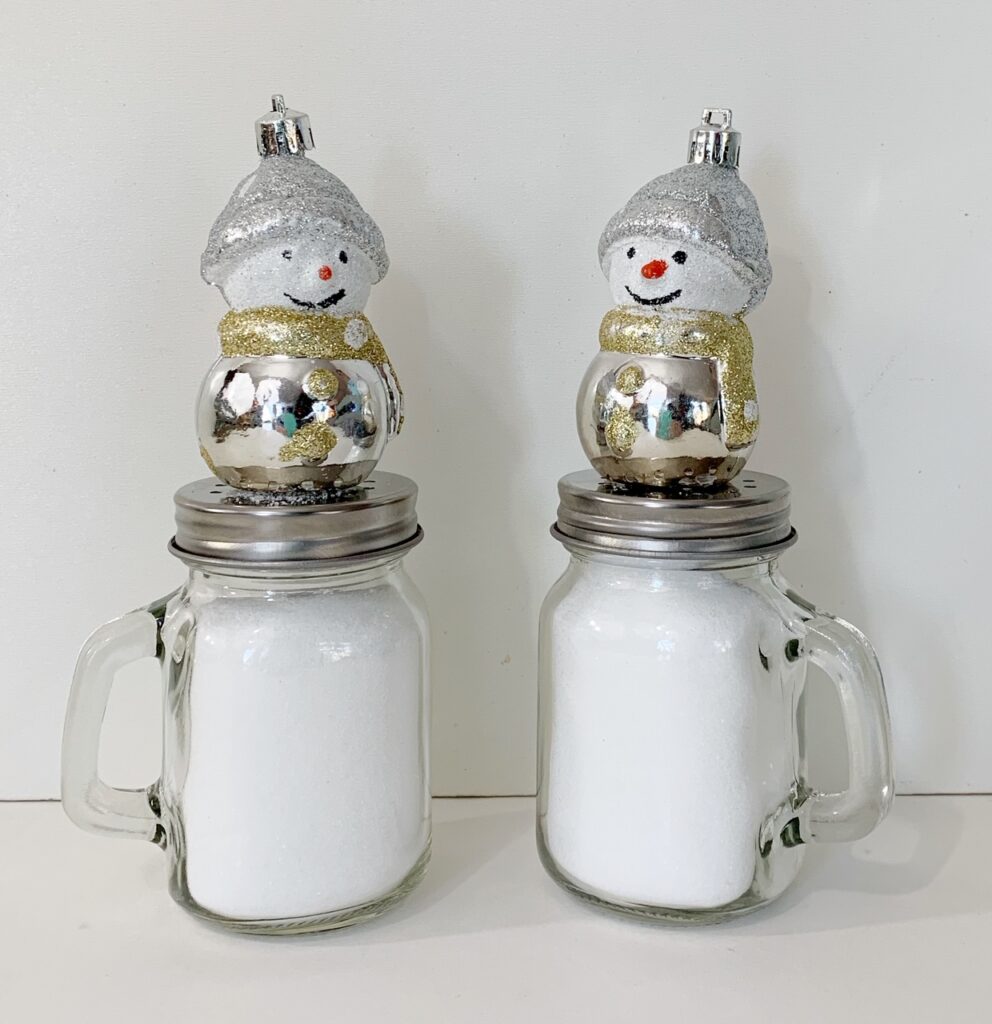
Salt Shaker Snowman Ornaments
Cost to make: $3 for the set, plus glue and salt
This was our version of the Salt Shaker Snowmen. Sometimes folks will collect salt shaker from thrift stores or garage sales, and use wooden beads to make their own snowmen (and some of them are really beautiful). We found these snowman ornaments, and decided to do this really simple version, and just love how they turned out. They will be so cute displayed in the kitchen over the holidays! They look like something we bought in a boutique and yes you can still use them as salt shakers (you could add pepper into the second one too for a salt and pepper shaker).
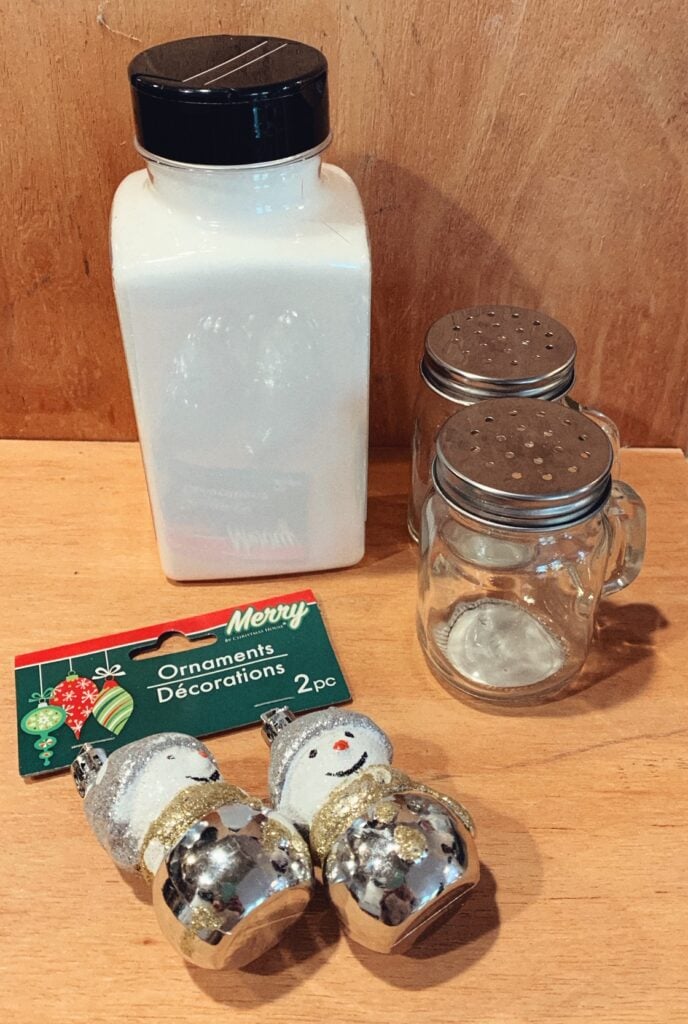
To put together your own Snowman Salt Shakers you will need:
- Salt Shakers (you can buy them in a set at the Dollar Tree for $1, but we found these cute jar styles for $1 each, and loved them).
- Snow man ornaments
- Salt
- Glue
Just fill your salt shakers up with salt, and glue the snowman ornaments to the top! It is that easy, and they turned out so cute.
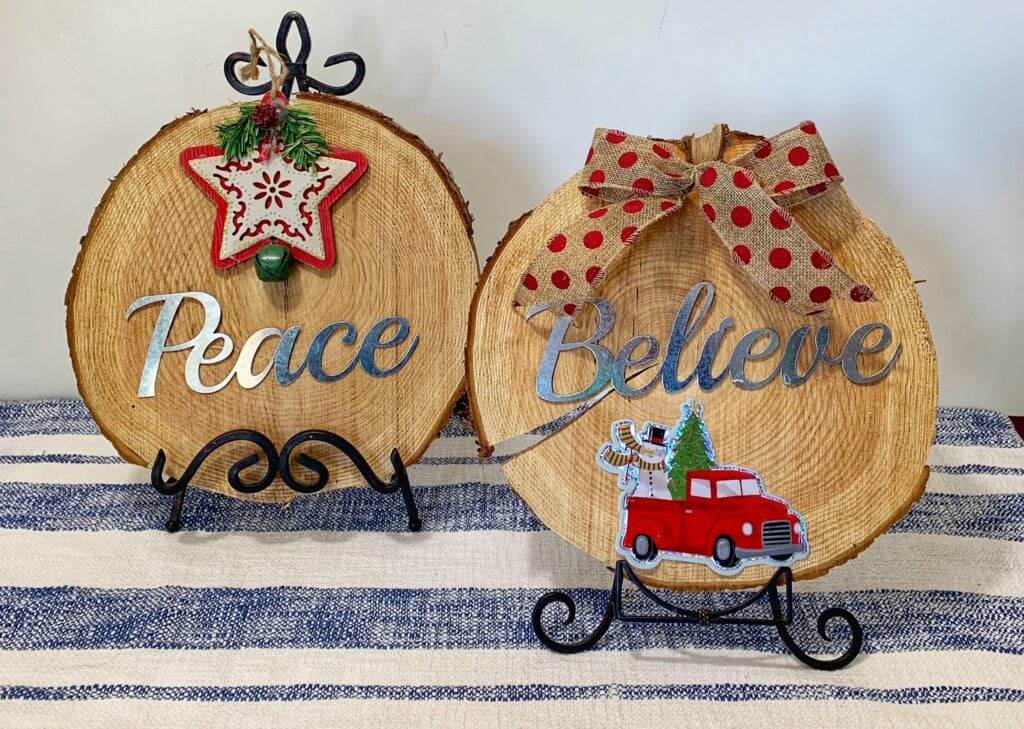
Wooden Peace, Joy & Believe Signs
Cost to make: $2 plus wooden board to use.
I have a Cricut and love to make signs, but when I saw these three packs of metal words for $1, I knew I could not make that for less so grabbed a pack. All three words were in one pack, so that makes them $0.50 cents per sign! I already had these wood discs (we cut from a tree that had fallen), so I used these, but you can use any kind of wood shape you want. You can get a circular cutting board at the Dollar tree for $1, and use that, or go get the small pallet wood boards at Walmart here.
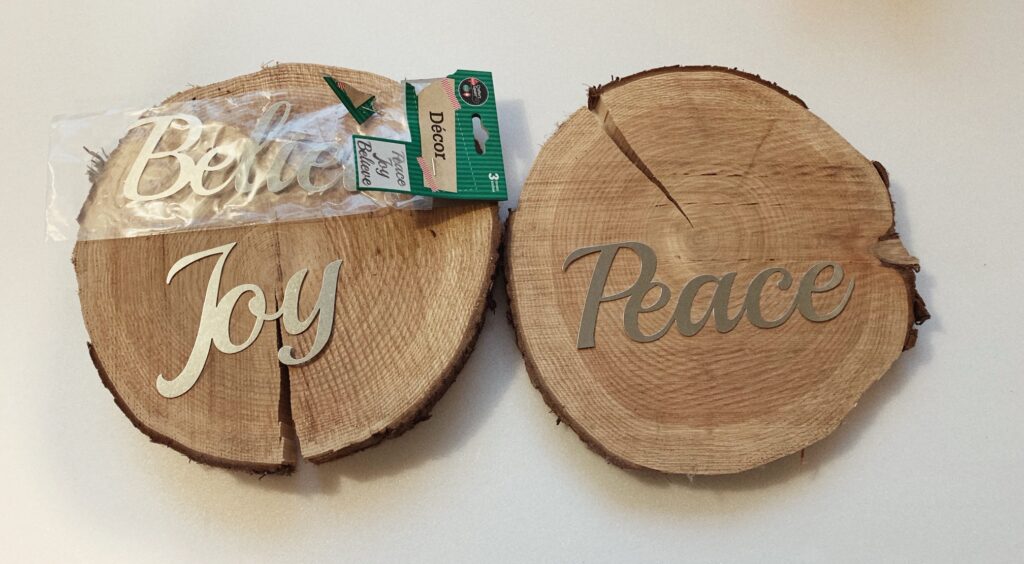
To put together your own metal word signs you will need:
- Metal words (come in packs of three)
Wood - Glue
- Embellishments (optional) – we used an ornament on one, and a window decal on the other.
This is another really easy project. Arrange things on the board how you want them to look, and glue them on with hot glue.

Snow Globe Wine Glass Candle Holders
Cost to make this: $5 + glue
I have been making snow globes for years with my kids (with small mason jars). This is a way to dress it up, and make it more of an adult project (something you can display during the holidays). This version is even easier than the ones I do with the kids because you are not adding water. You can use it as a candle holder, or just display it as a cute decoration.
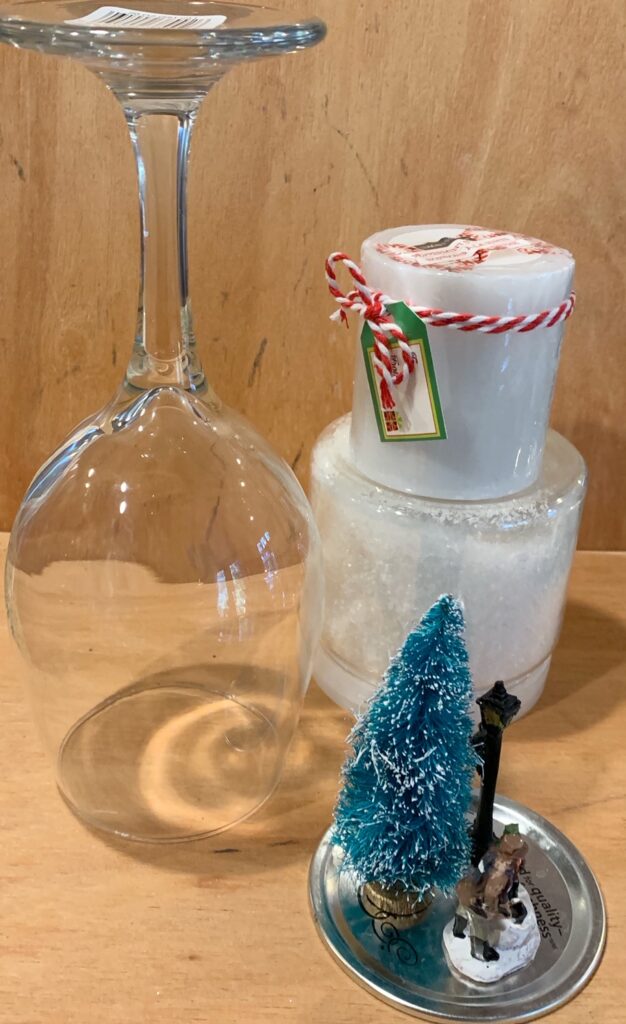
This one can be as affordable as you decide to make it. Find a wine glass at the Dollar store, then some fake snow, and it can be as simple as adding one tree (a $3 project plus glue & candle). Or you can pick a few extra items, and make it more of a full scenery for a couple dollars more.
To put together your own Snow globe Wine Glass you will need:
- Wine Glass
- Candle
- Fake snow
- Figurines/trees
- Glue (we used hot glue)
We used the inside of a mason jar lid for the bottom of this (we had this at home, you could also cut a piece of cardboard just slightly bigger then the opening of the glass)
For this one we glued the figures to the mason jar lid that we were using in an arrangement we liked. Then added about a large tablespoon of fake snow to the glass. We put hot glue around the rim of the glass, and attached the lid (the items going inside the glass). Once it is completely dry, turn the glass upside down to make the snow globe. You can then add a candle to the top to use it as a candle holder (and we added a bit of twine around the stem, which is completely optional – we just liked the look).
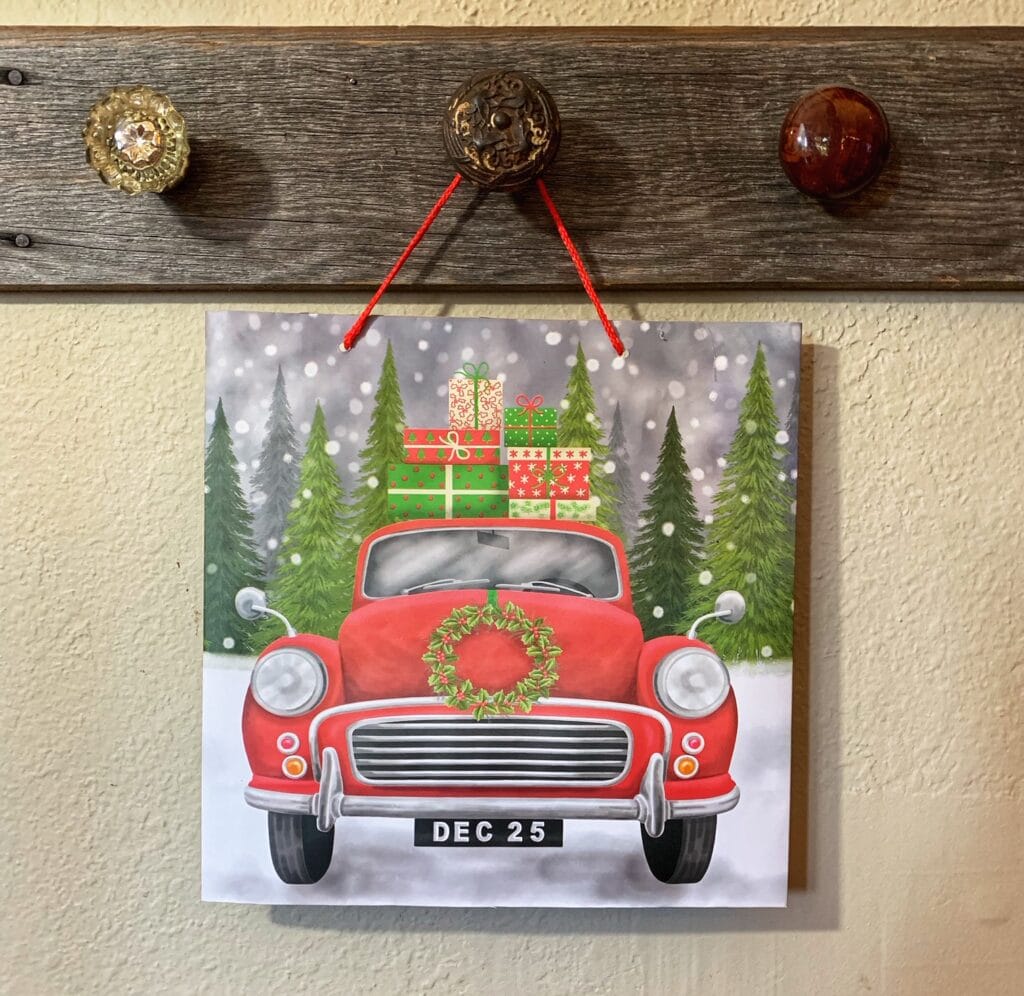
Gift Bag Signs / Dollar Store Particle Board Signs
Cost to make: $1 plus cost of board & glue (and any embellishments you want)
You will never look at gift bags the same again, after making these simple decorative signs. Simply head to your Dollar store and grab a gift bag with a festive holiday image on the front of it. Choose a board to use for the sign. We used scraps of a thin veneer wood we had on hand (cut it into 12×12 squares). You can head to the scrap wood section of your local hardware store and find a cheap piece of wood and ask them to help you cut them down in the store too.
There are a couple of ways you can make this one.
The simplest way is to cut the image on your gift bag to the same height dimensions of your wood, but keep the width dimensions a bit longer. Then wrap it around (like your wrapping the wood) and glue it to the back on both sides. You can even use the strap of the bag as the hanger for your picture. This is how we made the truck picture.
Or, cut out the image you want to showcase, and burn around it with a lighter (just the edges slightly to age it). Then mod podge it to your sign.
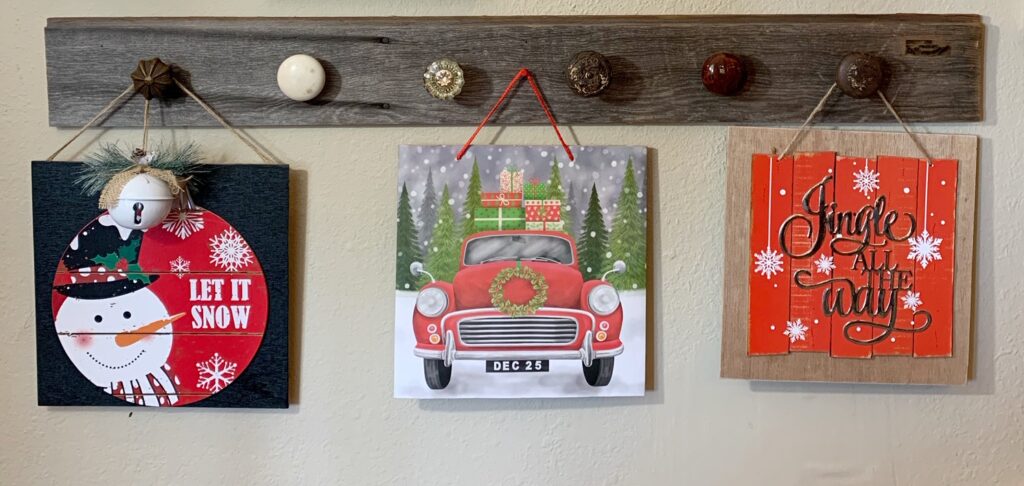
For the particle wood signs, we simply added a 12×12 backing to them to make them more substantial. One we painted black, and added an ornament (the snowman picture) and for the jingle bell sign we just used raw wood and twine to finish it off.
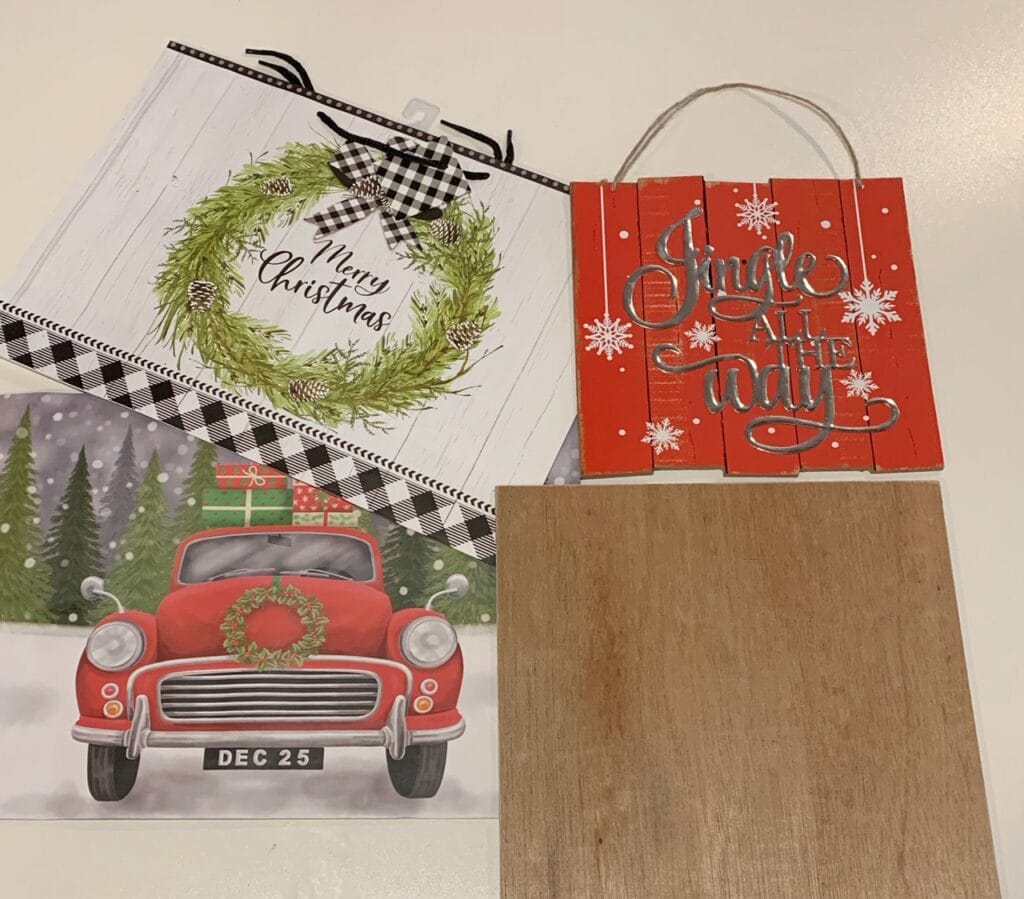
To put together your Signs you will need:
- Gift bag with an image on it you like or
- Particle board signs
- Wooden board for backing
- Twine for hanging
- Glue (we used hot glue)
- Embellishments (optional)
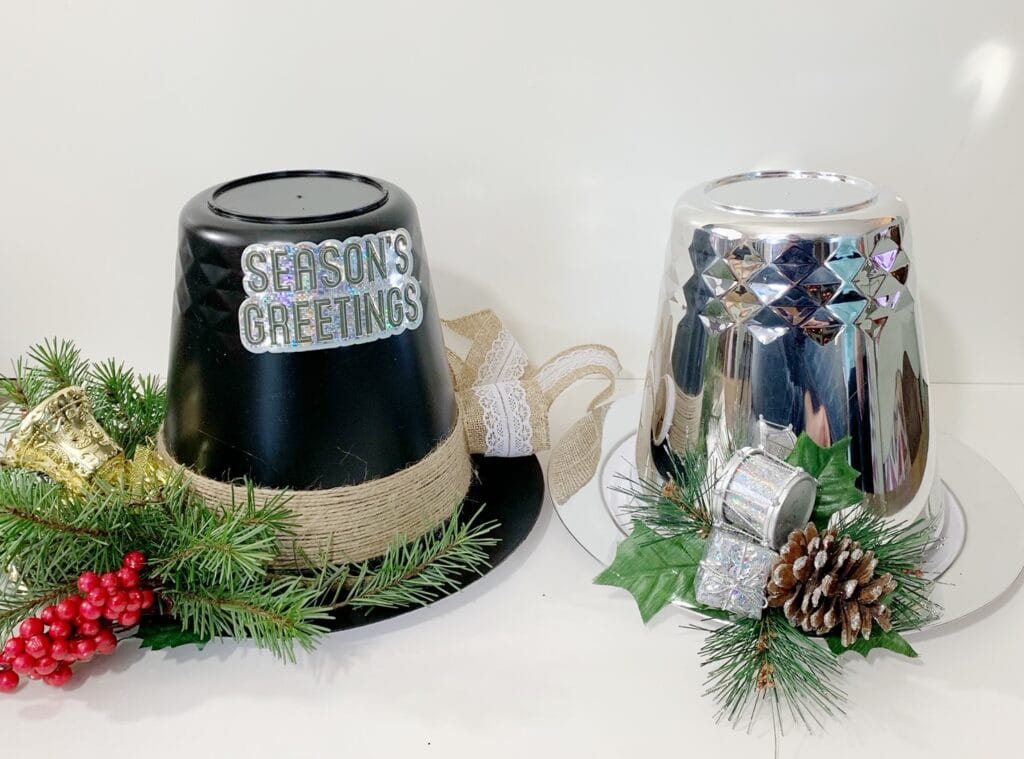
Ice Bucket Snowman Hats
Cost to make these: $3 + glue
These snowman hats made from a plastic ice bucket and plate, make a fun centerpiece for a dinner table, or a festive decoration around the house during the holidays. The silver version above was made without painting them. The black version is one we spray painted the outside of the ice bucket, and the plate first, and after they were dried then we glued the ice bucket upside down onto the plate. Add your embellishments. We grabbed greenery from our yard, and an ornament we picked up at the dollar store for our hats. For the black one we did wrap some twine around it too (you could also use ribbon).
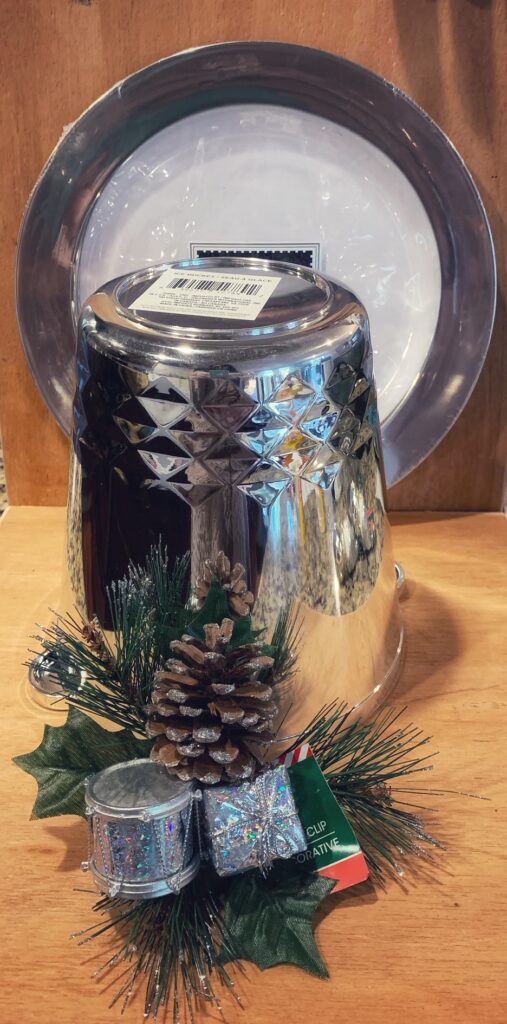
To put together your Snowman Hats you will need:
- Plastic ice bucket
- Plastic plate (we found them in the party supply section in sets of 4)
- Glue
- Embellishments (optional)
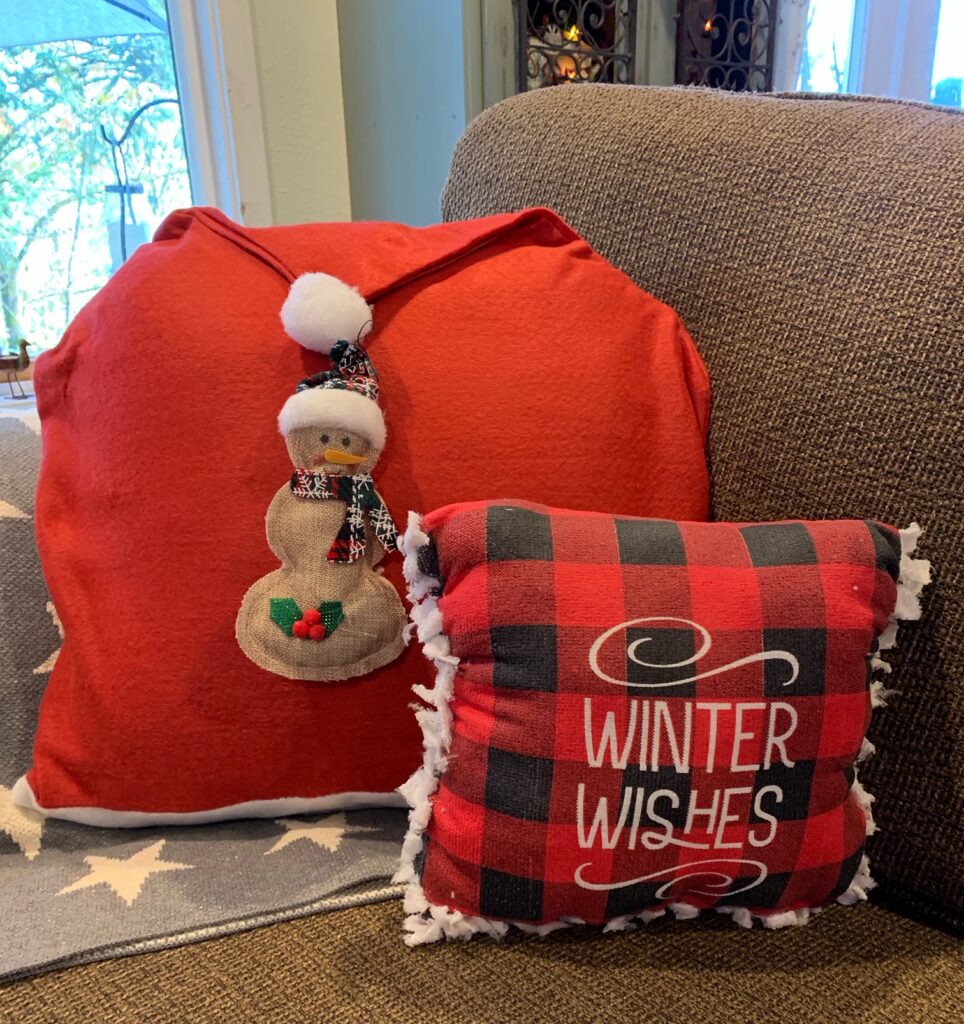
Dish Towel Pillows / Santa Seat Pillow Cover
Cost to make : $1 each plus stuffing (we used an old pillow), or pillow to insert if you are making pillow cover.
These pillow covers are really simple ways to add some festive decor to your couch or chairs in your living space. These are the most affordable pillows and pillow covers I have ever made. The santa hat chair cover takes minutes to make. The tea tree pillow is more involved as you have to cut and tie lots of knots, but both are easy.
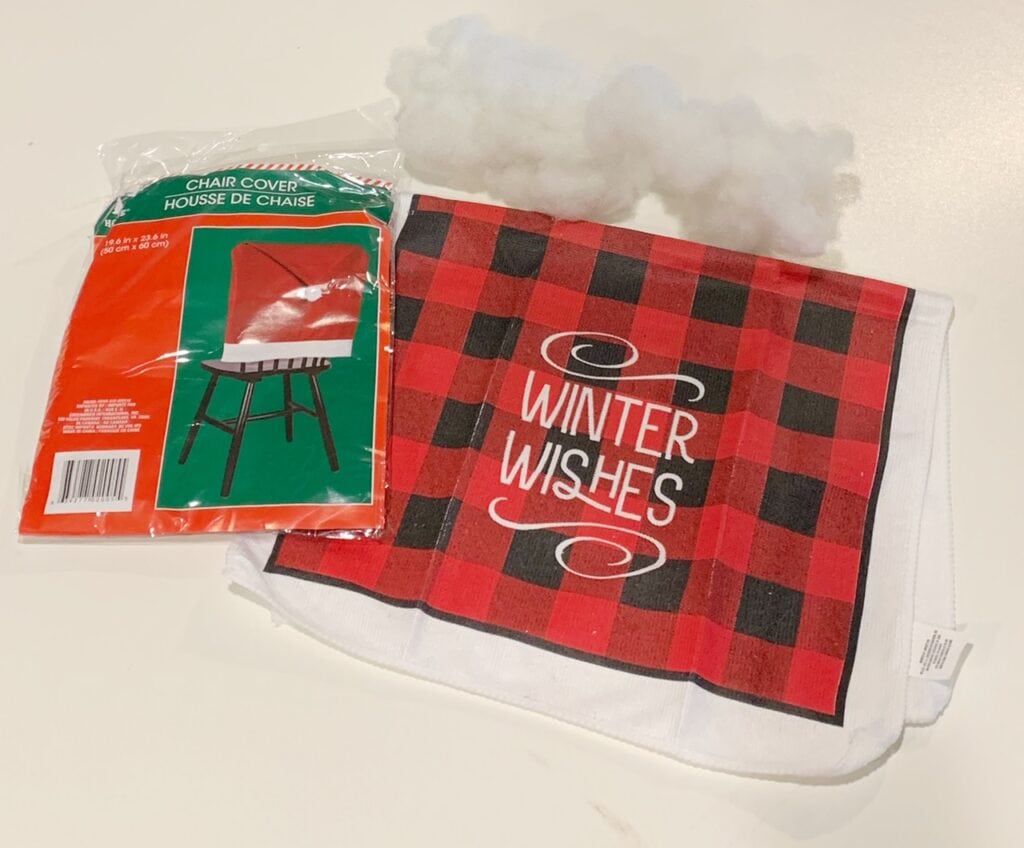
To put together your Dish Towel Pillow you will need:
- Dish towel of choice
- Stuffing (I used an old pillow I had in my giveaway pile)
For this one you fold the towel in half and then cut strips along the other three sides, and knot those on two side, stuff your pillow and tie up the third side. You can search no sew tie pillow for more detailed instructions.
To put together your Santa Pillow Cover you will need:
- Santa Chair Cover from Dollar Tree
- Pillow to insert inside (this is a pillow cover so you can take this pillow out later)
- Hot glue
- Embellishments (optional) We used a soft snowman ornament we found at Dollar Tree
For this one you just put a throw sized pillow into the chair cover, and close it up on the bottom with a line of hot glue. The top folds over to look like a Santa hat and we hung the snowman from there.
What are your favorite DIY Holiday Decor projects, or Dollar Store projects?
More articles you might be interested in:
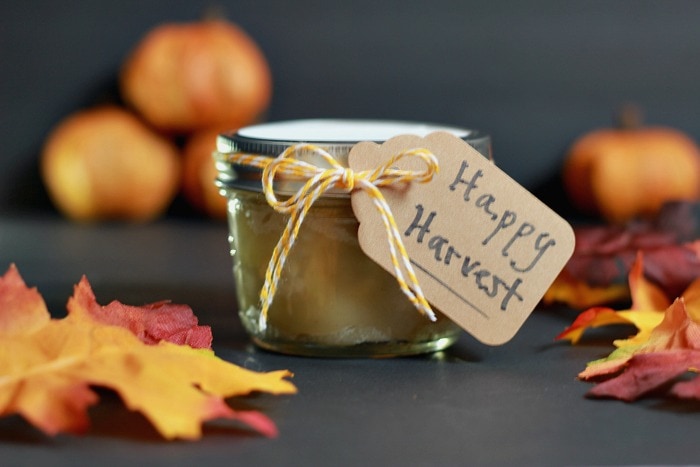
Homemade Gift Idea: Mason Jar Pies
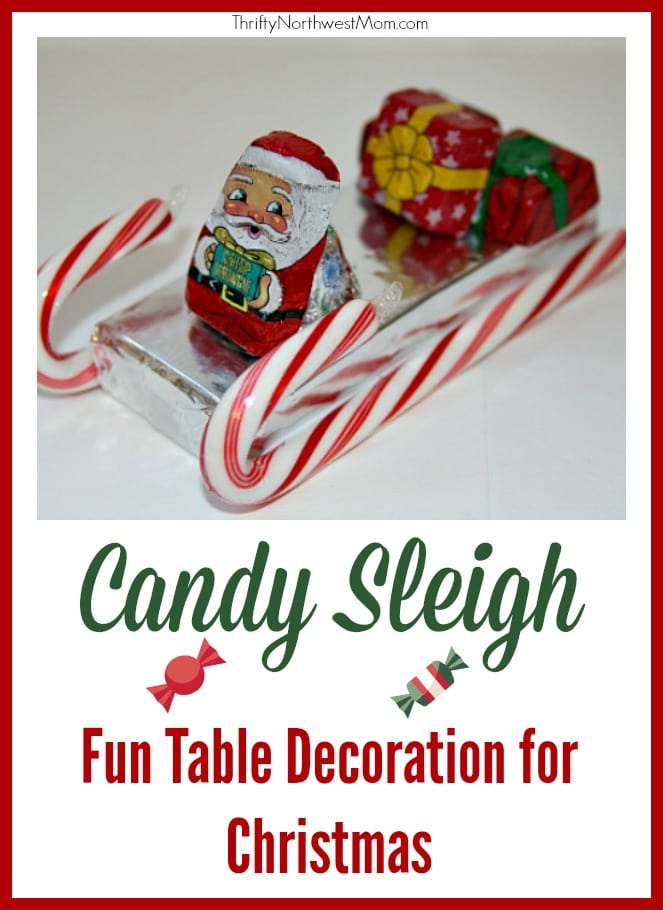
Candy Sleighs – Perfect for Table Settings on Christmas


Hi,
I like the wooden sign idea. I am going to make one with my own twist.
Thanks for the inspiration.
Hi Sunny, we would love to see pictures when you are done – let us know how it works out for you!
I am definitely doing the wagon, so simple and cute. I am going to place some faux gifts inside the wagon. Thanks for sharing.