
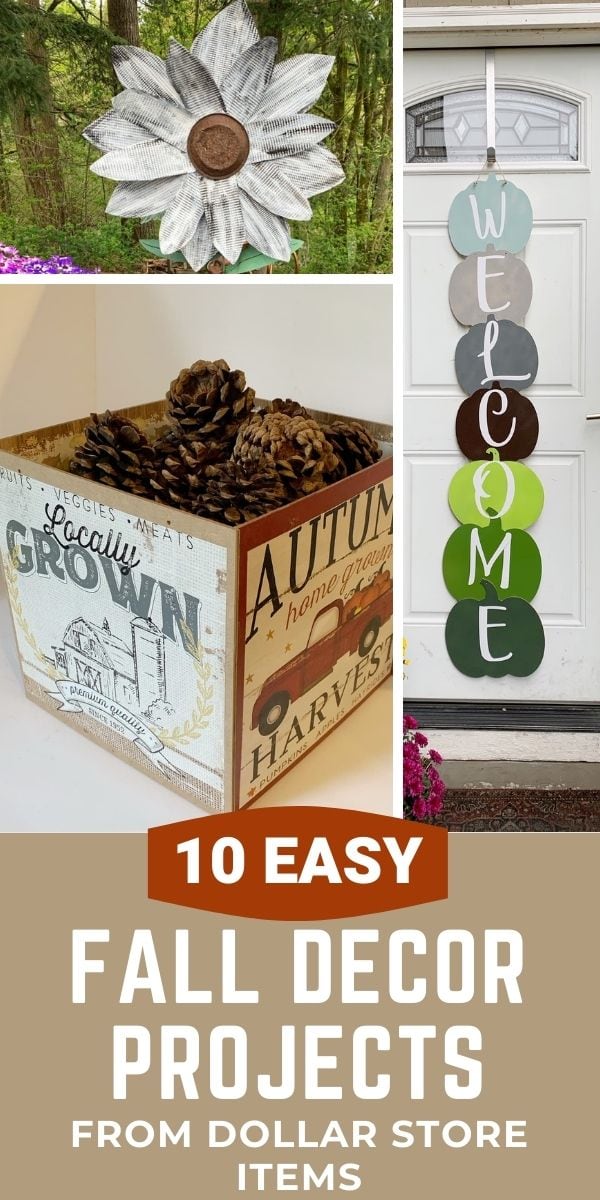
10 Fall Decor Items You Can Make With Dollar Store Items
This post may contain affiliate links and I may be compensated for this post. Please read our disclosure policy here.
10 Fall Decor Items You Can Make With Dollar Store Items
I love fall decor, and especially if I can make cute decor items on a serious budget. While you could just go to the Dollar store and buy some items to put up around your house, I much prefer to remake items I can find there, into something a little more my style. We have compiled 10 fall decor projects that you can make here, using Dollar store items, but that will result in a much bigger “wow” factor. All of these projects can be made for $5 or less, and some for just a couple of dollars!
They are also all that I would consider pretty easy projects too. They should not take too much or effort. We tried to come up with a well-rounded set of ideas, so you could add decoration pieces in different parts of the house. The cost estimates may assume you have some supplies on hand (like hot glue for example), so you might be able to do these projects for a little more or a little less than the estimates, based on what supplies you have at home – but they should be pretty close. We have the Dollar Tree in our area, so that is where I got all these supplies. This list is meant to inspire you, so use what you have and what you can find in your area. Have fun, and let us know what your favorite project is.
Plus, check out lots more year-round DIY Dollar Tree Craft Ideas too!
Update – Dollar Tree has raised their prices to $1.25 now, so these will all cost just a little bit more, as we made these prior to the price increase.
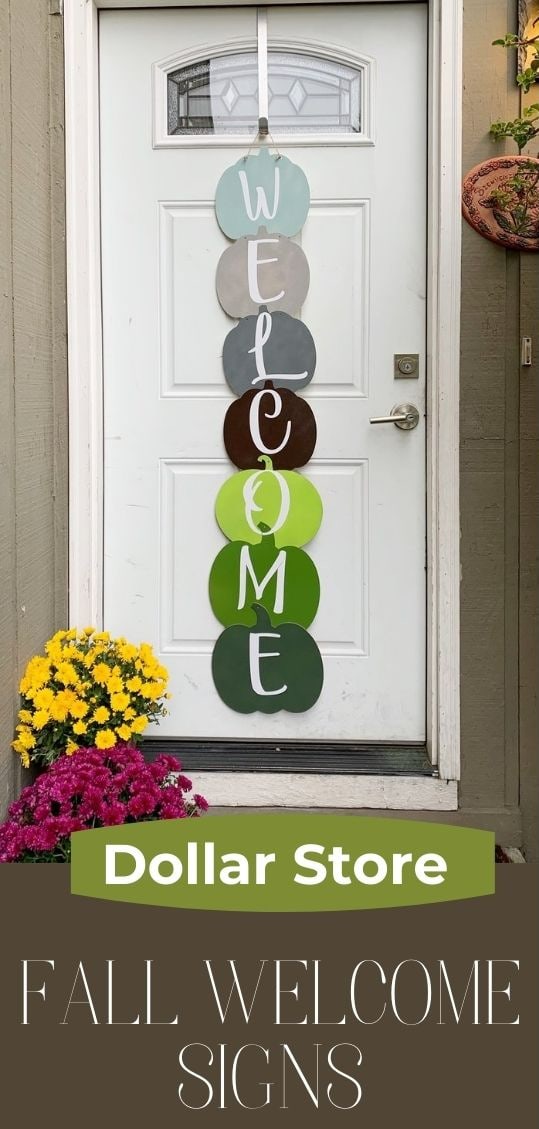
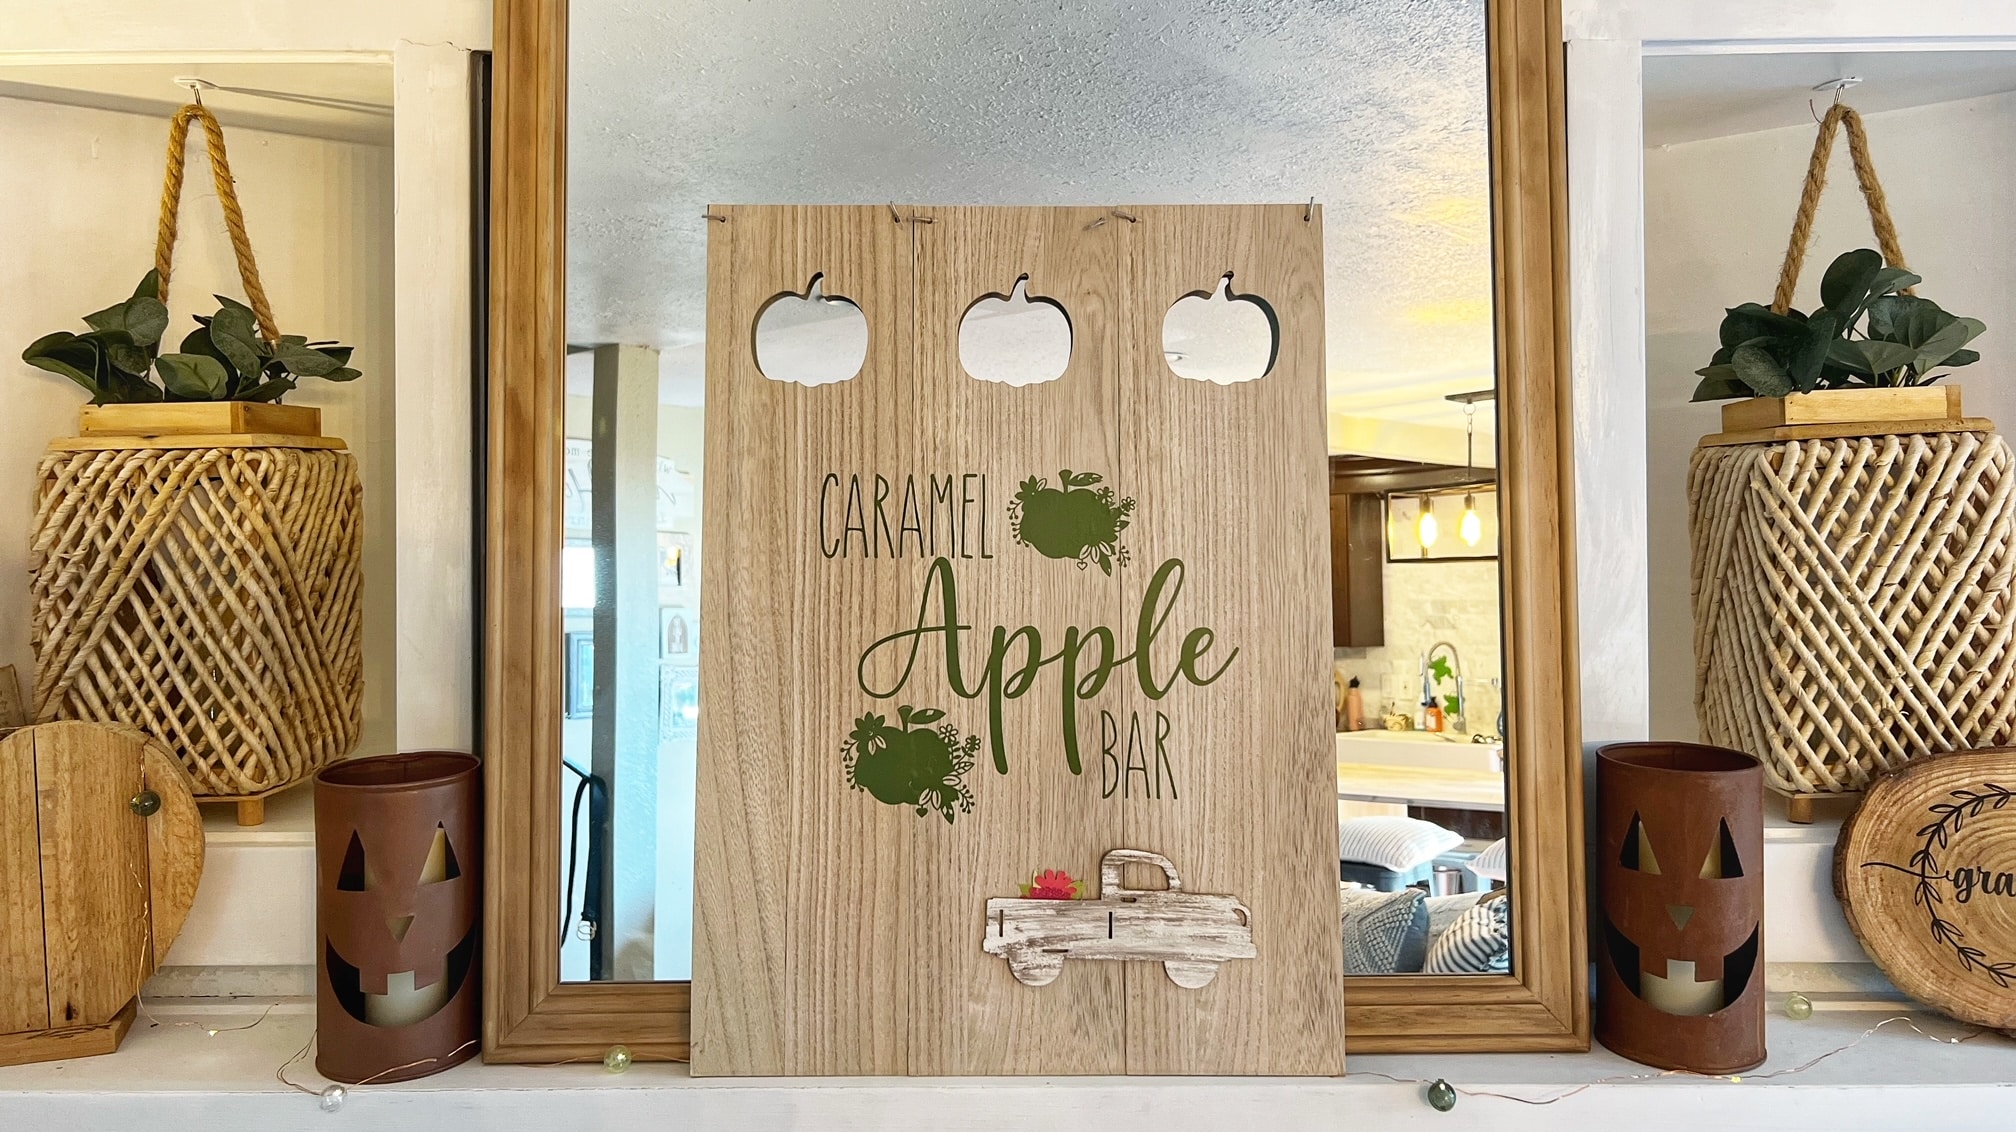
Fall Porch Signs Made From Dollar Tree Pumpkin Signs
We made these simple door or fall porch signs from Dollar Tree pumpkin signs. This is a really simple project that will make a big impact on your porch. Find full directions on how to make these fall welcome signs here.
Splatter Screen Pumpkins
This project has been so popular, and you can really use your imagination to make it all kinds of ways. Some people cover theirs in lace or other fabrics, some paint it a more traditional orange, and then decorate the actual pumpkin any way you like. The limit is only your imagination. I do a kind of rustic, simplistic decor at my house, so this was what we did this year with ours.
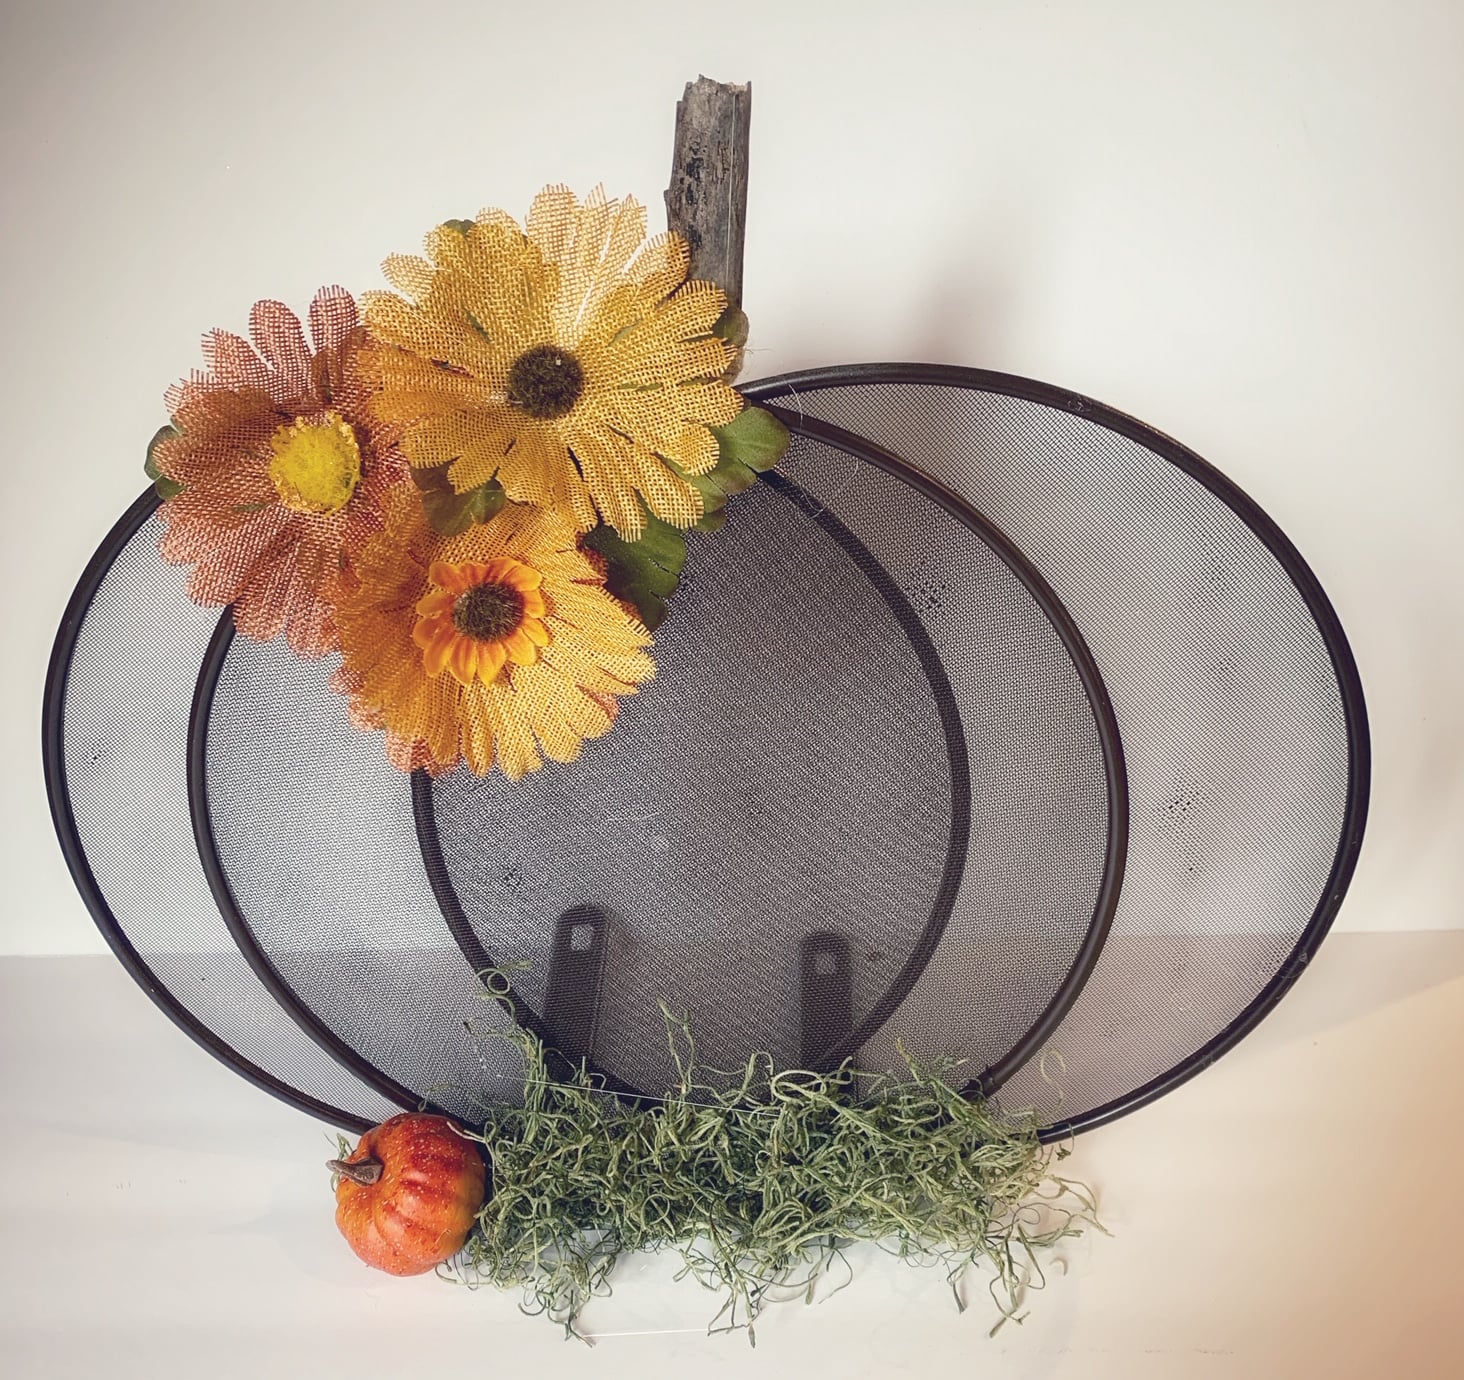
Cost to make: $3 in Splatter Screens, then whatever supplies you choose to use to decorate it.
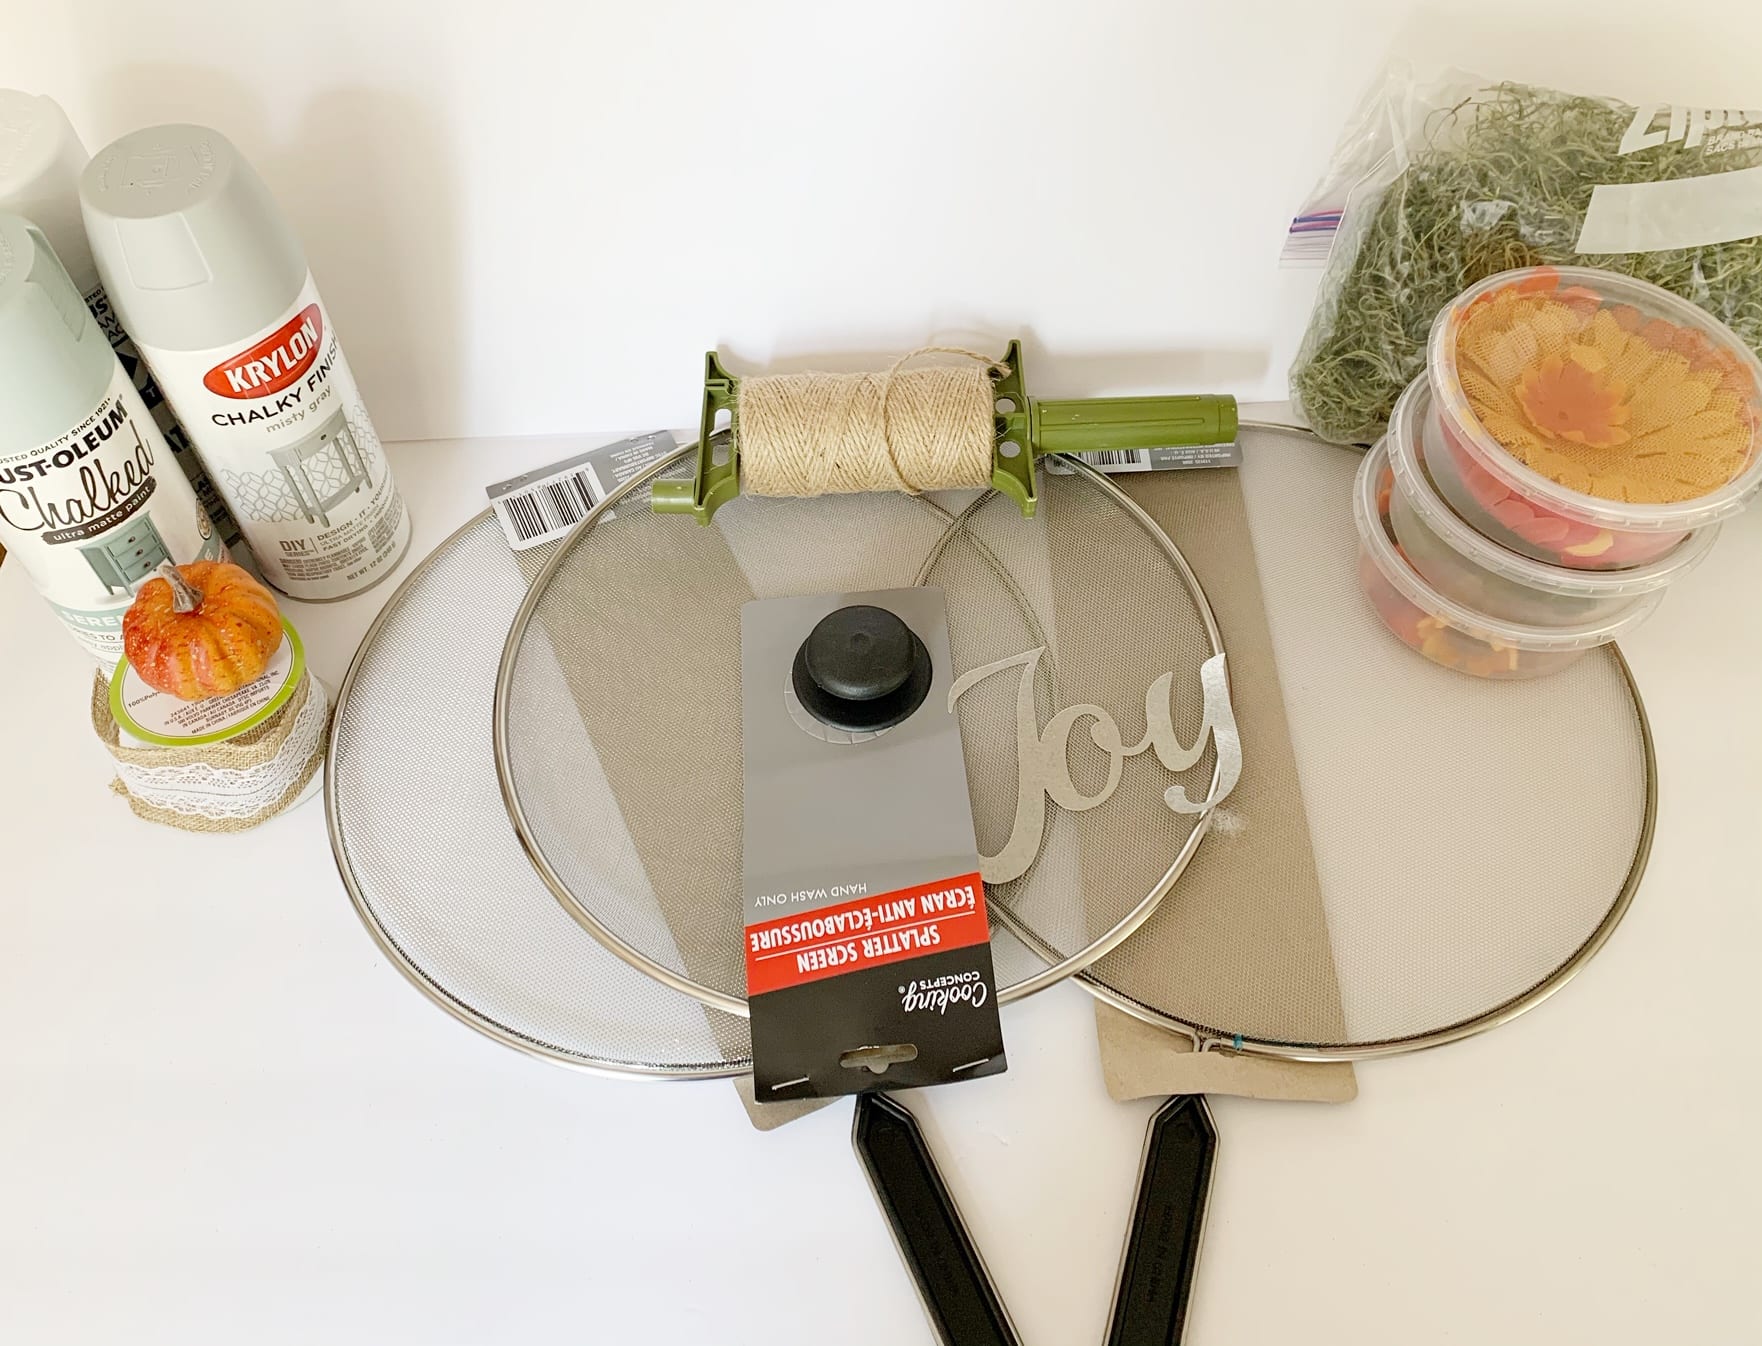
To Put Together Your Splatter Pumpkins You Will Need:
- Three splatter screens for each pumpkin (if you want to use one of the handles for your pumpkin stem, get three with handles on it. If you want to use your own stem as we have done, get two with handles and one with the knob in the center (and you simply remove that by unscrewing it)
- Thin gauge wire to put it together ( I use a pack of floral wire I got at the Dollar store)
- Paint or material (whatever you choose to cover your pumpkin with. I used a chocolate brown for mine)
- Items to embellish (optional)
You can decorate your splatter screen with just paint, spray paint is the easiest way to do it, but you can use acrylics, chalk paint, or any other paints you have on hand or find at the dollar store.
Once it is all dry, bend back the handles on two of the splatter screens to make a stand, and use a thin gauge wire to attach them all together.
If you are using one of the handle versions to make a stem, use a third one in the middle with the handle pointing up (many folks cover that with twine). I used my piece of wood from my yard for my stem, and so used one with the knob in the middle (just unscrewed the know with a Phillips screwdriver).
You can google splatter screen projects for more ideas. You can make gingerbread men, snowmen, and more with these $1 screens and some paint.
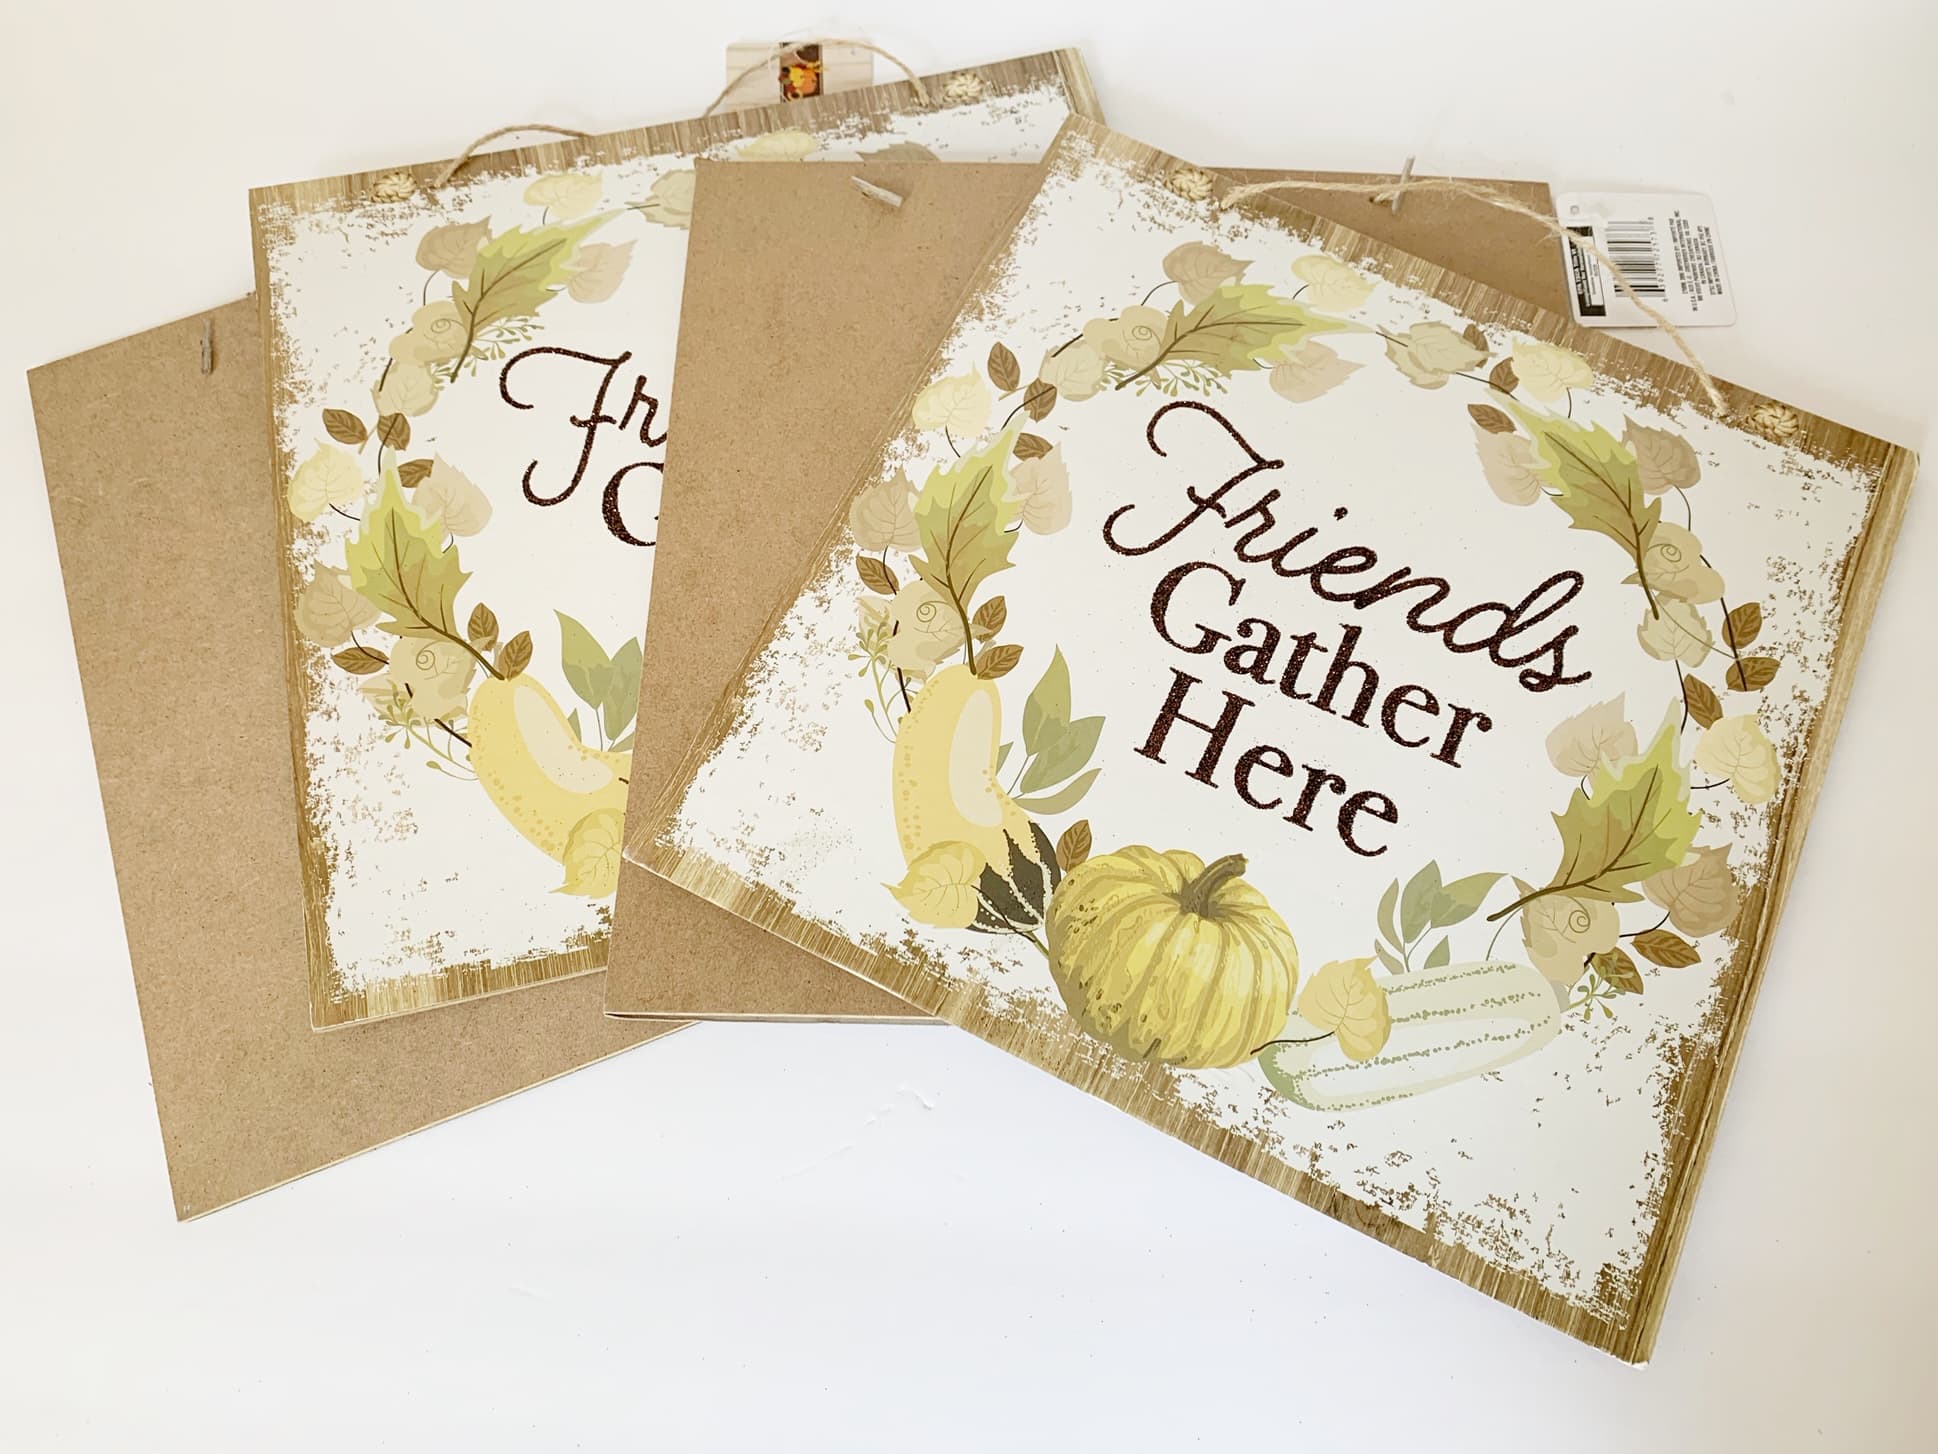
Wood Fall Signs Made From $1 Calendars
We have made a few different signs from Dollar Store supplies. One of my favorites is when we combined 3 signs to make one larger one, like this Apple Cider sign bar sign.
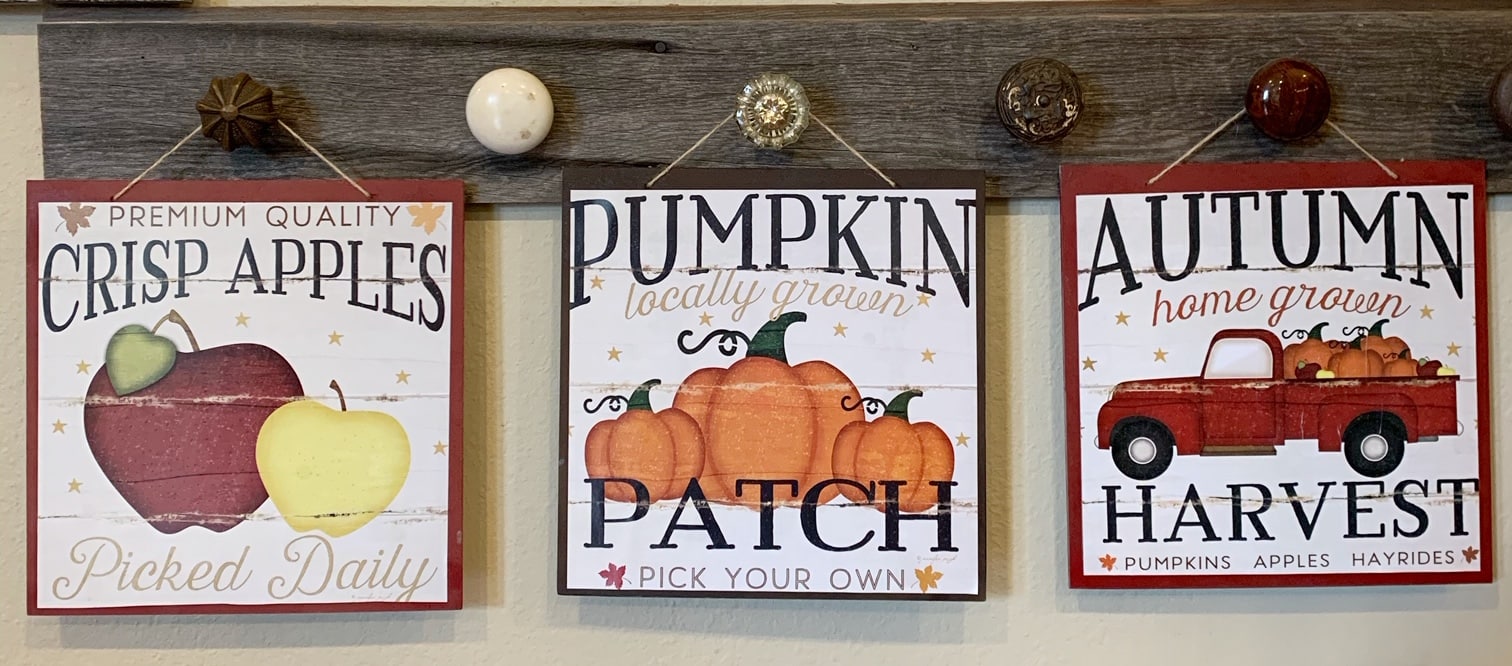
This was my favorite project to make. It is ridiculously simple, but so cute. Plus you can make so many signs from one calendar (fall and other ones to use in other areas of the house). You will want to look for this Farmers Market 2021 calendar at your Dollar Store (it was out this month at mine) for this project. This has the cutest images to use for fun signs. I have heard Hobby Lobby also has a similar style calendar you can use, but it will be more quite a bit more than $1 (in case you are a Hobby Lobby shopper).
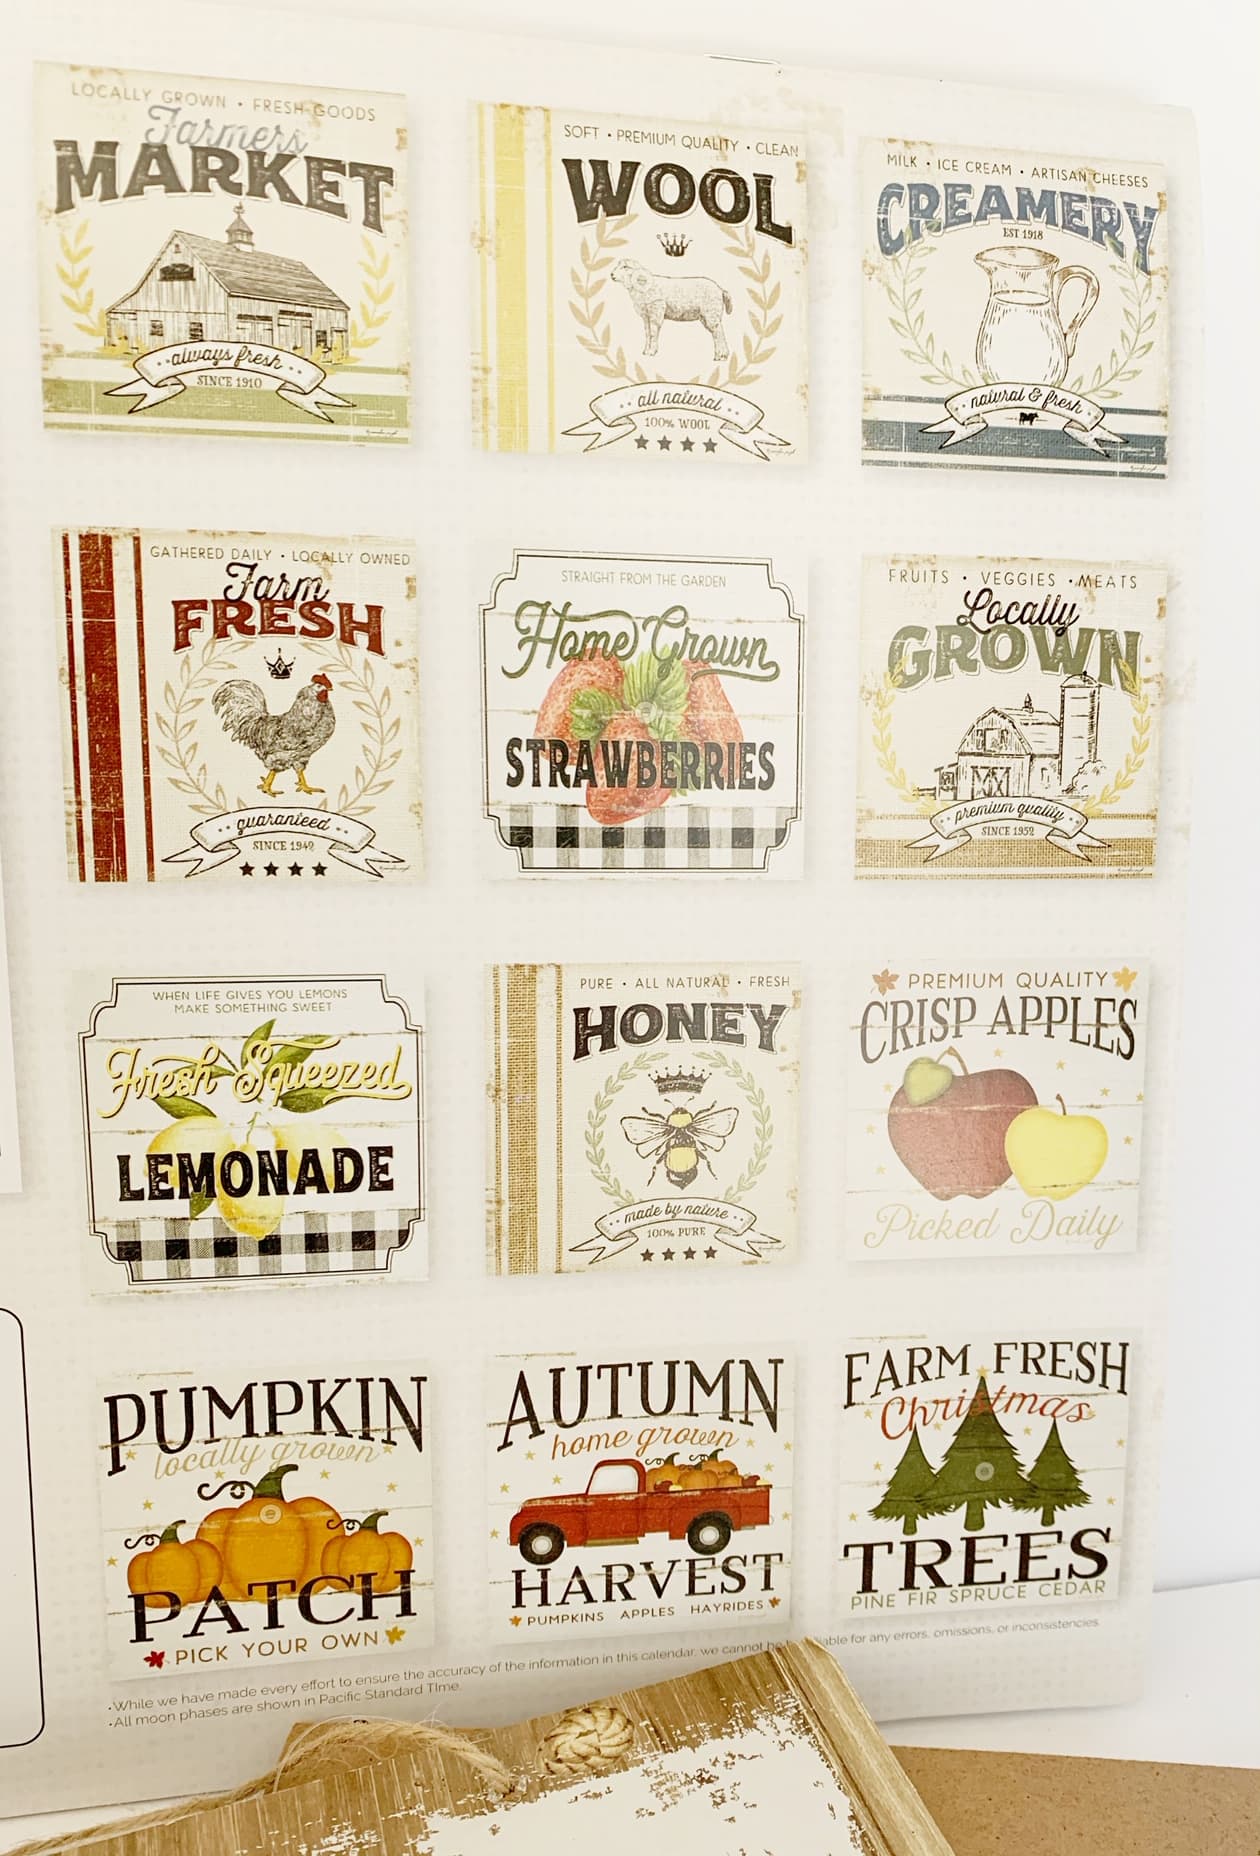
Just look at all the cute pictures in this calendar!
Cost to make: $3, including Mod Podge (less if you consider the calendar could make 12 signs, and Mod Podge makes around 3 signs, so you could be closer to $1.50 per sign if you make multiples)!

To Put Together Your Fall Signs You Will Need:
- 1 of the 2021 Farmers Market Calendars
- 12 x 12 Signs (made of particle board, you will use the back, so ignore the sign on the front – shop for the shape and size you want).
- Mod Podge
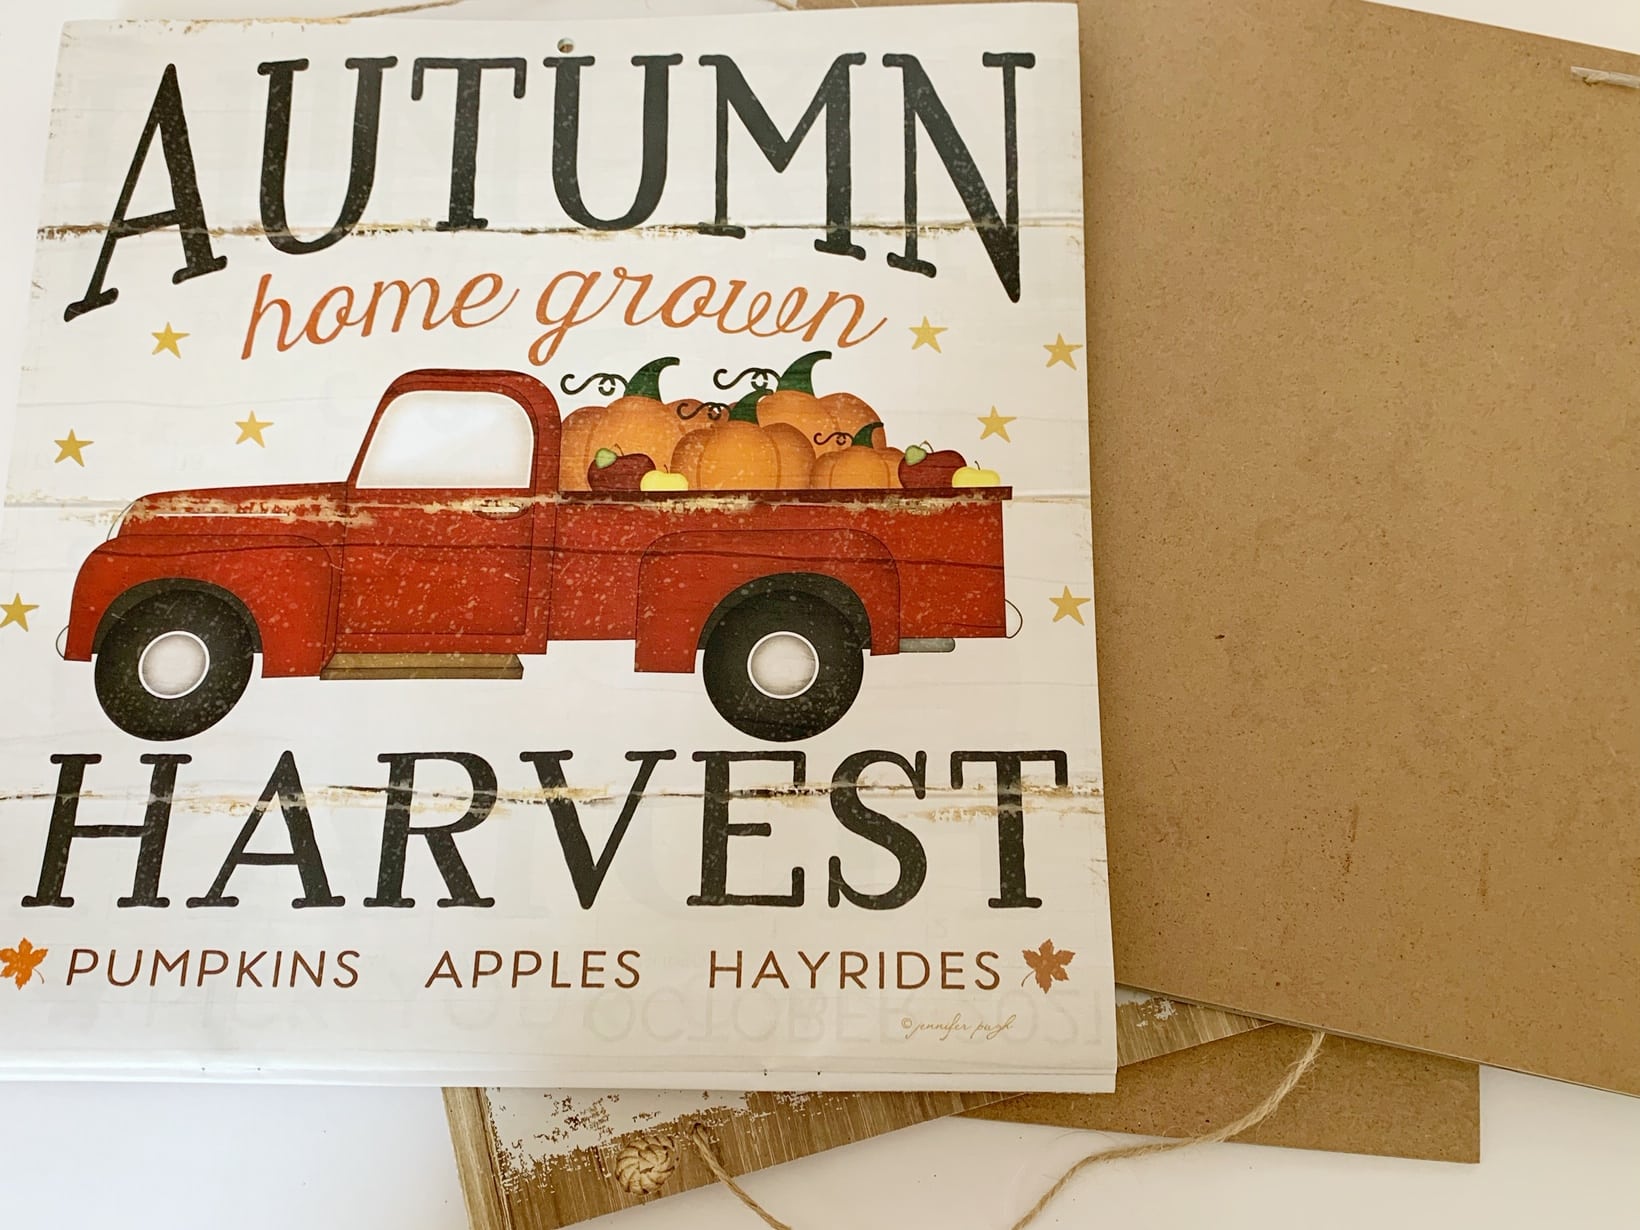
This project is so simple! You are going to choose the picture you like from the calendar and cut it down to the size you like (I trimmed mine on all 4 sides so it left a bit of a border on the outside). You can paint the outside of the board if you want a different color than the wood. Let that dry thoroughly.
Next, attach your new image to the back of the 12×12 particle board sign you bought to make it a custom sign to your liking, using a layer of Mod Podge. You can cover it with Mod Podge to protect it. I loved these signs, and it was the easiest project ever to make.
Find detailed instructions on how to make these custom fall signs here.
Fall Sign Boxes
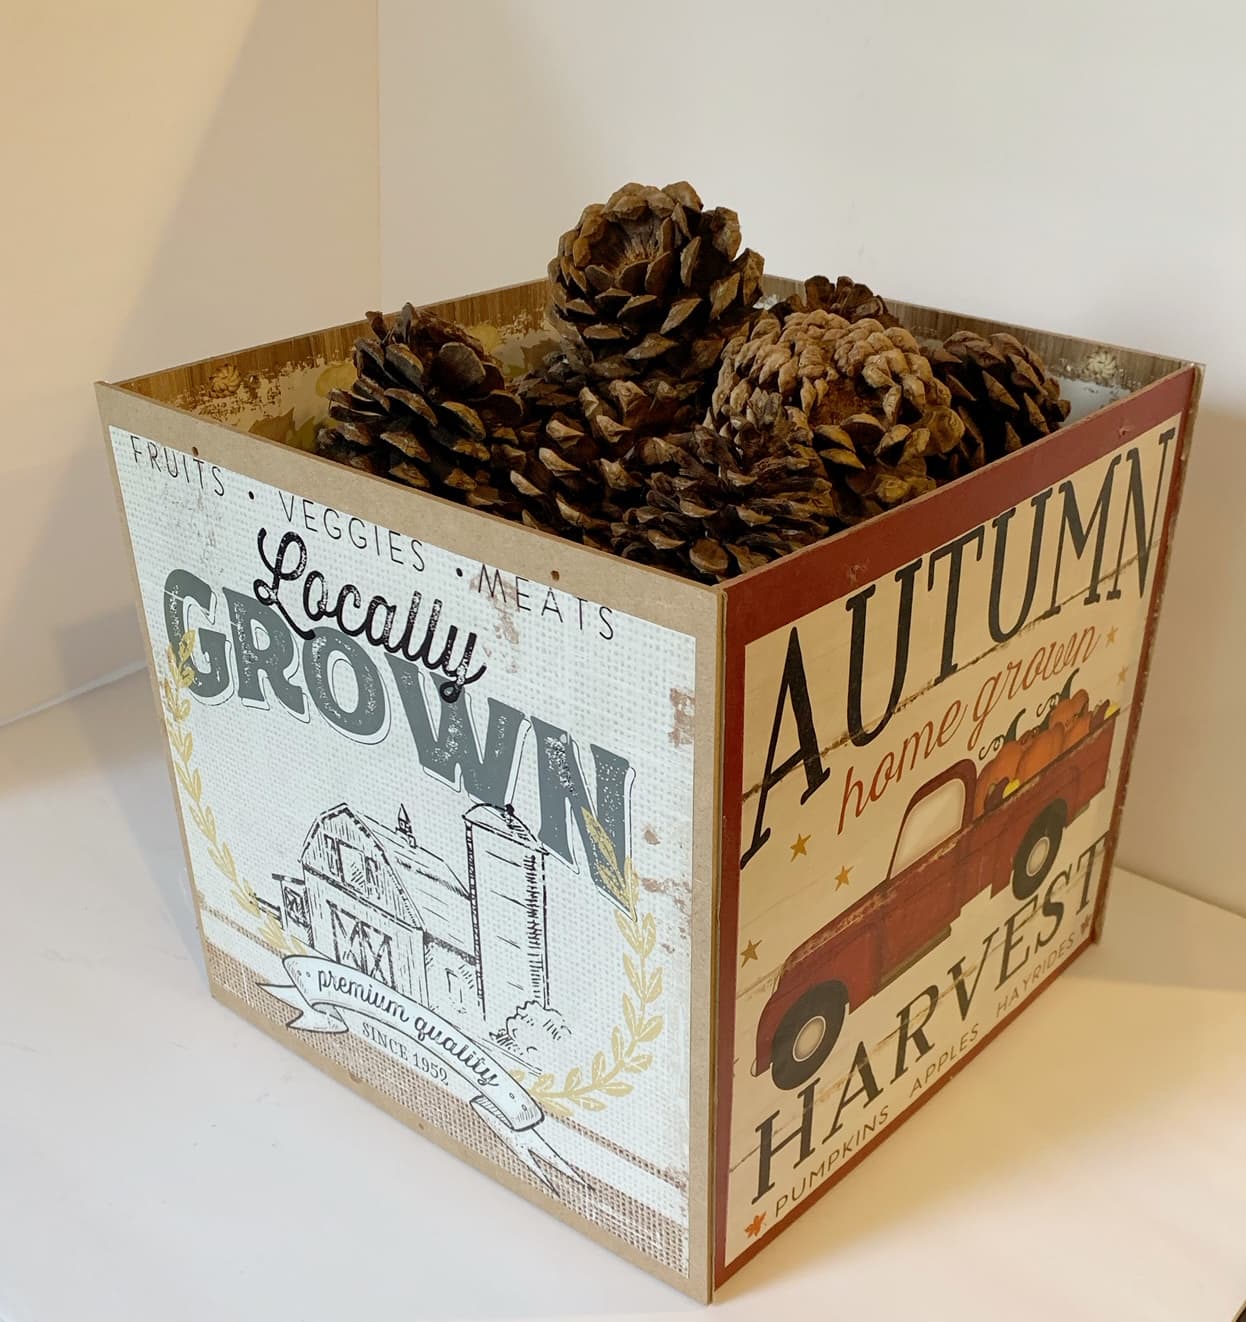
Another way to use those custom signs you just made from the calendar – make a decorative box out of them. I like to fill mine with the cinnamon smelling pinecones, to add that scent to my house in a decorative way.
Cost to make: $5 in signs
To Put Together Your Fall Sign Box You Will Need:
- 5 of the square 12 by 12 signs (you can use 4 if you do not need a bottom to it – ie you just want to add a decorative element around a tree stand for example).
- You can either use the signs as you buy them, or you can customize them to a look you want like we did, using the calendar we mentioned above for the custom signs project.
- Hot Glue
Now that you know how to make the custom signs that we showed you above, if you are looking for a more creative way to use them, other than hanging them – how about turning them into a custom box?
This is a decorative box that you could use to hold scented pinecones, or a decorative tree, firewood, or anything else that makes sense to you. Simply hot glue 4 of your signs together, and then add one to the bottom, and you have your decorative box!
DIY Fall Pillows Made From Dish Towels or Placemats
These decorative fall pillows are so easy to make and will cost you so little, especially if you get creative and re-use the fill from something else you have around the house. We made one from a dish towel and one from two place mats we found at our Dollar store. I had hot glue on hand and used two old pillows I had in my giveaway pile, so I made my pillows for $1 and $2 each. Hard to beat that price!
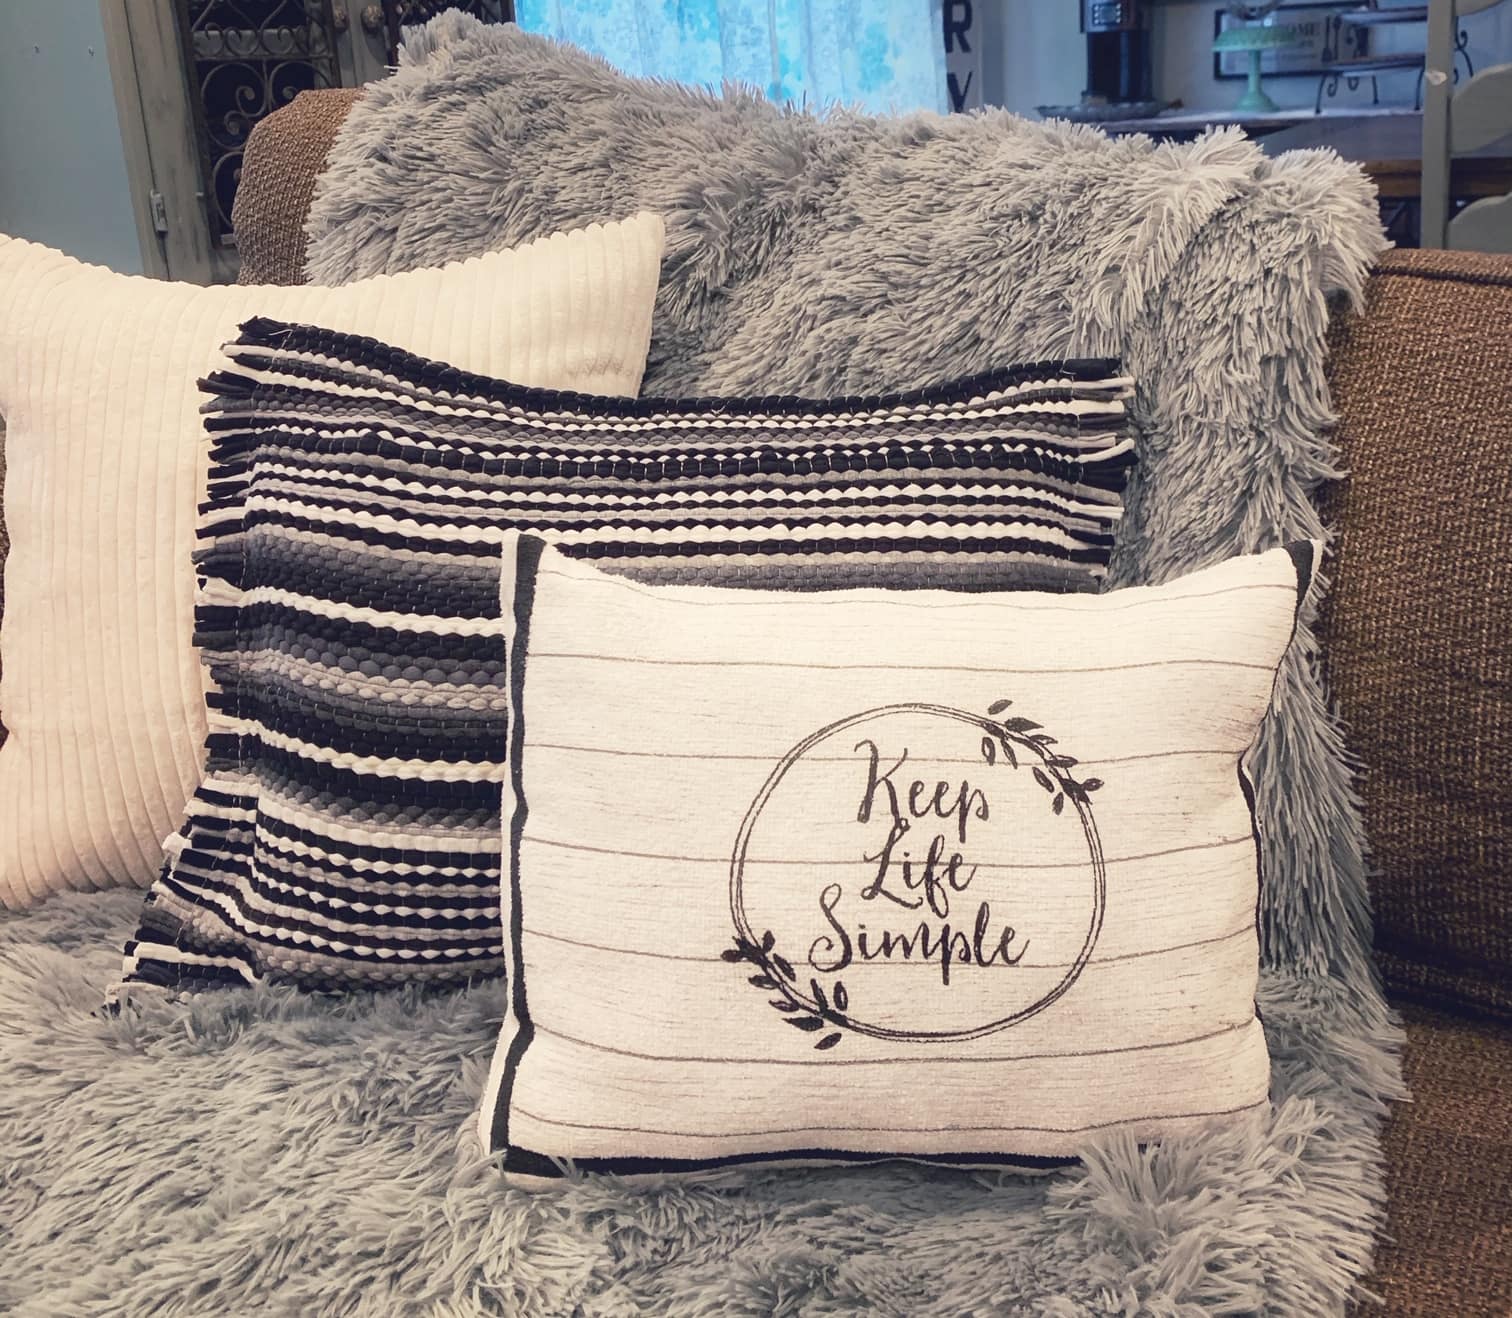
The Dollar store has lots of fall festive looks out for tea towels and place mats right now. You could grab something that has fall leaves, or pumpkins, for more of a traditional fall look. I was going for a simplistic farmhouse look this year, so I grabbed these two black-and-white options I found at my dollar store. This is just to inspire you with the idea of how to make them, but grab the look that works best with your fall decor!
Cost to make: $1 – $2 + glue and old pillow or stuffing depending on the method you use.
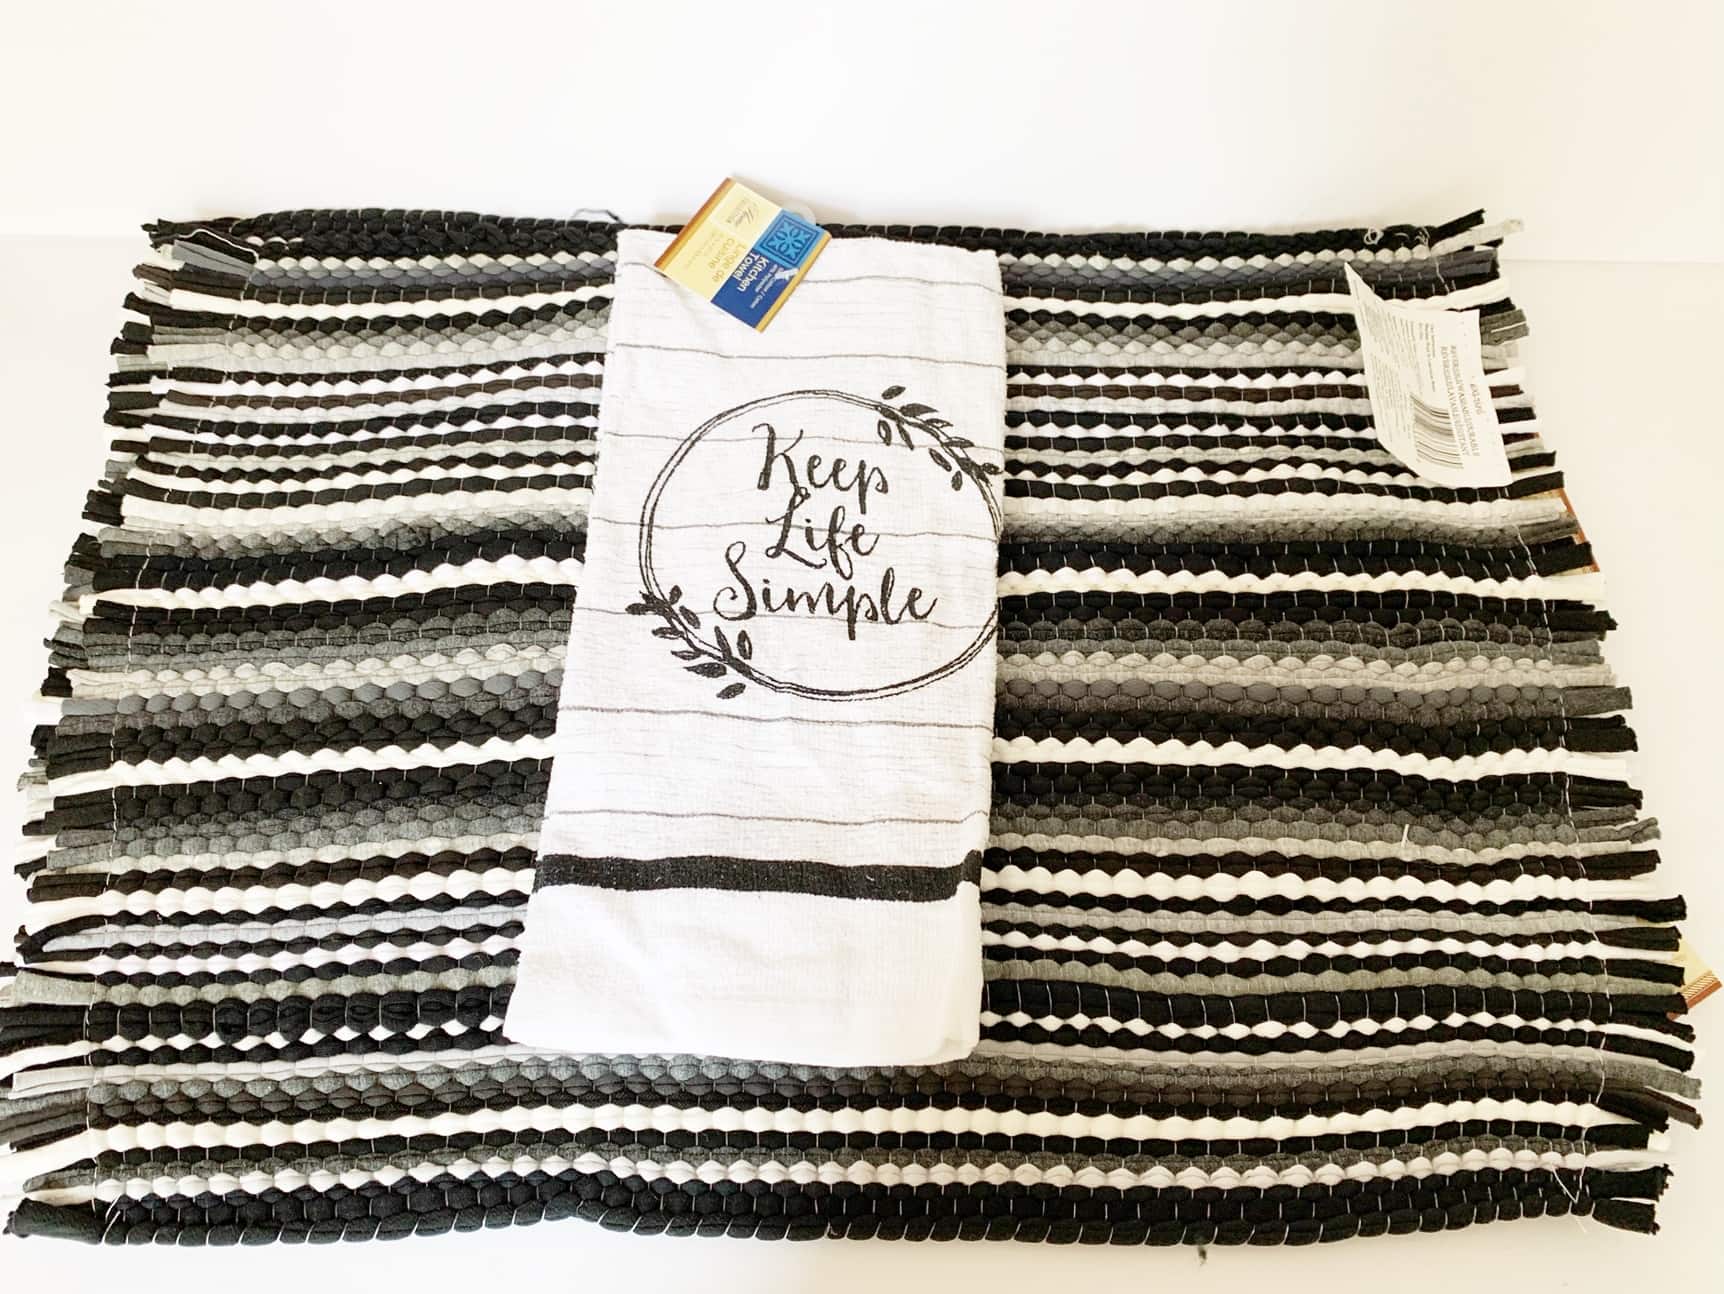
To Put Together Your Fall Sign Box You Will Need:
- 1 dish towel for small size pillow (Keep Life Simple pillow shown above)
- 2 placemats for larger sized pillows (black and white weave pillow shown above)
- Hot Glue
- Filling (or an old pillow, or stuffing from an old stuffed animal)
There are three easy no-sew techniques you can use to make these super simple pillows:
- Hot glue them together (that is what we did above here)
- Cut and tie them together (like we did for these Christmas tea towel pillows here)
- Use Stitch Wizery or iron on the hem to iron them together (this will work on the tea towels, but not the thick placemats – it could work if you choose thinner placemats).
For the pillows shown above, we simply added a bead of hot glue around the three edges & half edges, then filled and glued the last part closed.
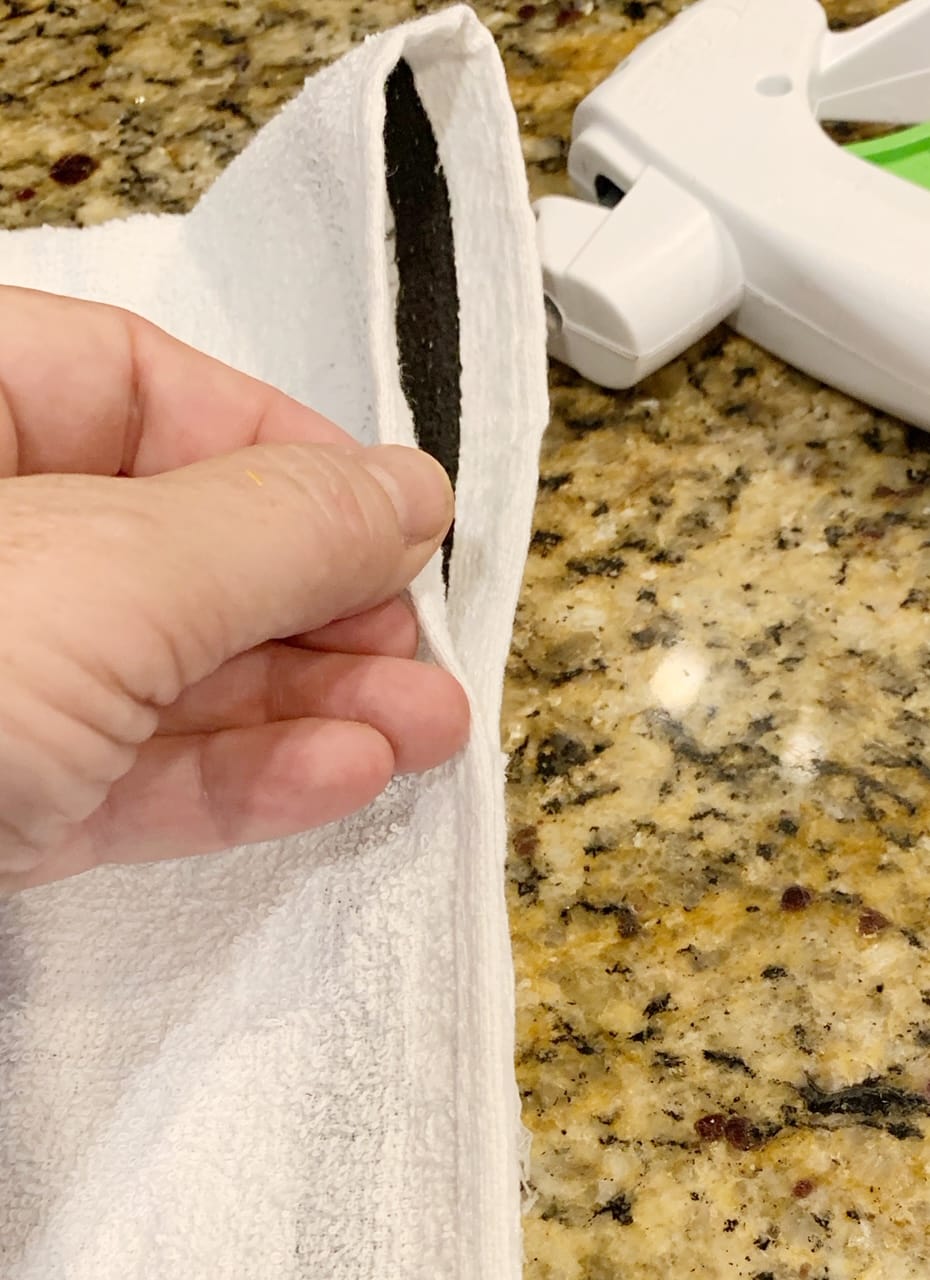
Specifically, for the tea towel we folded it inside out and glued three and a half edges, then folded it right side out, and filled it. Then we glued that last portion of the edge to finish it off.
The placemat pillows are so simple, as they already have a fringe on them for a finished look. Lay one placemat on top of the other, glue 3 edges, then add your pillow or fill, and glue the bottom closed. So simple, but such a great look for any season!
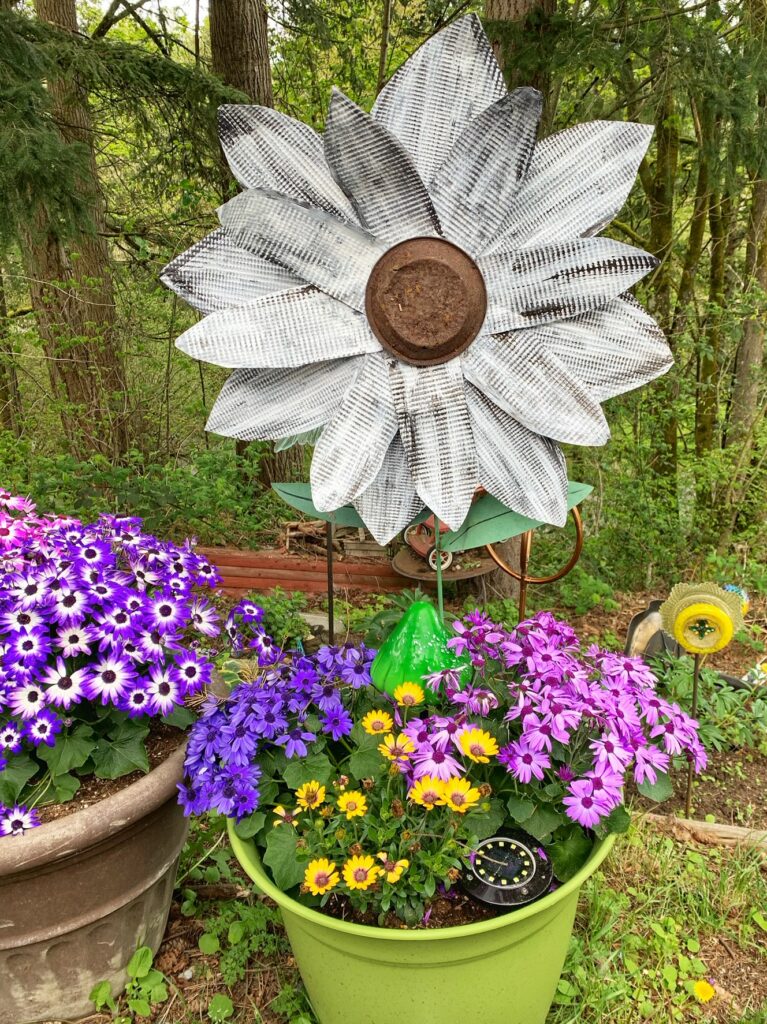
Tin Cookie Sheet Rustic Flowers
These rustic tin flowers make the perfect fall decor and are pretty simple to make. You can use them outdoors, or make the flower and hang it on your front door or one of your walls like you would a wreath too.
Cost to make: $4 in Tin Cookie Sheets (I had the rest of the supplies on hand, so it may cost you anywhere from $4 to $10 per flower, depending on what you have on hand)
To Put Together Your Tin Flowers You Will Need:
- 4 sets of 2 tin sheets (I found these at the Dollar Store for $1 per set of 2 – so $4 total)
- Paint of your choice
- Glue (we used a combination of E6000 to hold long term as well as hot glue to bind it quickly, but you could use epoxy or Gorilla Glue too – or hot glue if you are just using it inside)
- Scissors
- Picture Hanging Kit, Ribbon to hang, or a post of some kind to put in the ground if you want to use it outside.
- Round object for the center of the flower (we discuss various options below)
- Round objects to glue petals too (I used an old CD because my flower was going to be used outdoors – if you are using it indoors you can use a cardboard circle).
Find a full set of instructions to make these simple fall tin flowers, out of Dollar Store tin cookie sheets here!
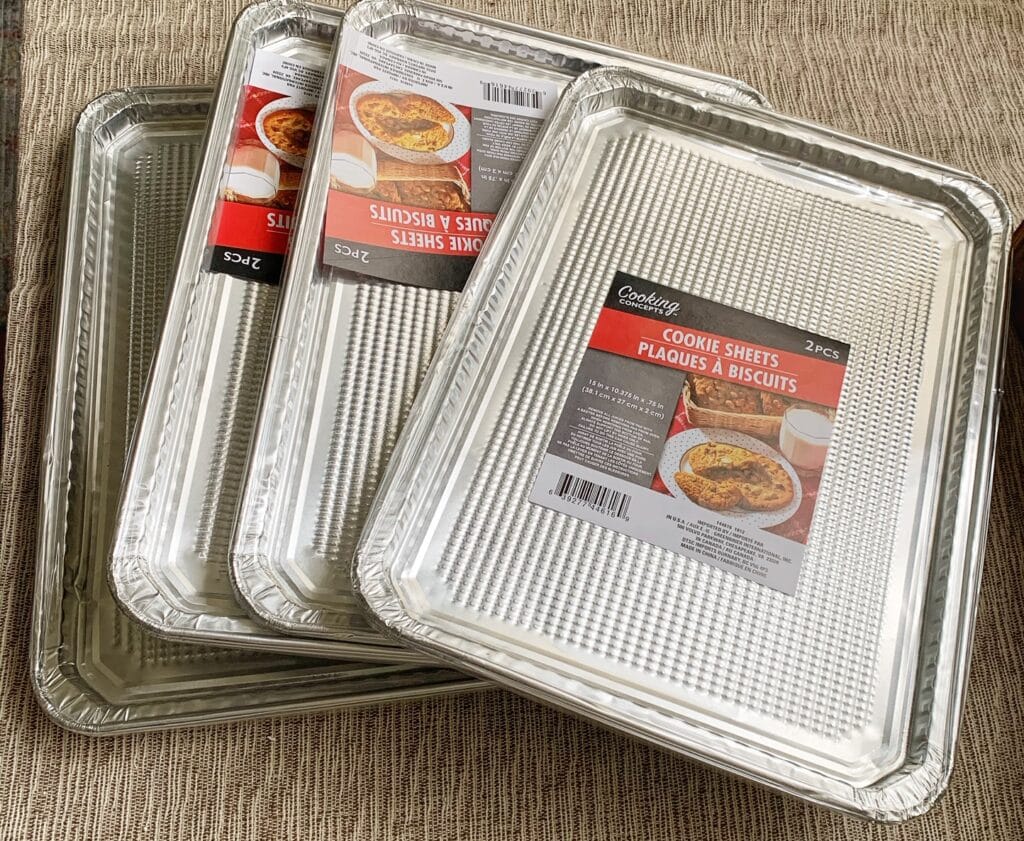
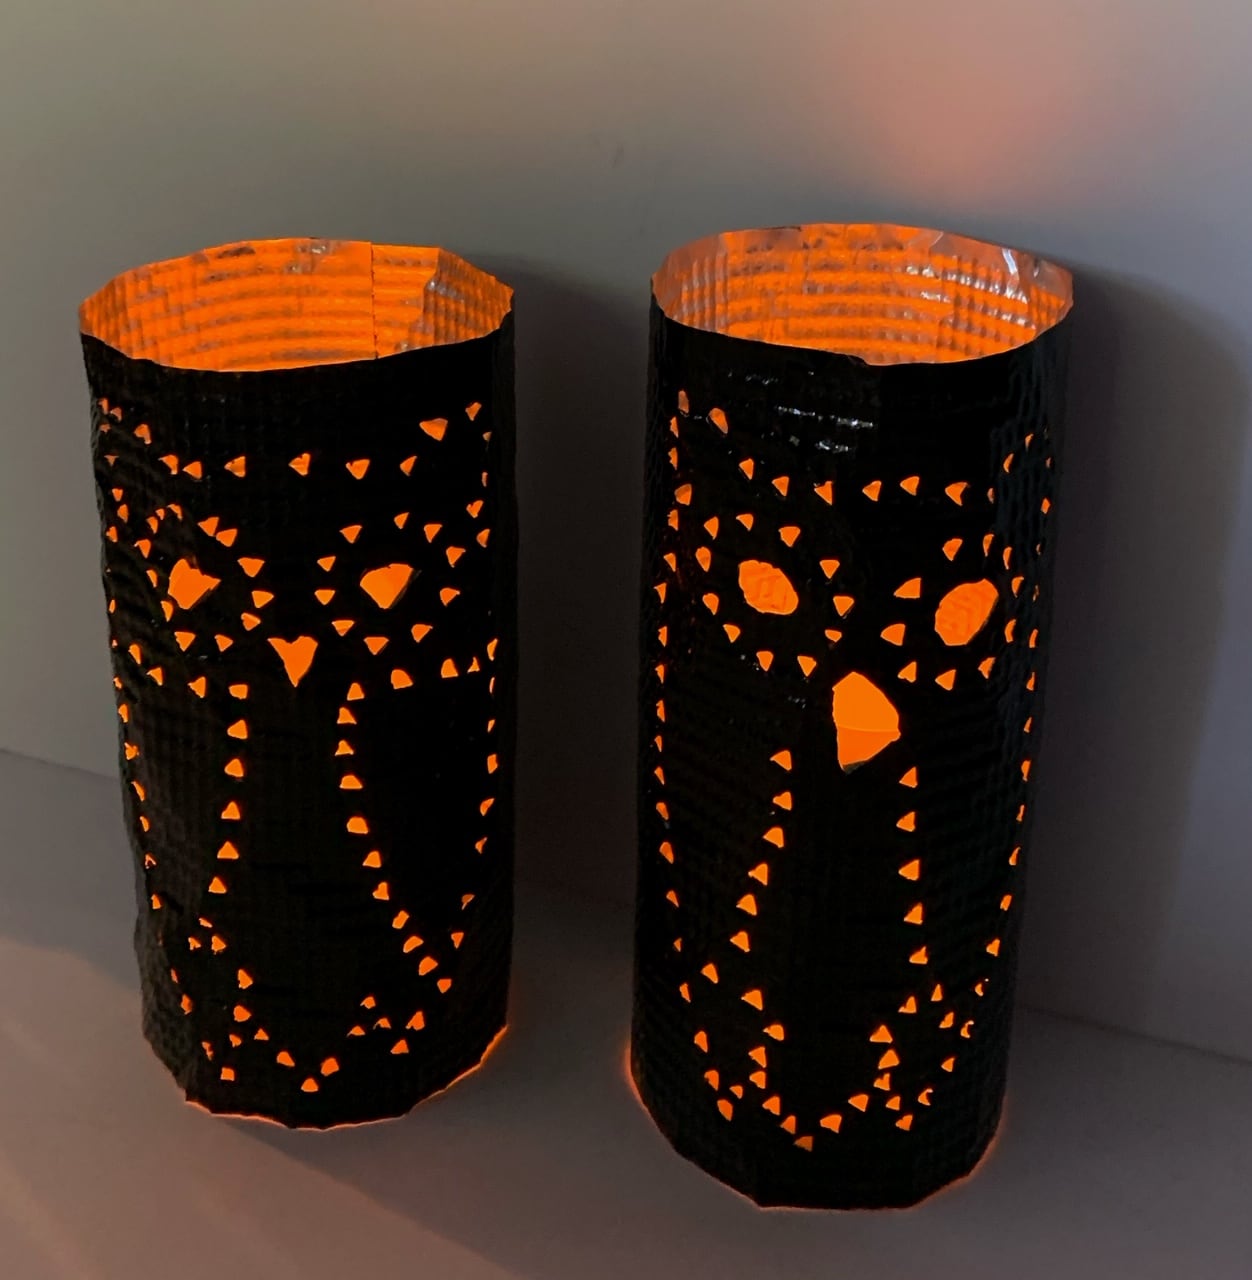
Fall Lanterns Made From Tin Cookie Sheets
These fun fall tin lanterns are made from the same set of tin cookie sheets we used for the tin flowers shown above.
This is a really fun project to use indoors or outdoors for some ambiance and mood lighting during the fall time. You can use any design you want, and they are really easy to make. We went with an owl design on ours, just because a lot of my fall decor is centered around wood pumpkins and owls. You can design this to go with any fall look you have in your home (pumpkins, leaves, something spooky, etc).
Cost to make: $1 plus Votive Candle
You will get two tin cookie sheets for $1 at the Dollar store, so it is really only $0.50 cents per lantern + votive.
To Put Together These Fall Lanterns You Will Need:
- Pack of 2 Tin Cookie Sheets from Dollar Store.
- Hot Glue
- Pen, or something to trace the design
- Fall design (search for your favorite design on the internet and download it to trace)
- Phillips screwdriver or something to make holes in tin
- Votive candle to illuminate
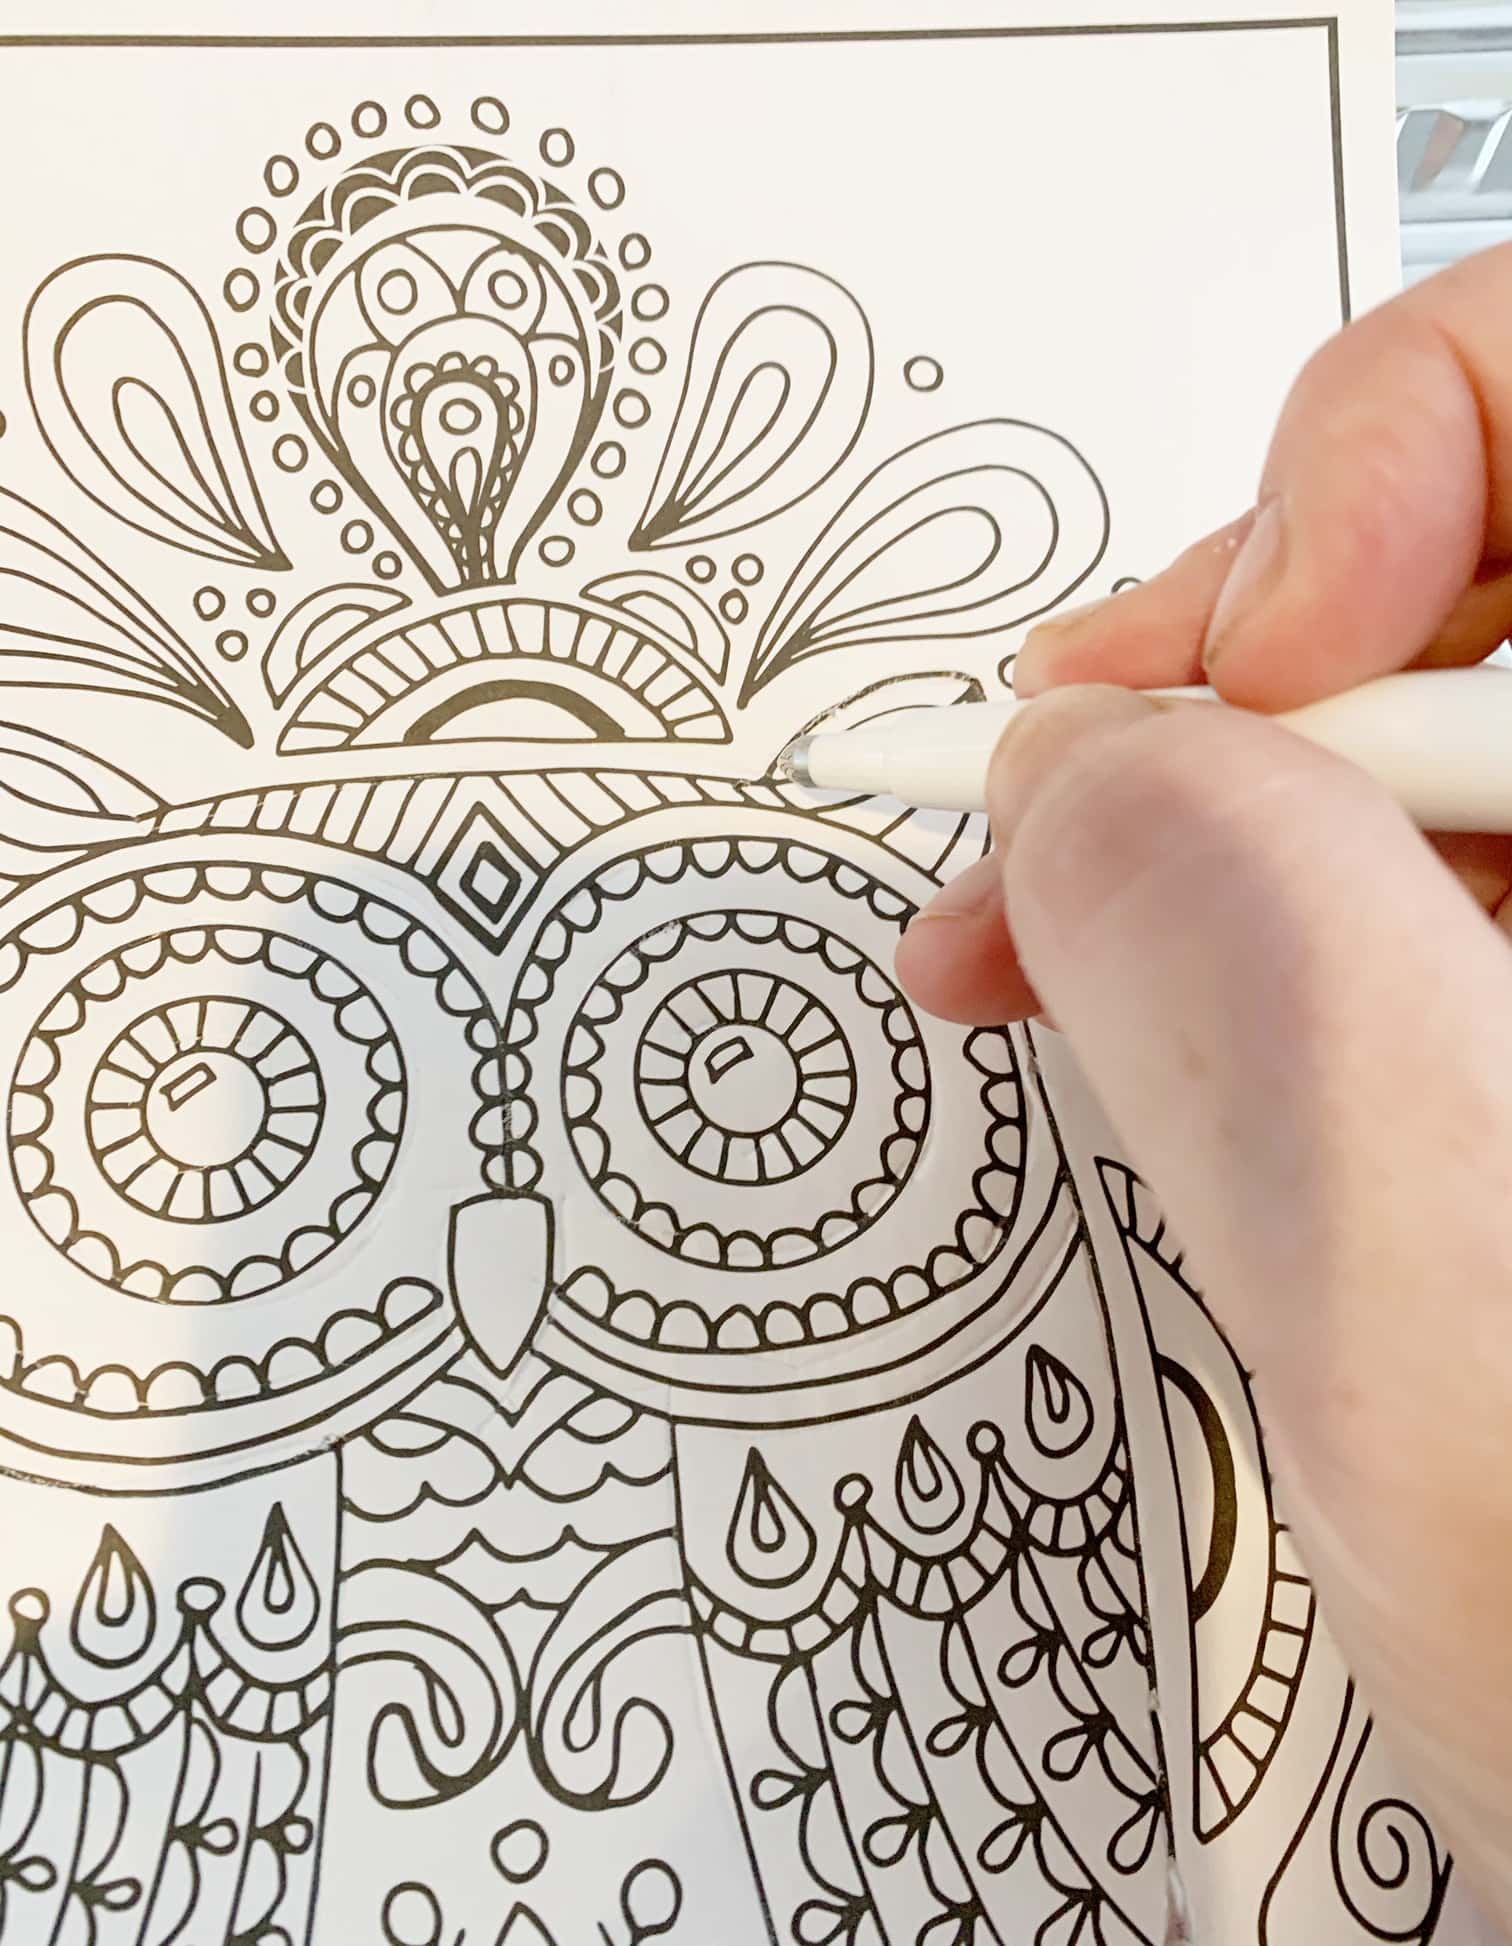
Start by finding a design you would like to use on your lanterns. You can use pumpkin carving designs (you can often find these at the dollar store), pages from coloring books, or print out something from online to use. I had my own image that I used for my vases from an adult coloring book (then just traced the outline, not all the details). You will want a simple design, as you will be poking holes to make it show through, and too much detail can make this hard.
Once you have your image, use a pen or embossing tool to trace around the outside of it, to leave the pattern on the tin.
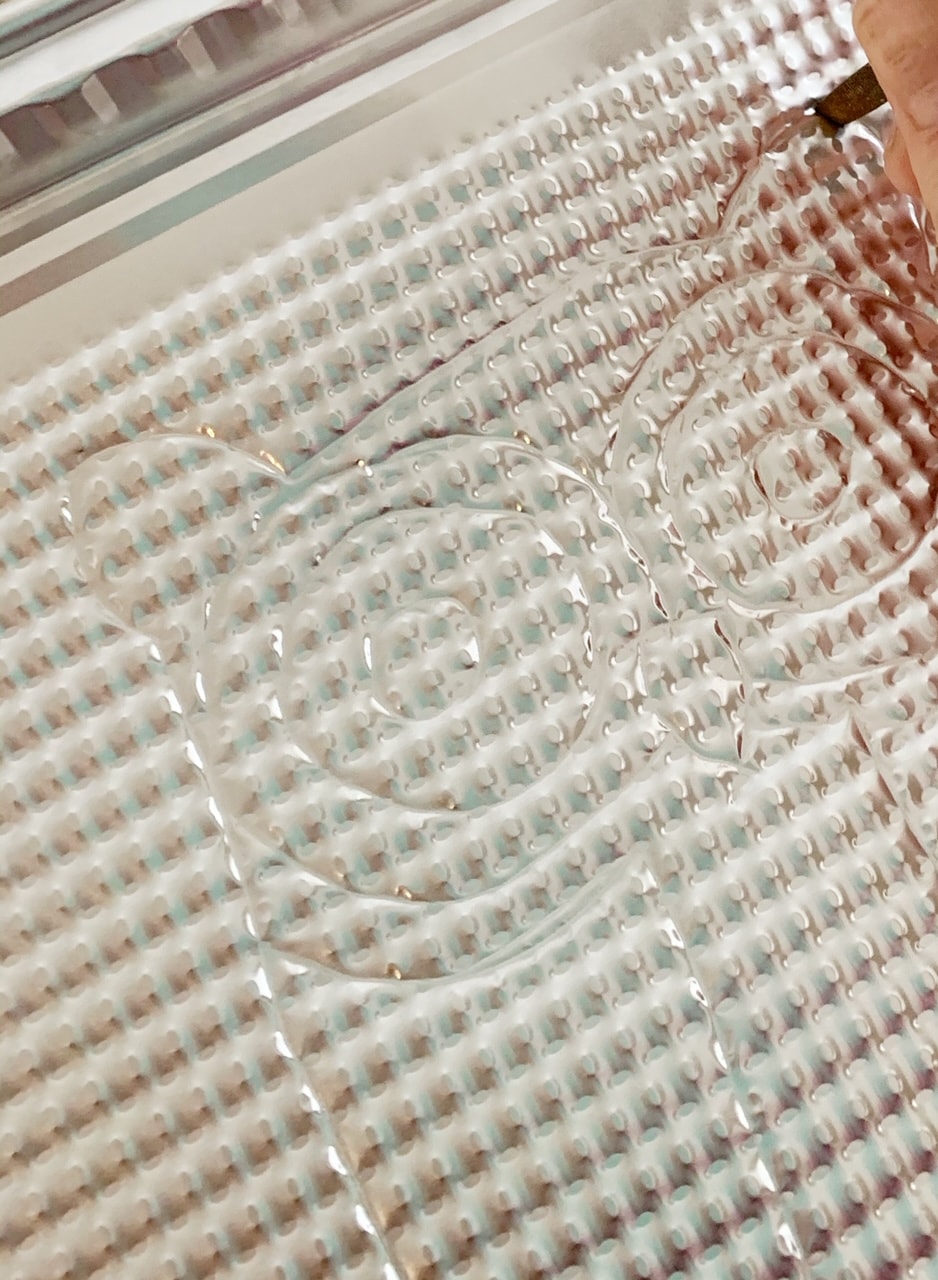
Then use a small Phillips screwdriver (or something similar) to poke holes every couple of centimeters apart. Once this is done, cut off the outer edges of the tray to make it a flat surface (you may want to wear gloves when doing this as the tin is sharp and can cut you).
Lastly, paint it if desired (I painted mine rust brown to mimic iron), and let dry thoroughly. They can be left the tin design too, so this step is optional. Wrap it around into a cylinder shape, and hot glue along the seam to hold. You may need to play with the tin a bit to get it to be a nice smooth shape.
Add a votive candle in there, and your lanterns are ready to be used.
Fall Lanterns Made From Vases
This has got to be one of the simplest projects I have ever done. Find the vase shape you like. Find the candle cup shape you like. Glue them together and add lighting – and that is pretty much it! This project will give you a big bang for your dollar – especially if you make more than one for a setting somewhere in your home.
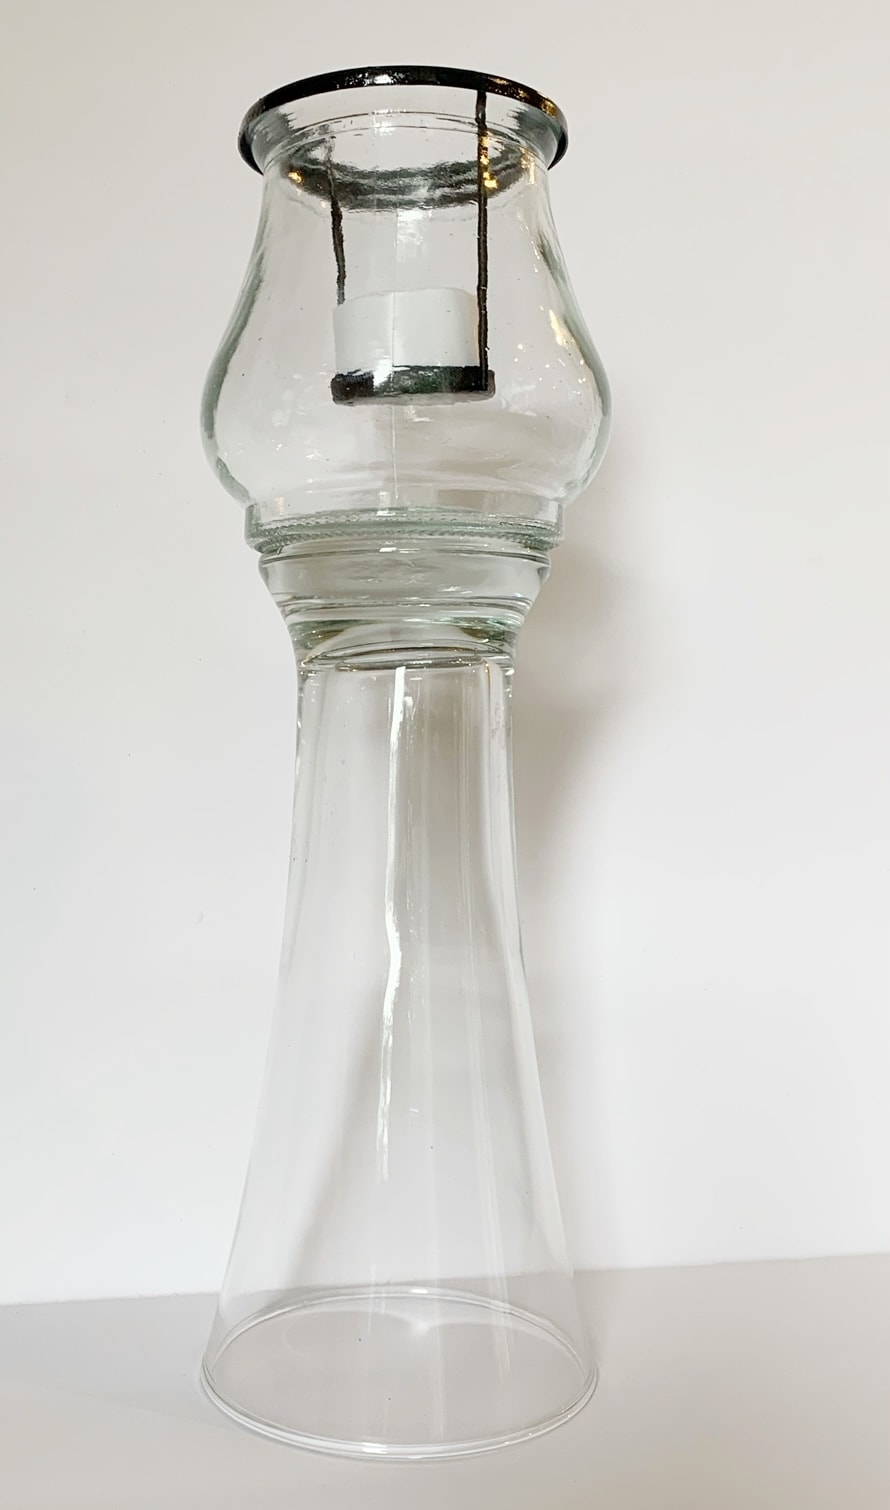
This lantern is super easy to make! You can use a vase (or I found my base in the glasses section and liked its shape better than my vase options this trip). Plus you will look for a candle jar, over in the section where they sell candles. There were a number of options at my store (including one that had a mason jar look to it that I liked too, but decided to go with this one as it had the votive holder already in it)
Cost to make: $3 (plus candle)
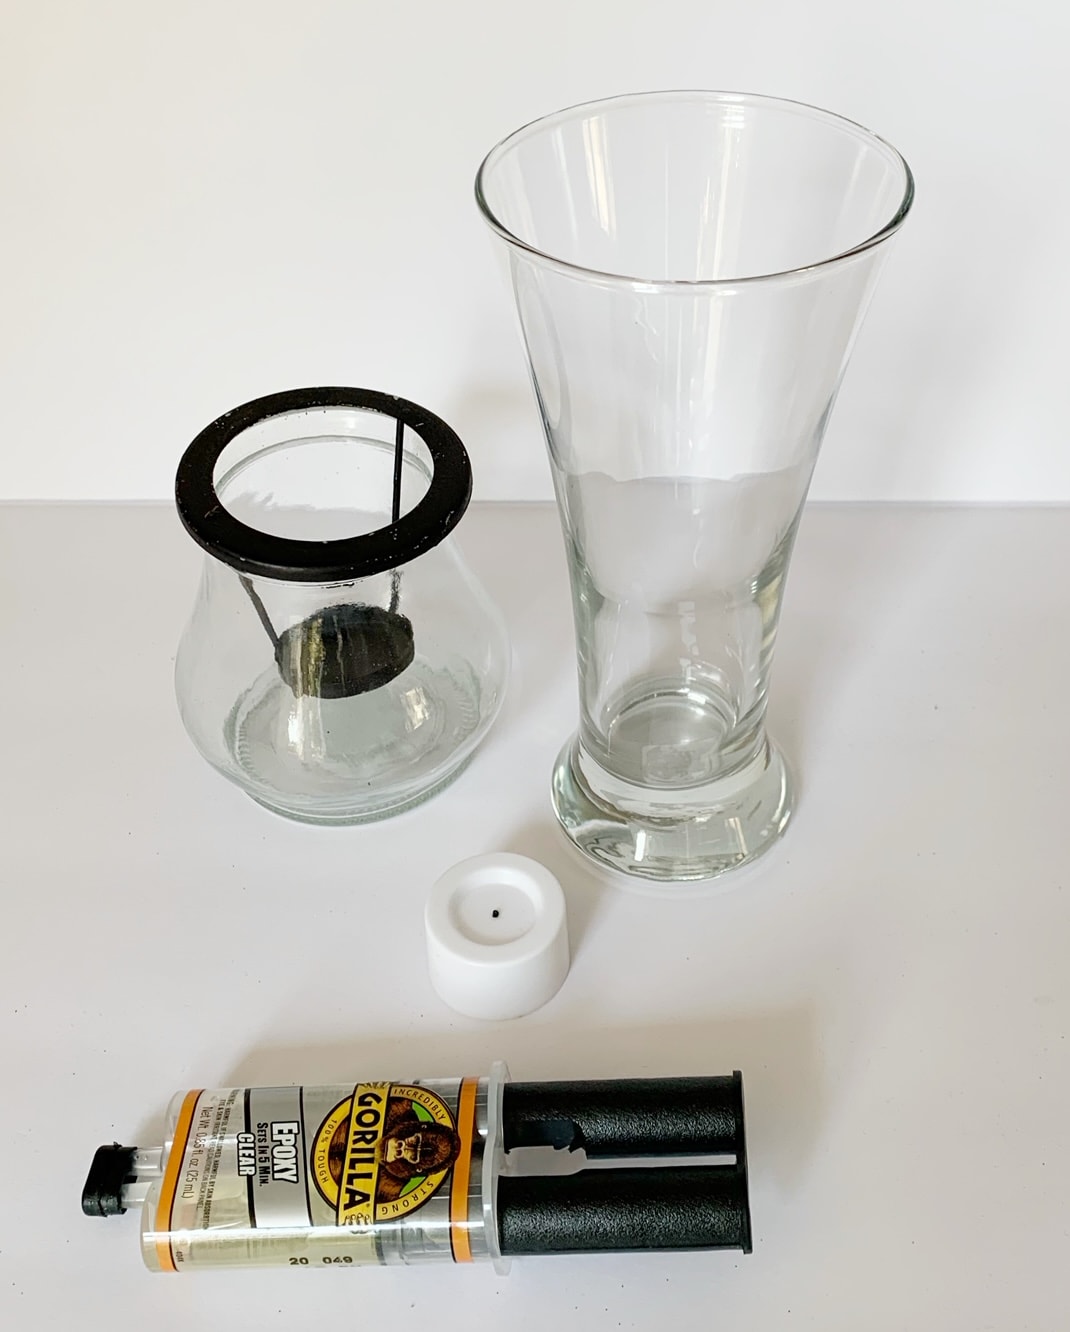
To Put Together These Fall Lanterns You Will Need:
For this project, you simply turn your vase or glass upside down and glue the jar to the bottom of the glass. I used epoxy glue (I have found them at the dollar store over by the hardware stuff – so factored the cost of using epoxy you buy there into the cost above). My favorite epoxy though (and the one I used) is the Gorilla Glue epoxy. E600 would also be another great glue option for this project. You could use hot glue, but in my experience that will eventually come apart so I only use that if I want it to be a temporary hold for a temporary decoration.
Add your votive (I used a battery-operated one) and you have a beautiful and simple lantern to light up next to your fall decor for just a few dollars!
Embellish Their Wood Cut Outs, or Use Craft Sticks To Make Your Own!
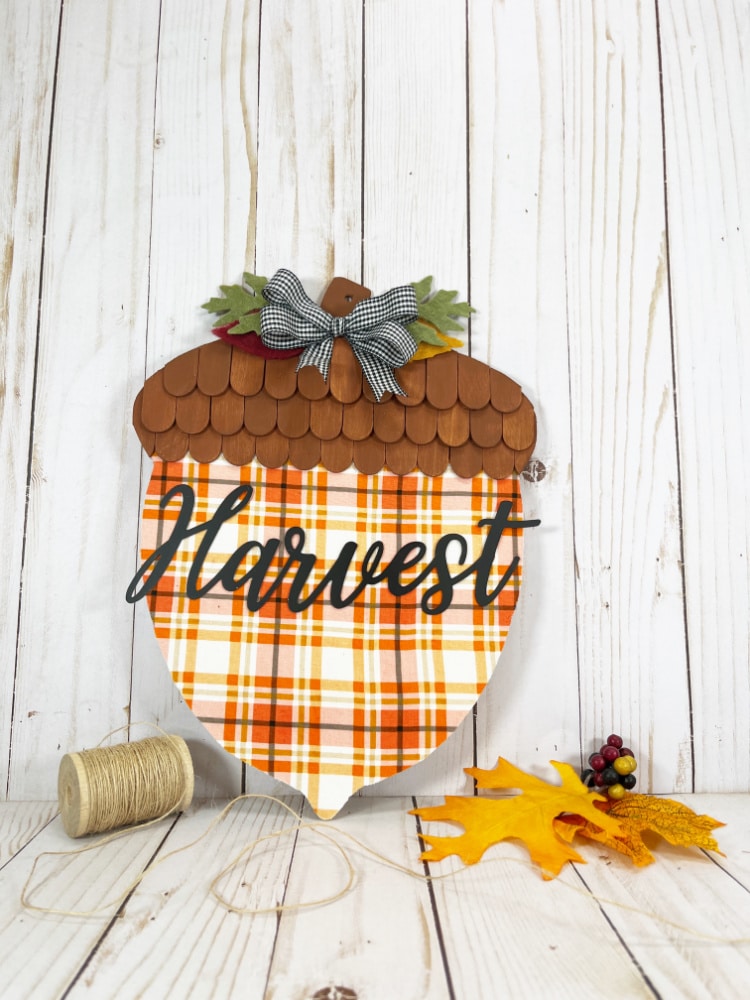
We show you how to embellish the Acorn Wood Cut Outs here!
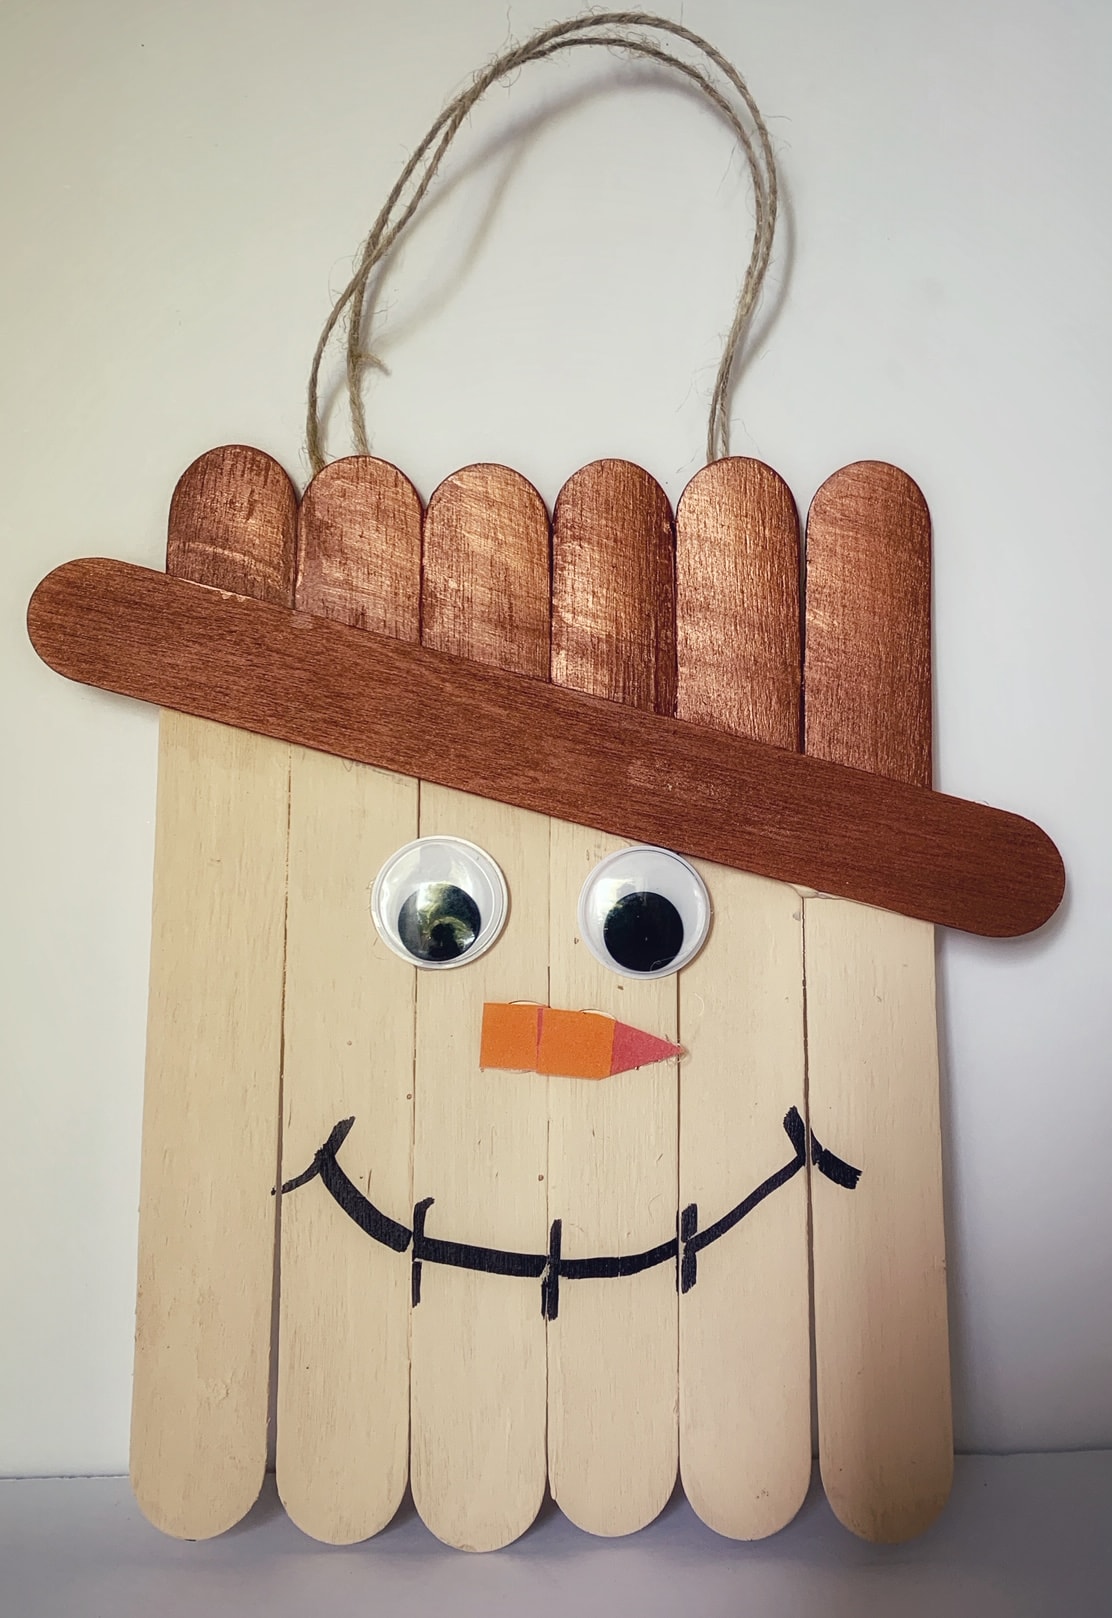
Or make your own Scarecrow with the Craft Sticks!
This is a simple craft, where you just line up paint sticks or craft sticks in a certain way, and paint out the look of a scarecrow! You can use paint stick packs from places like Home Depot (to make a larger scarecrow that you can hang from your front door all by itself, for example). You can also use this pack of craft sticks I picked up at my Dollar store, and make a centerpiece for a larger wreath, or show off in a picture hanger and more.
Cost to make:
$1 plus paint
To Put Together Scarecrow You Will Need:
- Paint sticks or craft sticks
- Hot glue or staples
- Paint
- Something to hang it with
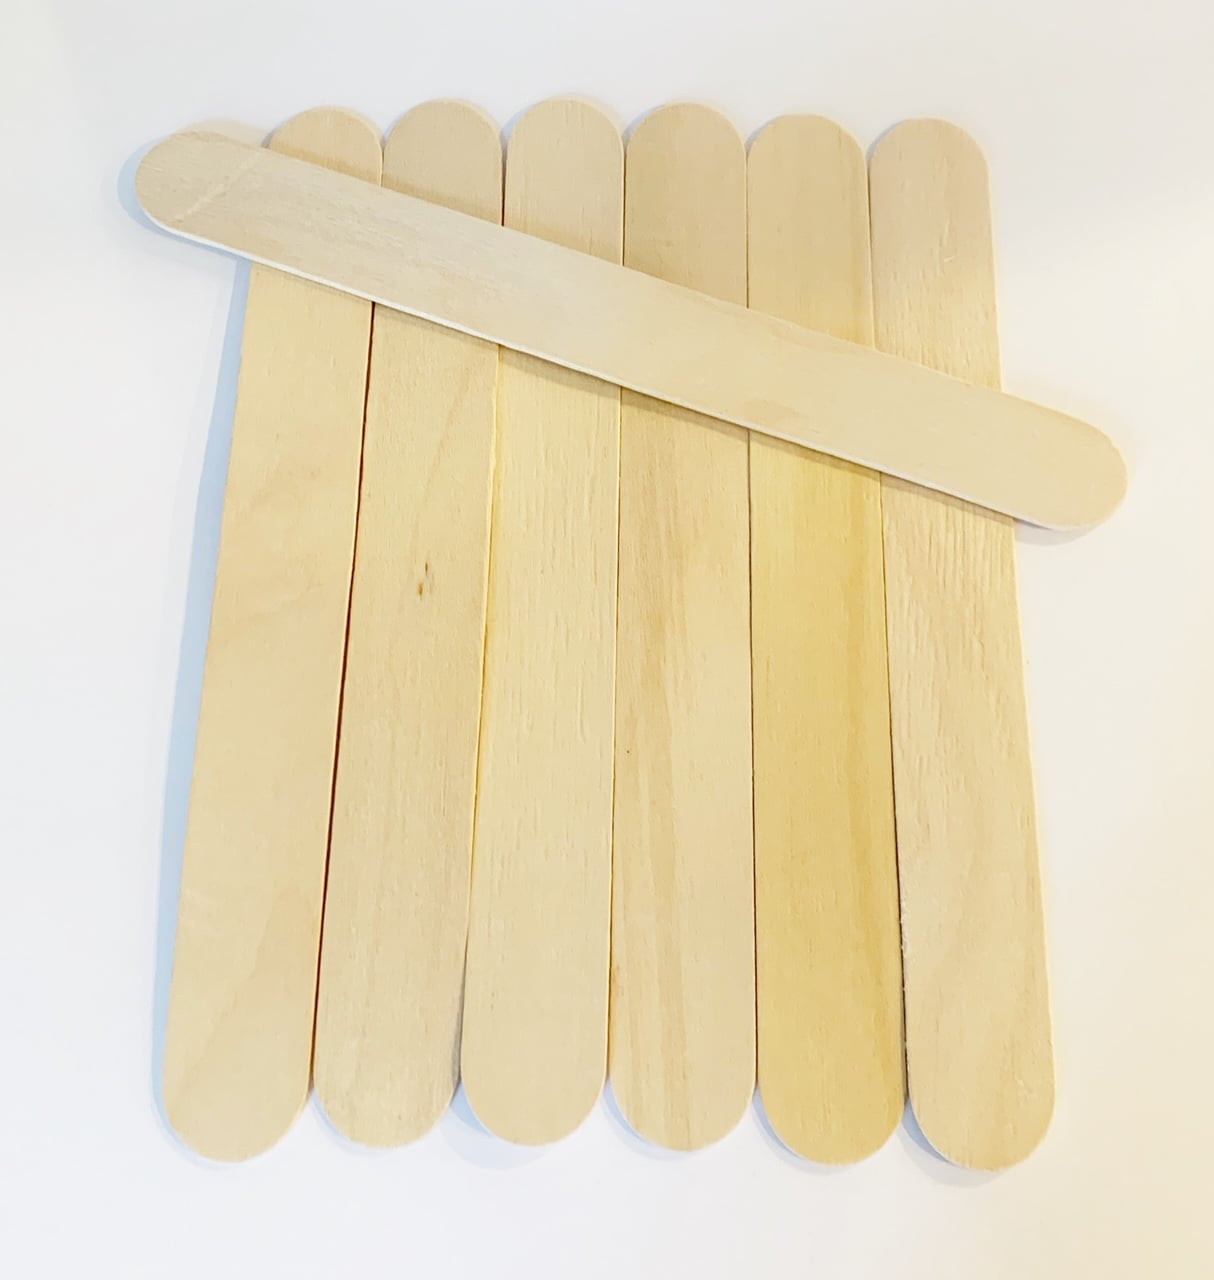
Line 6 sticks up vertically together. Take one stick and place it on the slant, as shown above. Add a generous amount of hot glue to the stick you have on the slant, and hold it down over all the vertical sticks to hold the entire piece together.
Next paint out your scarecrow (you can paint out eyes and nose, but I used some googly eyes and a paper nose I had on hand). You can add hay under the hat on the sides to make it even more authentic! Glue some twine to the back to use as a hanger for your Scarecrow and you are ready to show it off wherever you want.
Dollar Store Fall Wreath
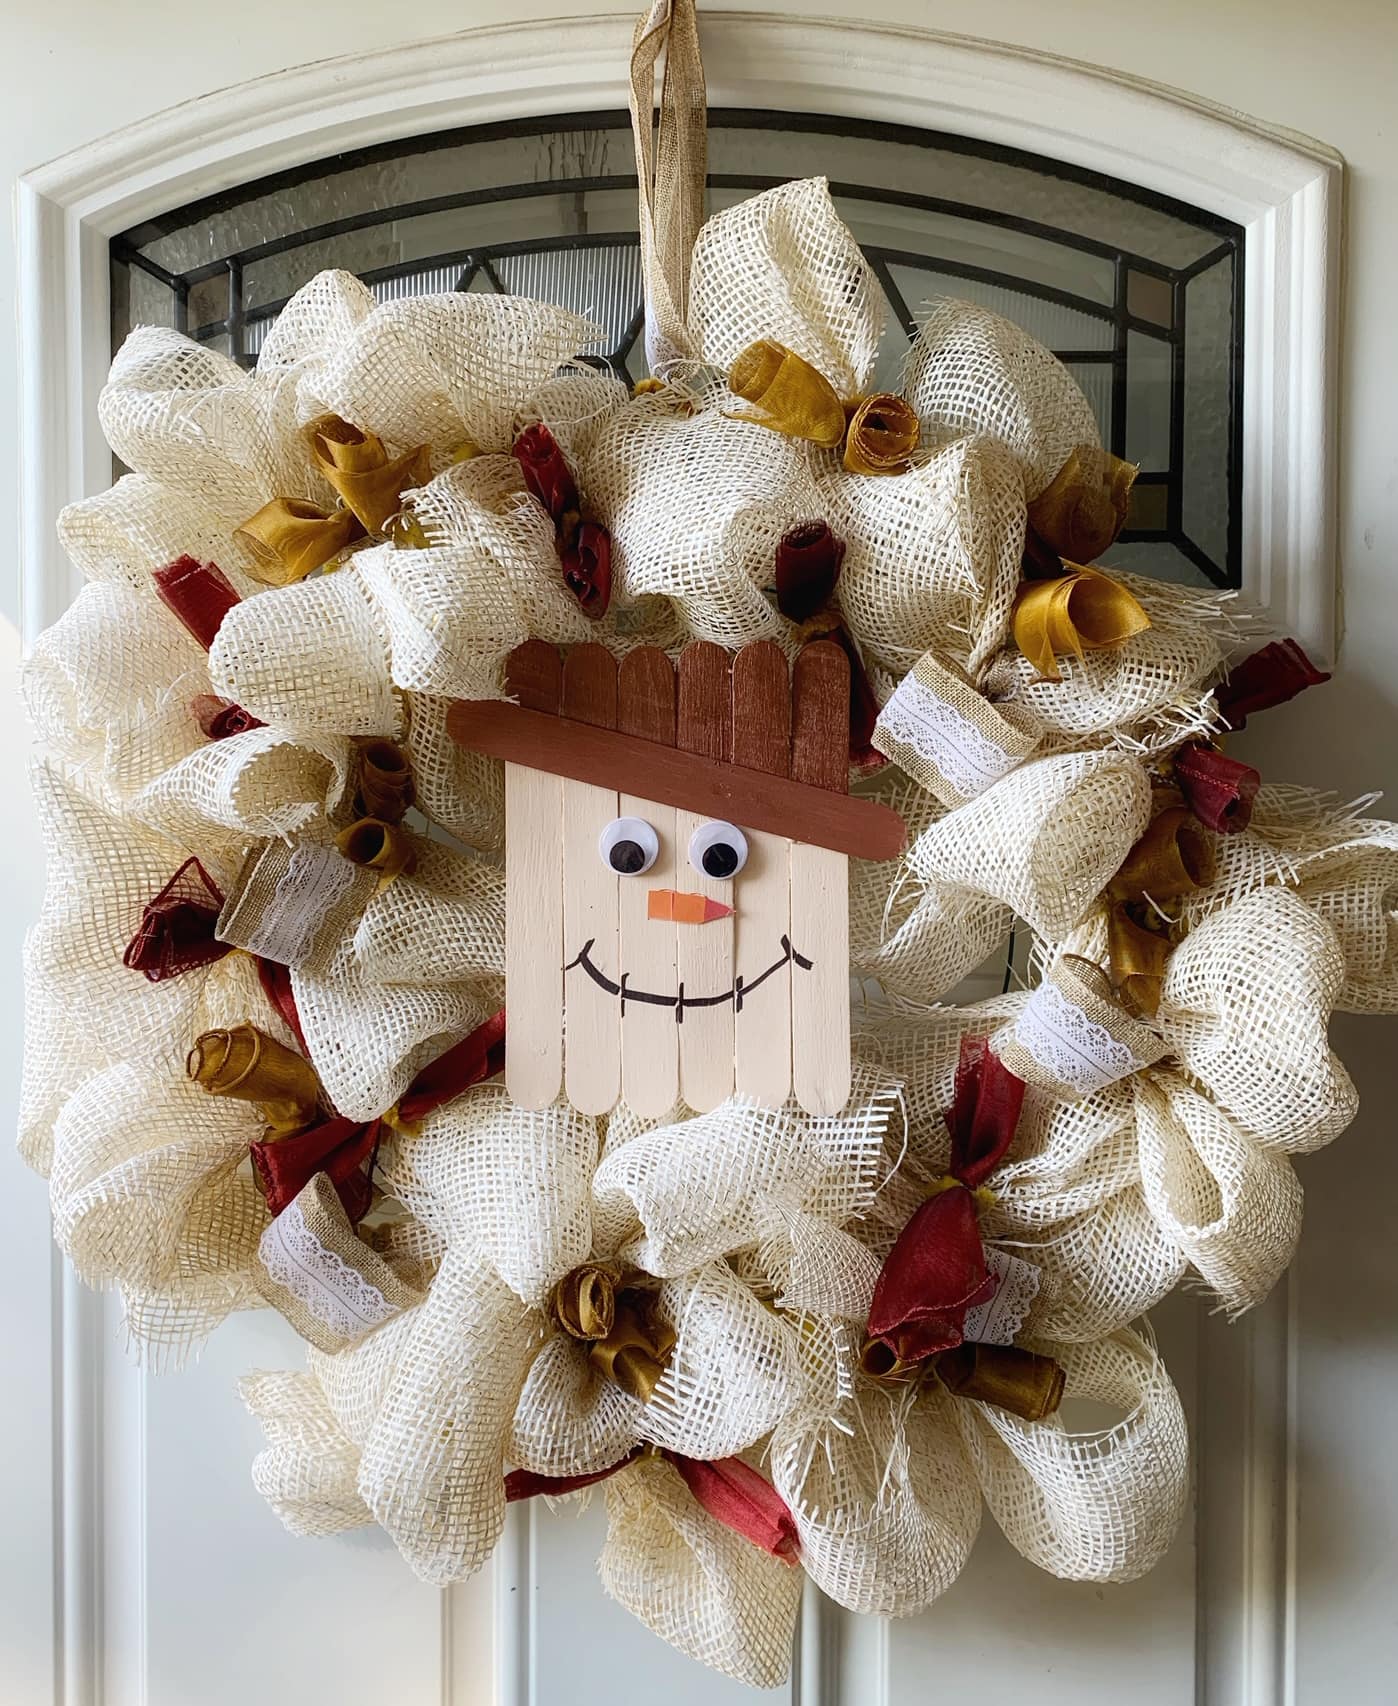
If you have looked at the cost of fall wreaths in decor stores, you know they are not cheap to buy. Here is a super easy one you can make for just a few dollars, then embellish however you want to. It is a great way to decorate the front door on a budget – without looking like you are on a budget!
Cost to make this Wreath – $5 plus any embellishments you use
What You Will Need to Make the Wreath –
- wire wreath frame
- 3 packs of 6-inch wide ribbon
- 1 pack of pipe cleaners
- whatever you might want to embellish your wreath
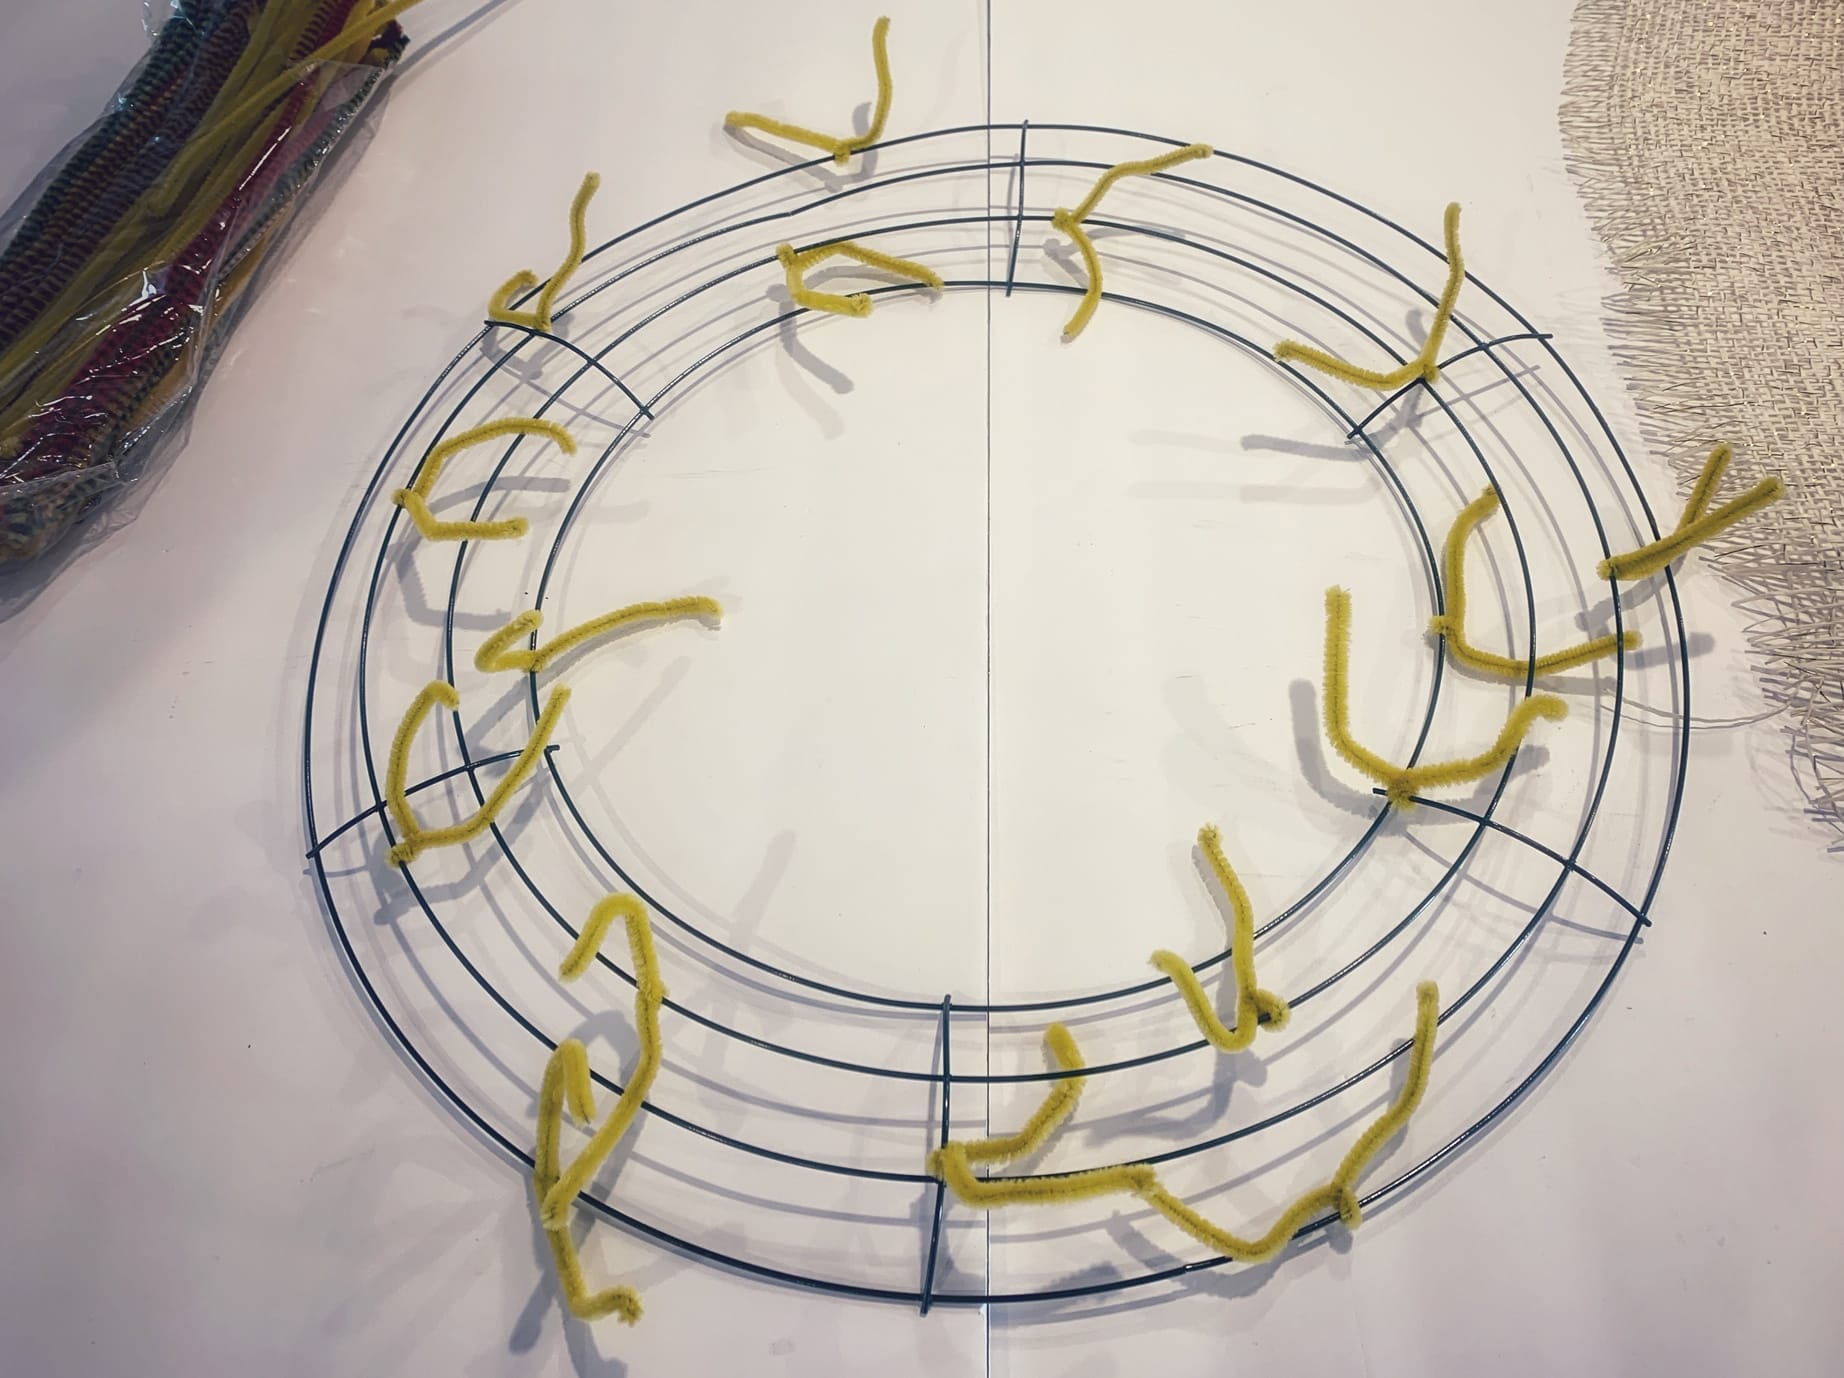
This wreath is pretty simple to make. You are going to cut some pipe cleaners in half and tie them in various places on your wire wreath.
Next, you will take your size inch size ribbon (you can buy it like this at the dollar store, or cut it to size if you have something larger) and fold it into approximately 3 inch size ribbon folds and tie it on. Do that all around your wreath until it is full (you can google Dollar Store fall wreath to watch videos on how to do this).
You can then add any embellishments you want (buy a Dollar Store fall sign to put in the middle, or we added one of the craft stick scarecrows we show you how to make above)!
Salt Shaker Night Lights
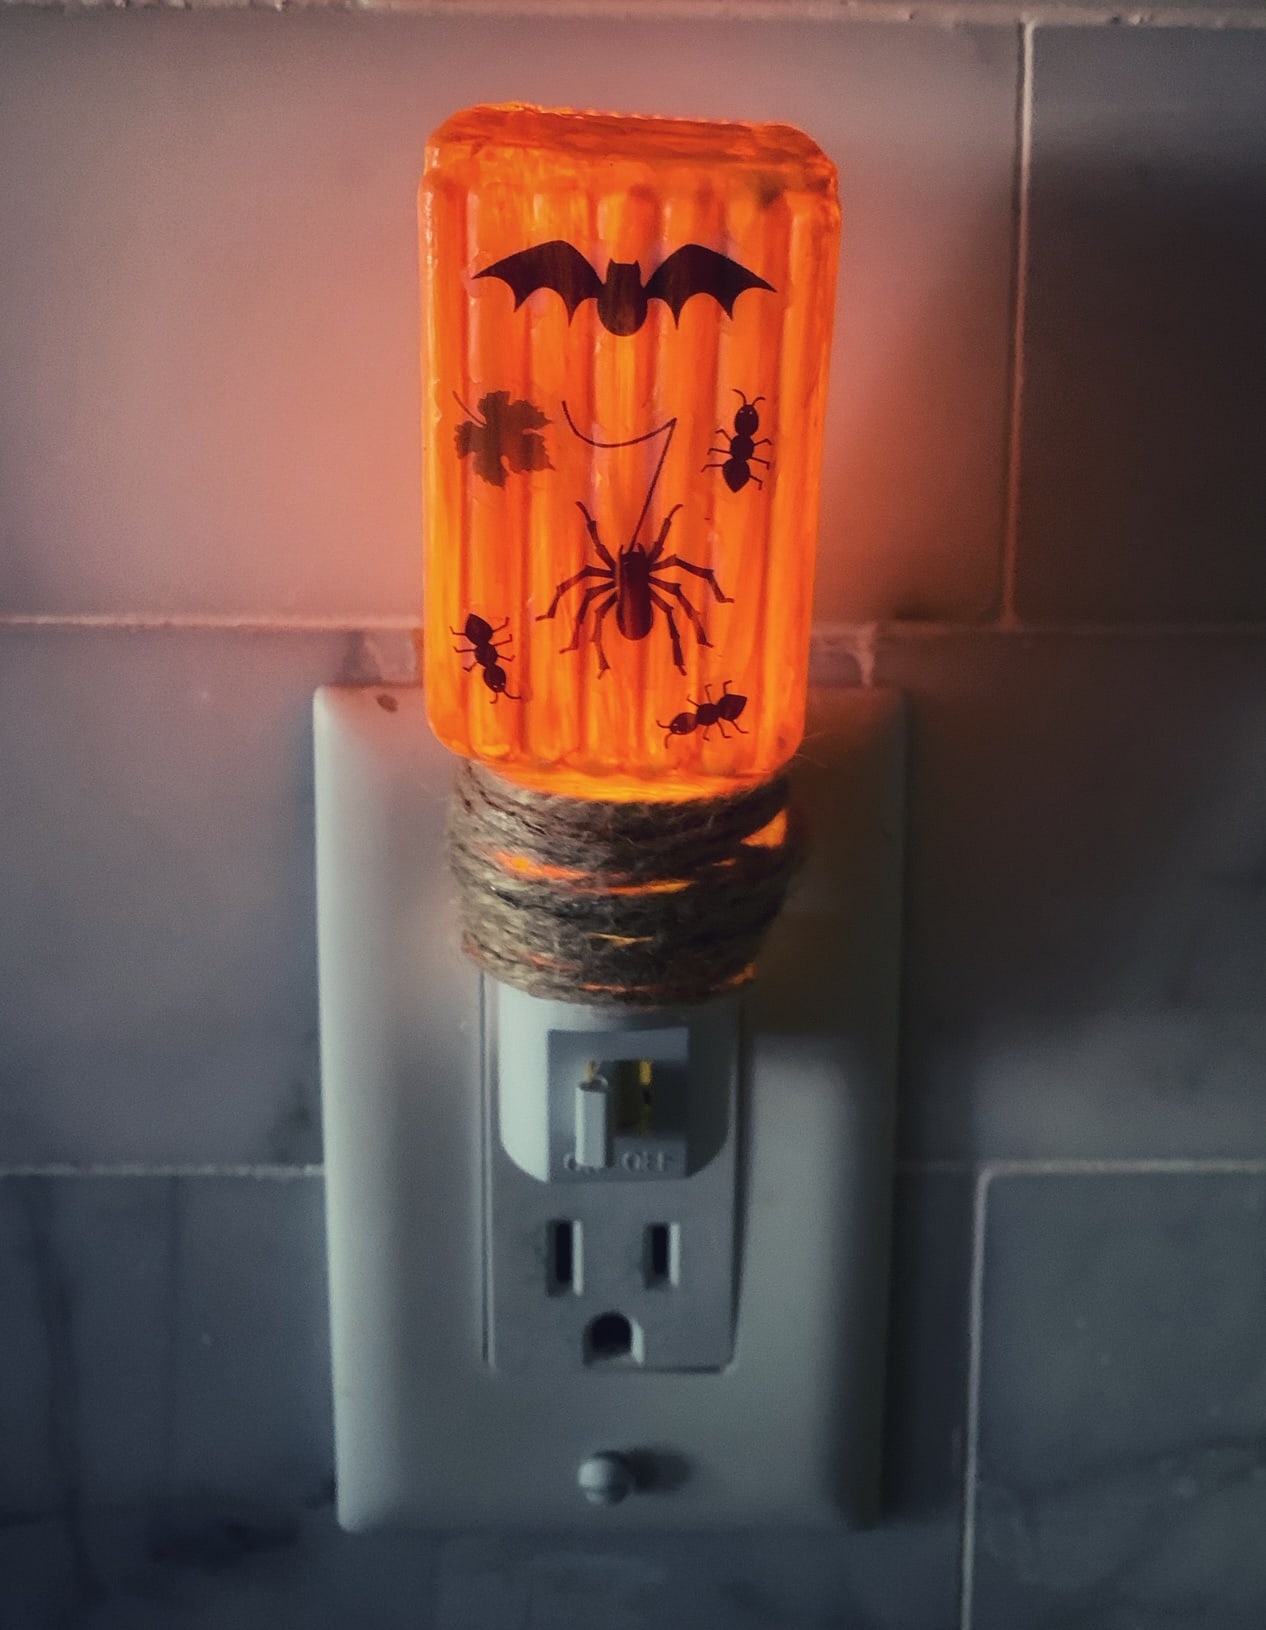
This project is a really simple way to add some fun lighting anywhere in your home for the fall time. You can use owls and fall leaves to make it more family-friendly or add some creepy crawlers as we did above to make it more Halloween-like.
Cost to make: $3 – $5 per night light, depending on what you use.
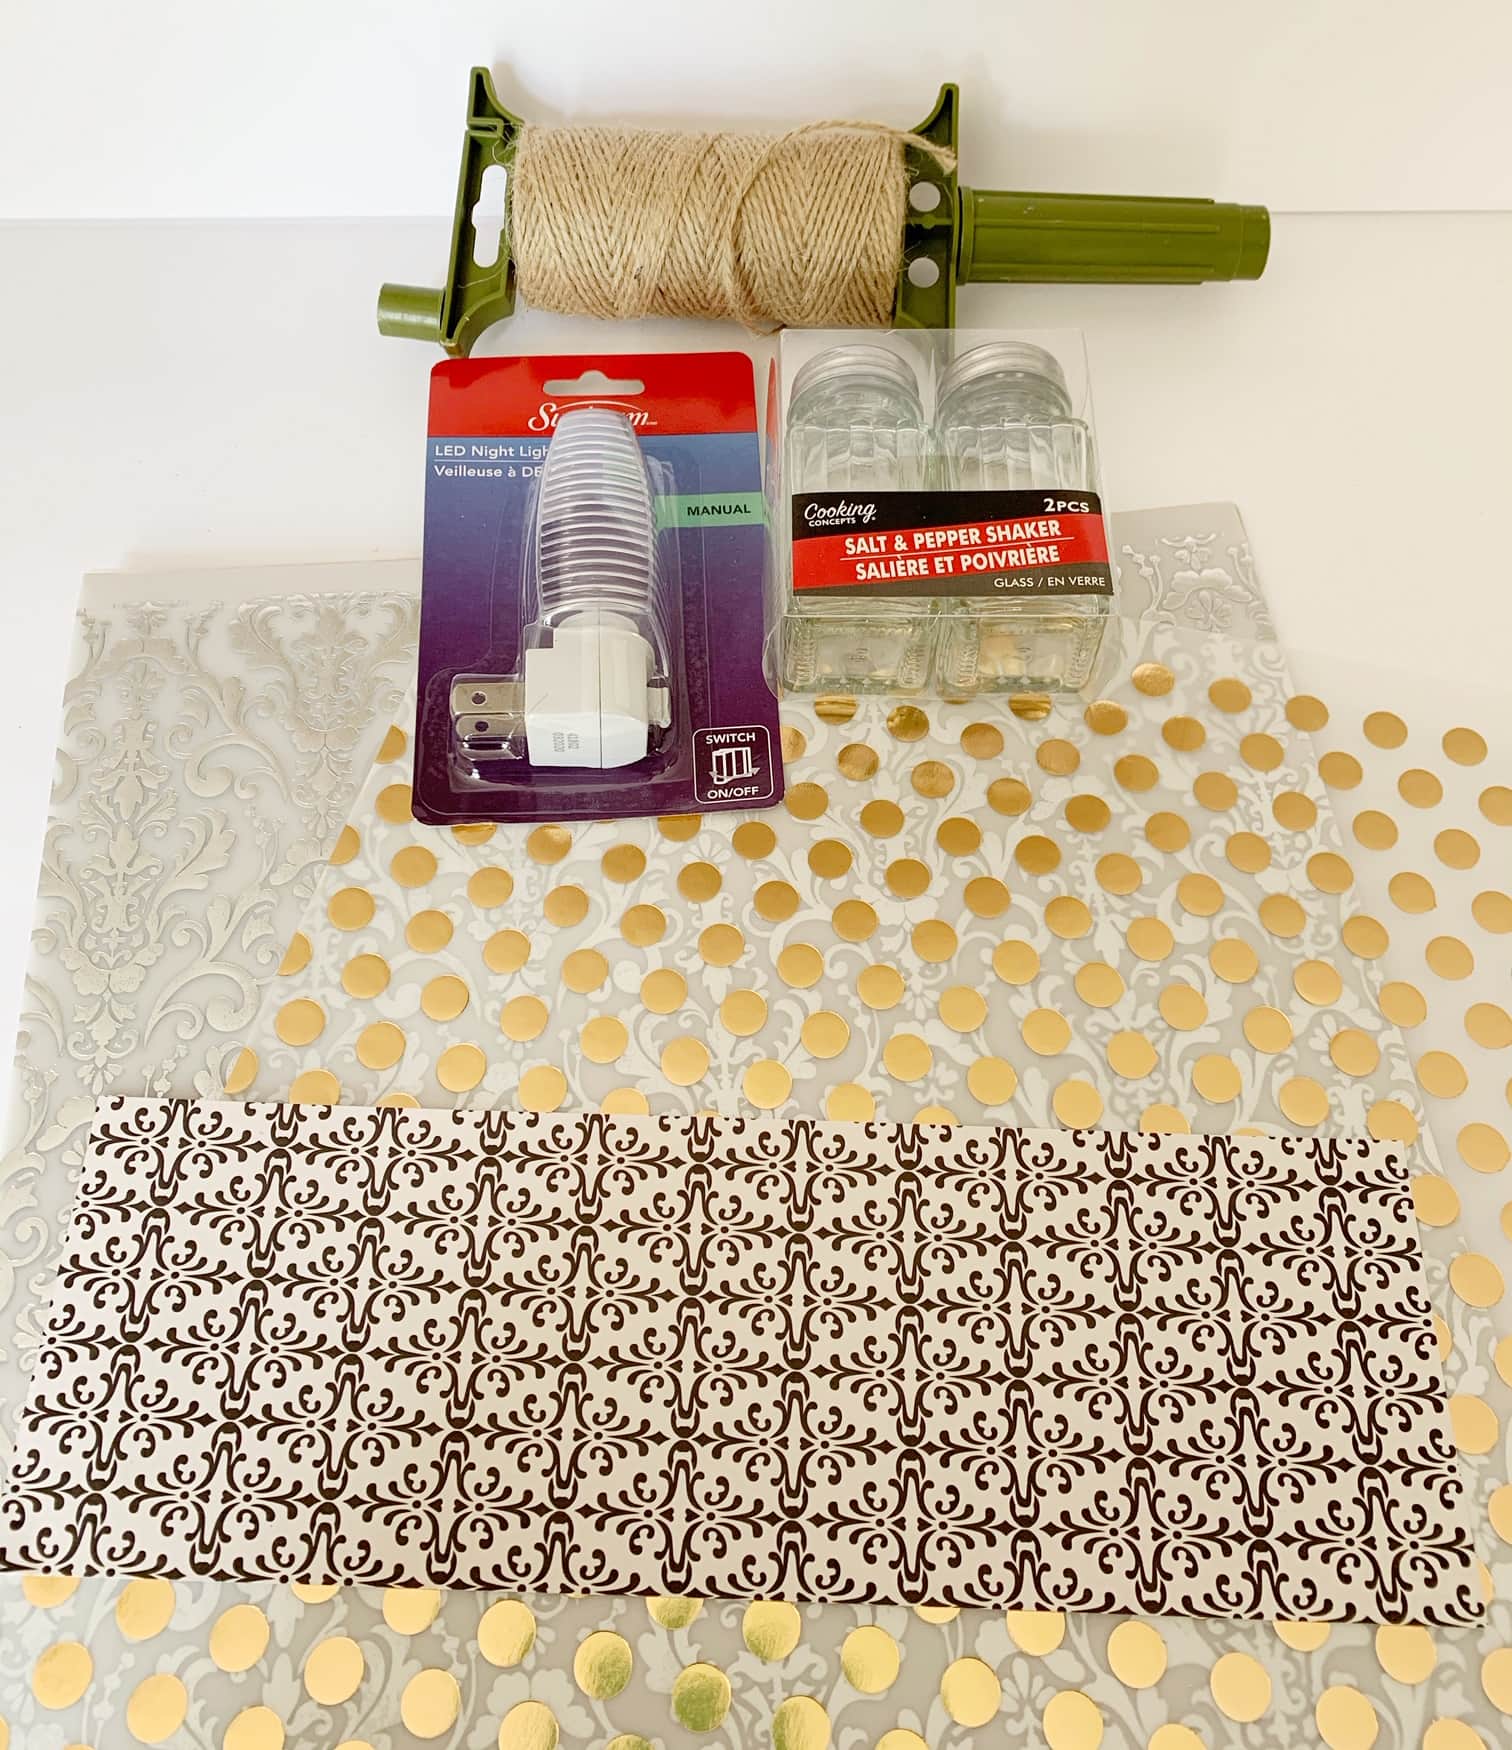
To Put Together Your Splatter Pumpkins You Will Need:
- Night Light from Dollar Store
- Salt & Pepper Set from Dollar Store
- Mod Podge
- Paint, stickers, or Paper To Mod Podge onto lights
- Twine (Optional)
- Hot Glue
For this project start by painting taking the lid off the salt and pepper shaker, and removing the plastic casing from the nightlight (leaving only the small light on the plug-in base).
Next paint the salt shaker your color of choice (we painted ours orange with an acrylic paint, and used two coats). Let it dry completely.
Once dried, we mod podged on some small stickers we had for Halloween. You could also use paper cutouts if you prefer. Let Mod Podge dry completely. We then used hot glue to attach some twine to the base of our salt shaker (optional) and then glued the base of the night light plug into the salt shaker (placed over light upside down).
It is not ready to illuminate your room at night with whatever design you choose to make!

More Articles You Might Like –

You might also be interested in these DIY Christmas Decorations you can make from dollar store items too!
More articles you might be interested in:
Black Cat Halloween Decorations – Simple DIY Project for Wooden Halloween Cats!
