
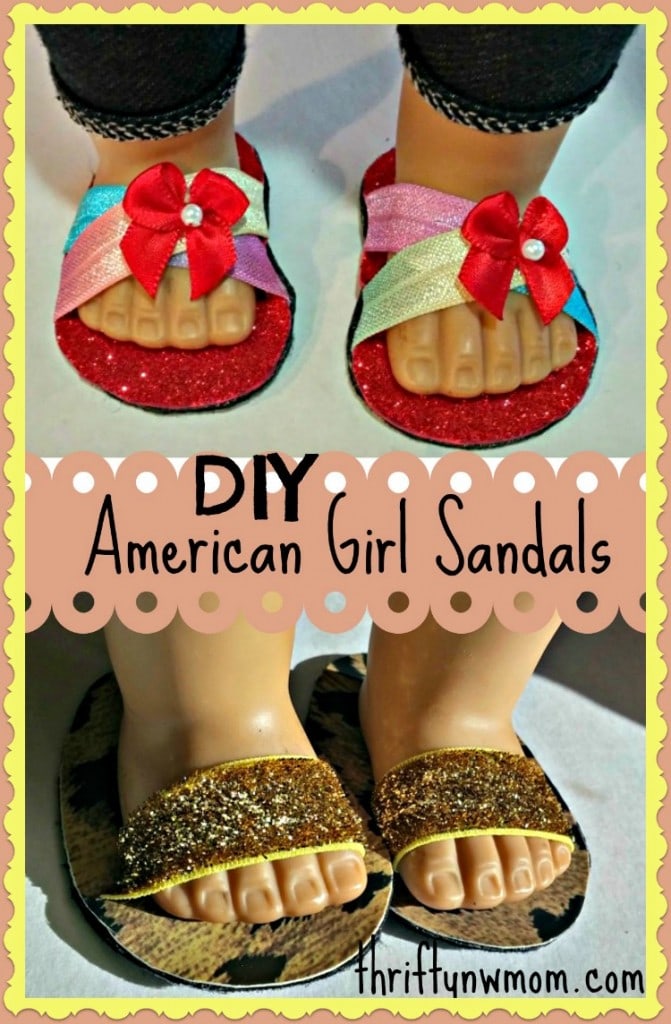
How To Make American Girl Doll Shoes / Sandals (No Sewing Required)!
This post may contain affiliate links and I may be compensated for this post. Please read our disclosure policy here.
My girls love to play with their dolls. They both have 18 inch dolls, and clothing and accessories for the dolls can really add up. We had put together this American Girl Doll Closet with items from the Dollar Store for the girls, and now we were needing some new items to add to the closet.
They only had a couple of pairs of shoes, so we wanted to make some of those. I needed some ideas that I could do with the kids. I wanted to make shoes that a) were frugal b) were simple enough for the kids to help design and make (no sewing involved) and c) were durable enough that they would hold up when the kids played with them.
After some trial and error, we came up with these simple designs that require no sewing, and use affordable materials, that we will show you how to make below:
- Sandals (two styles) – These ones are the easiest to make, and we will show you in this post.
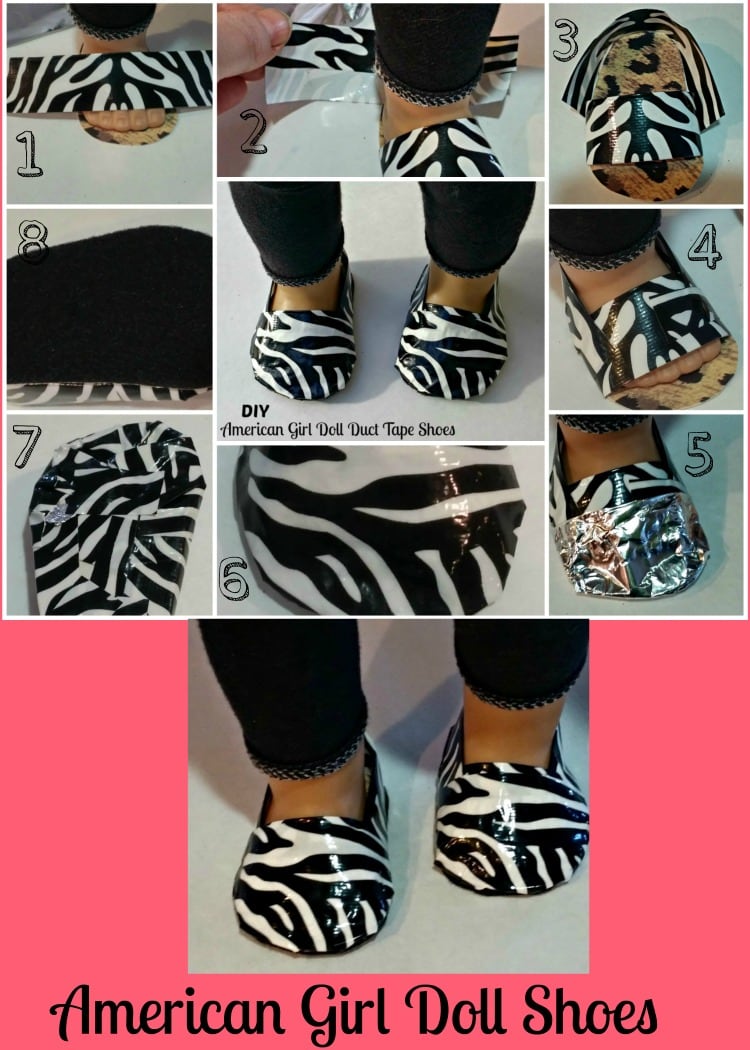
- Duct Tape Shoes – These are the most popular with my kids (and so easy to make lots of shoes on a budget)!
- Felt boots that only require some simple materials and a hot glue gun – these are the hardest to make, and require more adult supervision with glue gun, but my kids loved them for their dolls. Stay tuned for a post on how to do these.
You will see from the pictures below, that they have a DIY look to them, but my kids not only loved making them, they are now some of their favorite shoes. And, when you average out the cost of supplies you can make some of these for around $1 per pair!
It does require adult help, because of the hot glue gun, but you can let the kids do the cutting and designing, and then just help them assemble the shoes with the hot glue gun.
Download a FREE American Girl Shoes Pattern here.
This is the pattern we used for the Duct Tape shoes we mention above. For the Sandals you will want to add about an extra centimeter all the way around if your make the first design shown below (so you have room to poke the ribbon through). For the second one pattern, this size should work fine.
Alternatively, you could trace the shape of a pair of shoes you already own and make your own patterns.
The sandals are SUPER simple.
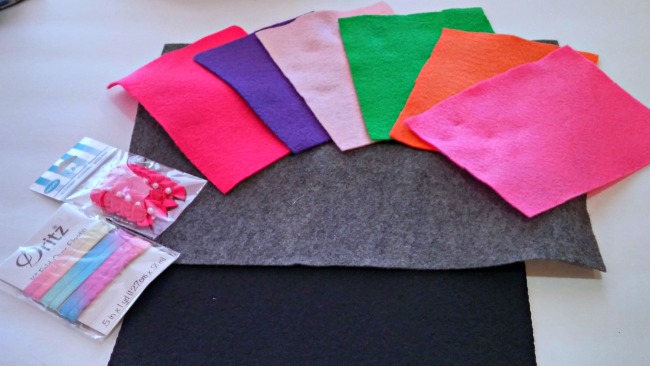
To start off with I found these sheets that are felt on one side and sticky on the other. I got mine at JoAnnes for $1 per sheet. It is about as firm as cardboard, so made a great sole for the shoes. One sheet easily yielded 12 pairs of soles for us, so its extremely economical to use.
General Materials you will need to make your own American Girl Doll Shoes:
Hot Glue Gun and Glue Sticks
Felt sheets (we found ours for $1 for the sticky ones and $0.50 for regular felt sheets). We used the sticky sheets for soles, and the regular sheets to decorate the top of sandals.
Elastic ribbon – we found ours at the fabric store. Pricing ran around $2.99 + a yard if you bought it in the spool section. We found some on clearance for $1 a yard too. We were able to make around 4 sandals with the criss cross tops out of 1 yard, or 8 pairs of the single strip sandals.
(You could use regular ribbon, but we found that the shoes were much easier for the kids to play with when we used elastic ribbon. They stayed on the dolls, whereas we found that the dolls easily slipped out of the shoes if we used regular ribbon).
Foam Sheets – These are another great option to use for the sandal style shoes. You can get a package of them at the Dollar store, so they will go along way for not much money! If you buy the thick foam sheets, you can use those for the soles of the sandals too, as another option.
Decorative bows, buttons, jewels etc. These are just extra pieces that the kids can use on the shoes to add more bling!
American Girl Doll Shoe Pattern – Print it for FREE here, or trace a pair of shoes you already have.
How to make your own American Girl Doll Shoes (18″ doll shoes):
This first design is very easy to make, and a great option to let the kids get involved. To make these you will want to print out the Sandal Pattern #1. These sandals are a bit larger then other shoes, so that you have room to add the ribbon.
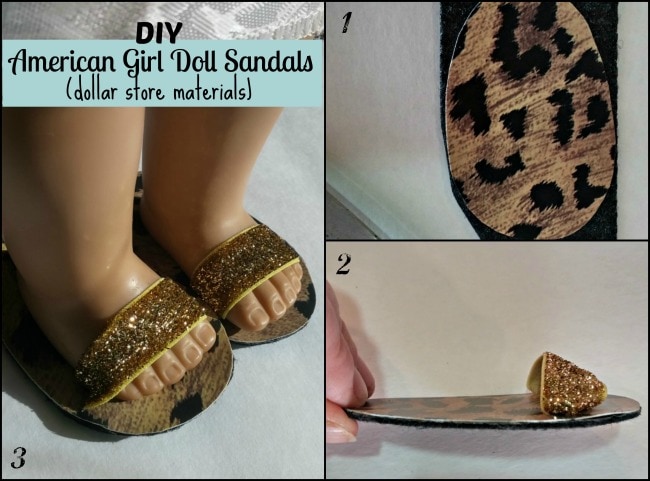
Cut out the patter in the material you want to use for your sole (both right and left) and the material you want to use for the top of your sandal (both right and left shoes).
In the example above I used the sticky felt for the sole, and we used a $1 placemat we found at the Dollar Store in a leopard print pattern. This is a good option for younger kids, as the plastic placemat materials was easy for them to cut. Simply trace the pattern for both right and left foot shoes on the back of the placemat (or you could use felt, or foam too). Trace the right and left foot pattern onto the paper side of the sticky felt (or foam if you prefer to use that for the sole).
1) Cut out all four pieces.
2) Put the dolls foot on the top piece of your material (in our example that is the leopard print placemat) once its cut out. With a marker, mark a dot where you want the ribbon to go across the top of the sandal (on both sides).
3) Using a pair of scissors or knife, carefully cut a small slit where the dot is on both sides.
4) Cut a piece of your elastic ribbon so that it is long enough to fit across your sandals, plus add in an extra centimeter on each side.
5) Thread the elastic ribbon through each of the wholes you cut on each side of the sandal, so that the strap is created on top of the sandal.
6) Hot glue the ribbon to the bottom of the place mat (do this step before attaching this piece to the piece you cut out for the sole of the shoe),
7) Once the hot glue has dried, remove the paper and attach the top part of your sandal to the sole of your sandal (you will have to hot glue if you are using foam rather then the sticky felt pieces.
(Note – even if you are using the sticky felt, you will still want to use a small dab of hot glue where you have added the ribbon, just for added strength when the kids start to play with them).
8) Lastly, trim around the edges if your sole and top of the shoe did not align perfectly. This is also where you can add some gems, or bows etc. to your sandal with a dab of hot glue.
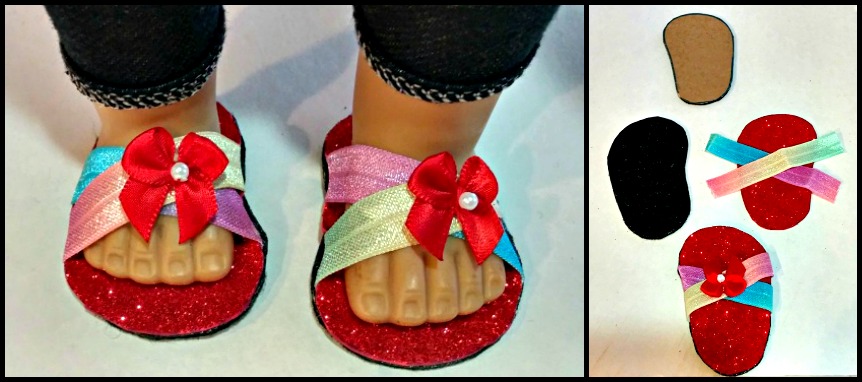
Sandals #2 with Cross Over Top (these were the sandals my kids liked best).
Follow the same basic steps detailed above. These shoes are smaller, as you will be folding the ribbon over the side, so they will more closely resemble store bought shoes.
Skip steps #3-#5 above, and instead cut out your elastic ribbon so that it is long enough to make an X over where you want the doll foot to slip in, and leave a few centimeters on each end to wrap around the bottom of the shoe.
With a dab of glue attach the elastic ribbon to the bottom of the top piece of your shoe. The X can lay flat on the shoe, as that provides a nice secure shoe for the doll to fit in.
Follow steps #7-#8 above (and do add a dab of hot glue where the ribbons are when attaching the top to the bottom of the shoes, even if using the sticky felt. This will keep it from pulling apart when the kids start to play with the shoes more).

I love these little sandals and my girl is loving making them. Did you get to the felt boot tutorial? I’d love the link if you did.
Thank you!
Hi Terra, I am so sorry but it has been a number of years, so I cannot recall what happened to that tutorial. I believe we used the same base, and they cut a piece of felt we sowed up the front and glued to the shoe base. So glad she is having fun with the shoes!!