
Kids Rooms – How To Organize Your Kids Bedroom & DIY House Bed Under $200!
This post may contain affiliate links and I may be compensated for this post. Please read our disclosure policy here.
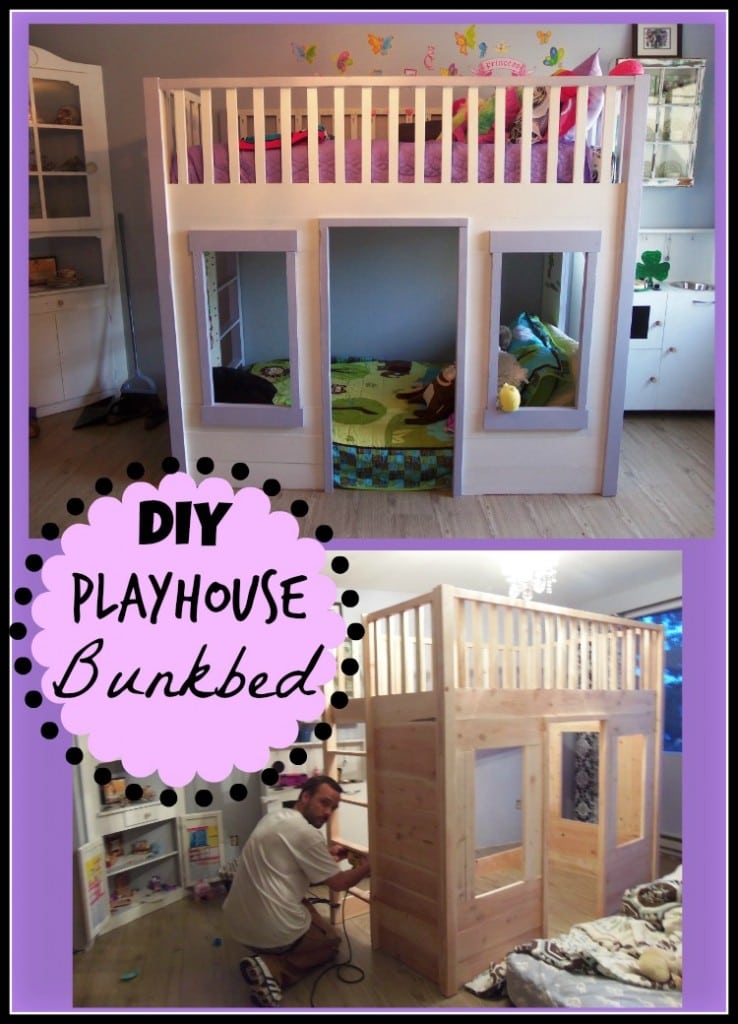
Playhouse Bed Under $200
Its been awhile since we shared this one. In case any of you are looking for some inspiration to do some Spring Cleaning in your kids rooms, here is how we built a playhouse bed for our two kids who shared a room at that time on a budget! Plus, be sure to check out this feature on organizing kids rooms, where Jen makes an adorable art corner for her kids room.
Being frugal, we have not spent a whole lot of money on stuff for our kids. I try to find creative ways to get their toys, books and clothing for cheap or free. Still – somehow they have acquired a ton of stuff. My two girls share a room, so the “stuff” problem was twice as bad. Something had to be done. So, we spent a weekend (and then some), working on their room. The highlight of the project was the bed my husband built them for around $170 (compare to this loft bed that Pottery Barn was selling for over $1200!)
Make sure to check out Jen’s ideas for reorganizing kids’ rooms too, with a fun art corner idea.
Here is what we did for our Bedroom Organization project:
#1) Gut & Organize – we spent half a day and a two Goodwill runs just to gut their room. Many of the items had been given to them, and over time *stuff* took over their room.
#2) Build Bed – my husband did most of this in our backyard, and then assembled it in their room. He got big props from me and the girls on this project, we loved his work!
#3) Re-purposed Furniture We Already Had On Hand – We have not spent much money on buying furniture. We have built most of it, or repurposed hand me downs into pieces we could use for their room.

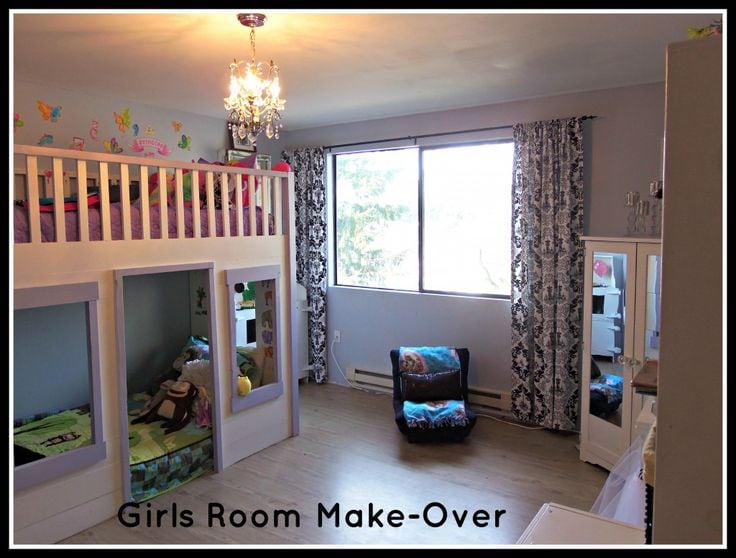
Wild room equals wild kids. Or is it, wild kids create wild room? I don’t know – but either way things were getting out of hand in their bedroom. We had recently repainted and upgraded them to a bigger girls room (from the nursery stage) – so we had most of the items we needed in the room – but they needed some help.
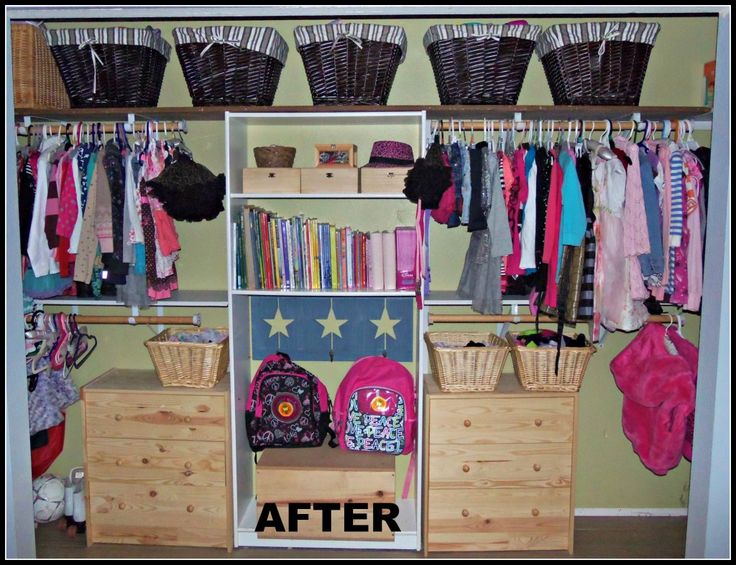
The closet in their room is huge, but we wanted them each to have their own sides. We did this by removing the closet doors, and adding a stock bookshelf from our local Home Depot to the middle of the closet. My husband then added a shelf and second bar on each side of the closet. I searched high and low for affordable matching dressers. I found these two at Ikea for $34.99 each! We have plans to add mirrors and silver paint to these down the road to glam them up some, so stay tuned for that project. A few baskets from Michaels and lots of gutting – and their closet is not such a scary place any longer.
The Playhouse Bed: the biggest project in the room!
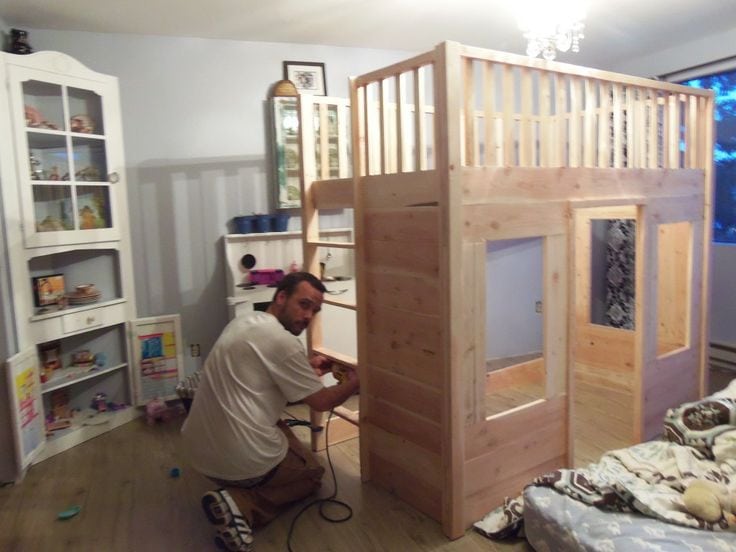
Previously we had a antique rod iron full sized bed in the room that the girls shared. While I love that bed (it was mine growing up), we felt like it was time to give the girls their own space. Since they share a room, we thought the best way to do that was to create a room within a room!
My husband built this play house style bed for around $170 for the kids (he used blue prints we found on Ana-Whites site, and modified those to what we wanted). We used common wood (lower grade wood) from Home Depot – and our wood total came to $110. Paint and screws were an additional $60 (he had all of the tools already). We still plan to add planter boxes and curtains to the house (I have material to match their curtains), but we just have not quite got that far yet. If we were to move and the girls had their own rooms, the bottom level can be converted to a playhouse just by removing the mattress and putting the kitchen inside.
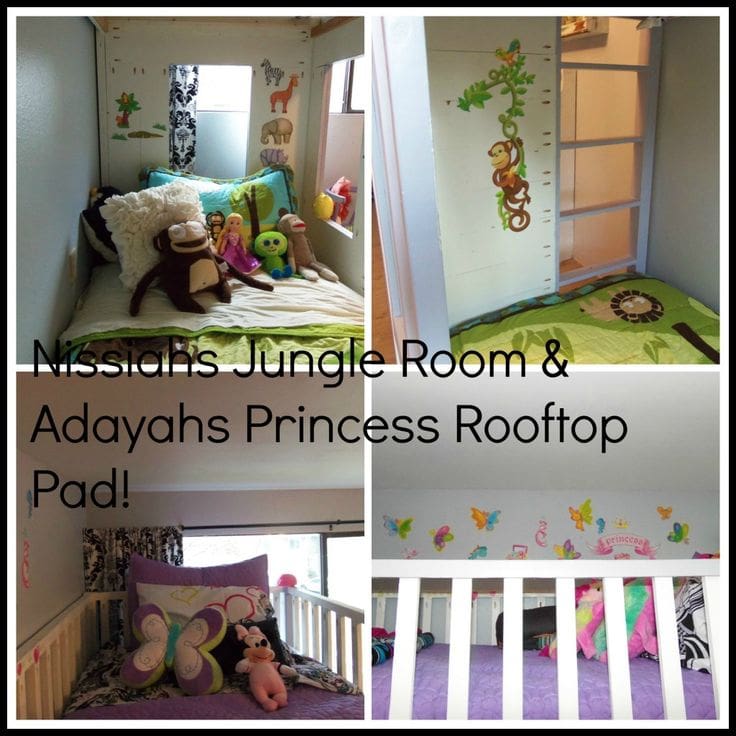
This was the perfect opportunity to let each of our girls express their own personality. My youngest, Nissiah, loves monkeys. She found the jungle themed comforter and pillows at Target, and we went to our local Dollar Store and purchased $2 worth of wall decals for her to decorate the inside of her pad with.
Adayah, our middle child, is a princess through and through. She went for more of a glam look in her roof top pad (we also used Dollar store decals for her to decorate the wall behind her bed). We plan to put up a track so that she can pull a sheer curtain around her pad if she really wants her own space.
Re-purposing Furniture
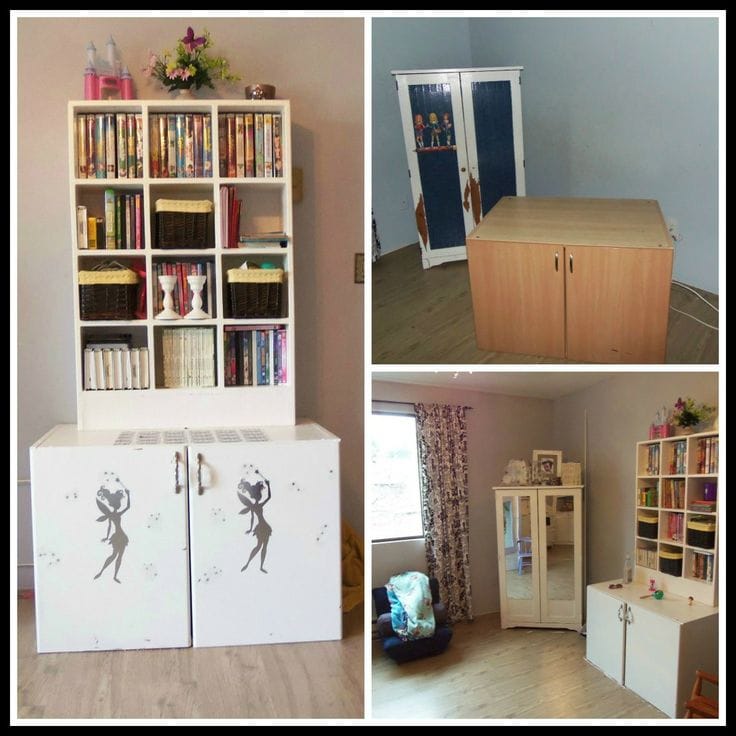
One of the things the girls needed most was more/better storage. We had an old kitchen cabinet (over the fridge) we were not using and it was deep enough to hold two huge toy boxes inside (the tubs you can find at Target). Only problem is that it was ugly. The solution: paint it white, add $1 mirrored Tinkerbell decals from the Dollar store to the doors, some new knobs and put a bookshelf on top (their grandpa built them the bookshelf). We then store all of their movies and some books in the shelves, and toys can be easily tossed in a tub when the girls are done playing.
We also had someone give us an old computer armoire that nobody wanted anymore. My girls needed some place to store their dress up clothes, so I thought I would make them a wardrobe closet fit for two princesses.
It was originallly brown. Initially I had done a quick remake with some duck tape (pictured above). Umm….that did not work out as well as I had hoped. I started by removing the shelves inside for the computer. A fresh coat of white paint (left over from bed), 10 $1 mirrors from the dollar store, some mirror adhesive from Home Depot ($4.99), and a free glass doorknob (took it apart and screwed them in for door nobs) and $15 + tax later and we had a wardrobe closet that I just love. Stay tuned for a more detailed post on that later.
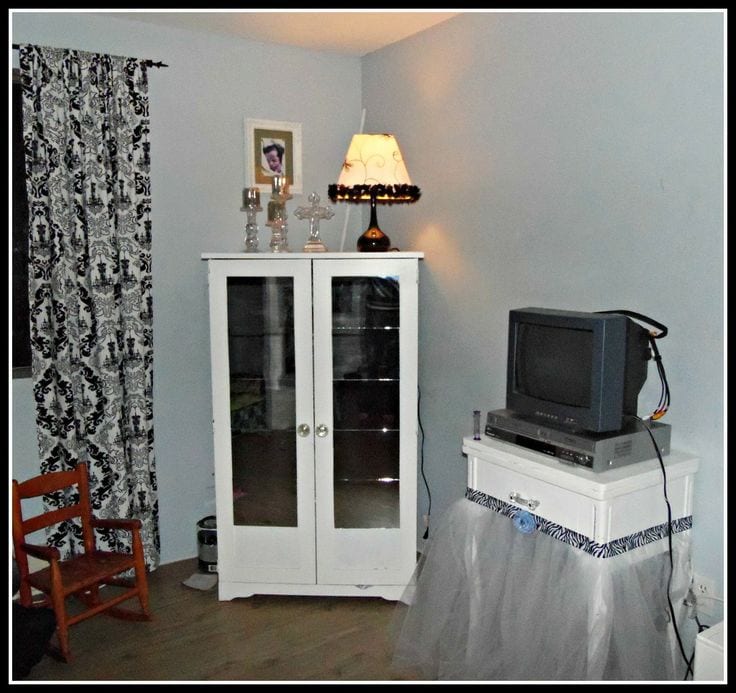
Candle sticks were $.50 at garage sales last summer. We had a cheap lampshade, so I dressed it up with a $9 black base from Target, and some girly fringe from Joannes. I got this look for about $12, compared to the $39.99 lamps we were finding.
I had an old sewing table that I got for $5 at a garage sale (yes – it still has the sewing machine in it!). I added $10 in tule, and a zebra ribbon aroun dit to give it the illusion of being wrapped in a ballet tutu. My girls love it.

Combining design with function is critical when you have two kids sharing one space. We used the bottom of a corner hutch that we got out of an old house for free (lots of painting and changing out of hardware to get it to look like that), to create a place for the girls to play with their polly pocket toys. We cut scenes out of barbie boxes and magazines (like a fireplace and closet) to decorate the house, then added some dollar store furniture. Best part is that they can keep their polly pockets in these zip up cases in one of the baskets in the closet. When they are done playing they zip the dolls away, close the door, and the mess is hidden!
You can find other ideas on how to convert bookshelves or old dressers into doll houses here.

We also built this kitchen and window cabinet for the kids (well their grandpa built, and I decorated). You can take an old cupboard and create a similar effect for a kitchen. Best part is that it acts as more toy storage. They keep all their kitchen toys stored inside when they are done playing. We shut the doors on the mess, which is what mom loves about it!
The window box above was made from an old window we got for $5 at a yard sale. We built a box the same dimensions as the window, painted it, and added hinges on. Now they have the perfect place to store a special tea set too!
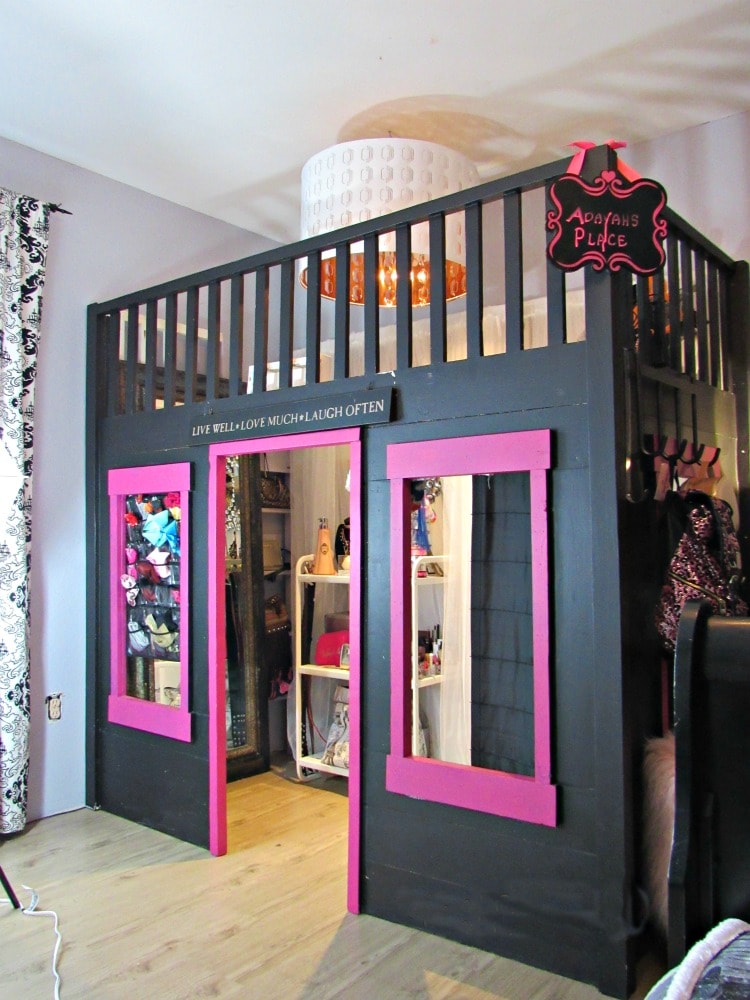
** Update – you can also see how we re-purposed this bed into a walk in closet for our daughter as she grew here.
More organizing posts you might like::
- How to Organize your Home – 5 Budget Friendly Tips
- More Organizing Kids Rooms – including a fun art corner in the room
- How to Make an American Girl Doll Closet using Dollar Store Items
- How to Organize your Garage on a Budget
- How to Organize your Master Bedroom & Make it more relaxing
- How to Organize your Pantry on a Budget
Make sure to check out our Home Organizing Board on Pinterest too!
Follow Jen & Sia | Thrifty NW Mom’s board Organize :: Home on Pinterest.
