
Reupholstering Chairs – Recovering Bar Stools & Recovering Chairs In 5 Easy Steps
This post may contain affiliate links and I may be compensated for this post. Please read our disclosure policy here.

Reupholstering Chairs – Dining Room Chairs & Bar Stools – So Easy!
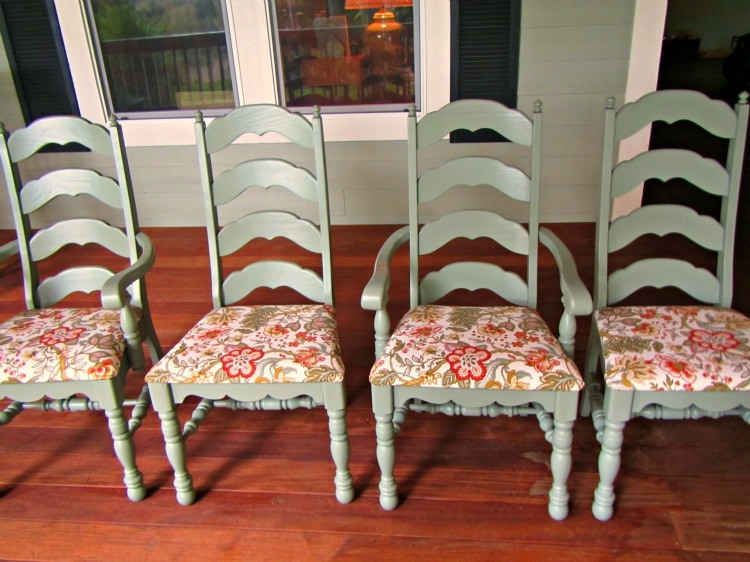
Reupholstering chairs and bar stools is so much easier than many people realize. It can be really affordable too. I love the frugality in re-purposing something you already own into something new, rather then replacing it. We have been recovering chairs and updating them for many years in my family. In all honesty, I do not think I have ever purchased a new set of chairs. We recently got the set of dining chairs above for $25. We used paint we had on hand, and found some fabric for around $10, so we had the entire set of new to us dining chairs done for under $40! That is much less then you will pay for one new chair.
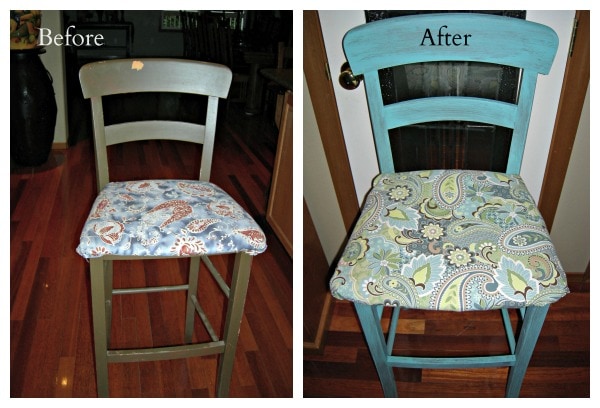
We also recently did that with a couple of bar stools that I purchased at Target about 12 years ago when I bought my first condo. These stools have been through many updates, but they all follow the same process. Your chairs may be a little different, but if you have the standard wood bar stools that seem to be floating around the past decade its so easy to give them a quick update.

Here are the supplies you will need for reupholstering chairs for the dining room or bar stools:
- Sandpaper
- Screwdriver
- Primer (optional – but results in a better finished product)
- Paint of choice and brush
- Fabric of choice
- Staple Gun and staples

Reupholster Dining Room Chairs!
Reupholster Dining Room Chairs – Before & After DIY Chair Redo!
Here are 5 easy steps to recover and update::
#1 – Remove Seat Cushion
Lay chair on its side, and look under the seat cushion. Often times chairs of this style are simply screwed onto the frame, and the seat portion of the bar stool can easily be removed by unscrewing it (be sure to set the screws aside some place safe, you will need them again when its time to reassemble).
I recommend using a hand held screwdriver for this (rather then a drill) to prevent stripping the screws.
#2 – Recover with New Material
You will want to take the seat cushion off and measure the top and add 4 inches all around to determine the amount of fabric you will need to recover each stool.
Lay your fabric out (with the top side facing down) and lay your seat cushion upside down in the center of your new fabric pieces. Start on one side and pull the fabric over the side and staple to the bottom (or backside) of the chair.
Once you have one side stapled on, go the the opposite side and pull the fabric taut (I think that is just a fancy way to say tight) and staple that side.
Repeat with the last two sides of the seat cushion, being sure to pull it taut so that it has a nice smooth covering once your chair cushion is turned right side up.
You can then go around and trim the edges of any excess fabric.
(***Note – you will want to pay attention to the placement of the screw holes. If your seat style allows, you will want to staple it on the bottom side of the chair BEFORE the screw holes, so that they are left exposed. Or, if you need the extra space to staple and have to cover the screw holes in this process, you will want to mark them with a sharpie marker, as you will need to cut holes in them to reapply the seat cover with the screws afterwards.)
#3 – Prep the Bar Stool Frame
Now, if you have a wood frame, you might just want to recover the seat cushion and leave it at that. I like to paint everything, so I cannot resist the opportunity to freshen them up with paint as well. If you want the more dramatic change that paint will offer your bar stool, you will want to start with a light sanding (many of these stools have a sealant coat on top, and you will want to lightly sand that off so the paint will adhere and not peel).
Once they are lightly sanded, use a tack clothe or damp rag to remove any dust (this is important, or you will end up with grainy looking paint).
# 4 – Paint (and Prime If Needed)
Once you have applied a light sanding, and then removed the dust you can start with the paint process. You will want to put a drop cloth, or old sheet under the stool to prevent drips on the floor.
The best option is to start with a primer coat, to give your paint job the best opportunity to last long. You can skip this step if you choose, but its a best practice to start here.
You can use either spray paint or standard quart of latex paint. Get creative with this step, and use your favorite antiquing or distressing finish too (they sell some really easy ones in the Martha Stewart Collection at Home Depot). You can always paint over it if you don’t like it.
In the photo above we used a distressing technique where we left the original bottom coat on (skipped priming) and used a dry brush to add brush strokes after we applied a coat of paint).
Your imagination is the limit here. The stools above have been a blonde wood, red with an animal print, the brown in the before photo, and now the shabby chic blue look. Who knows what we will do in a few more years!
#5 – Put the Chair Back Together & Use!
Let your chairs dry overnight for best result, and then screw the seat cover back on (just like you took it off originally), and wait for the compliments when company comes over to visit next!

These turned out great Sia! I have some dining chairs I want to recover, I may just tackle the project.