Farmhouse DIY Wooden Tree Advent Calendar
This post may contain affiliate links and I may be compensated for this post. Please read our disclosure policy here.

Farmhouse DIY Wooden Tree Advent Calendar
Looking for ideas on a Farmhouse Advent Calendar to decorate your home. How about making this DIY Wooden Tree Advent Calendar for under $10 (maybe under $5 depending on what tools and supplies you already have)! I love this farmhouse decor style advent Christmas Tree Calendar, and I show you how to make it for a fraction of the cost it would be to buy it here. This project is so affordable, but you would never know what you spent once you see the end result – it is so cute!

Farmhouse Advent Calendar – DIY Wooden Tree Advent Calendar
This year, I wanted to do a sort of farmhouse decor style Christmas, but I did not want to have to buy everything new (aka small budget for this), so instead I repurposed my existing decor, and made a few new items. One of the pieces I made this year was this Wood Tree Advent Calendar, and since I made it from items I already had on hand, it was free to me. It uses really affordable materials, so even if you do not have them all on hand you can still make one for under $10 (vs. the $20 price tag I found in the stores). You can also do a Dollar Tree Advent Calendar version, but using the smaller sized paint sticks they sell there (it will just be a smaller tree).

My Inspiration Tree for my DIY Advent Calendar
I was recently shopping in Fred Meyer and came across this wood advent calendar tree in their Christmas decor section, for $20. I immediately thought, I can make that for just a few dollars, with many items I already have at home. So I headed home to do just that! While this was my inspiration piece, I planned to modify it slightly, based on the fact that I wanted to use what I already had in my craft room to make this. You could mimic it exactly, or if you already have items at home, use what you have.
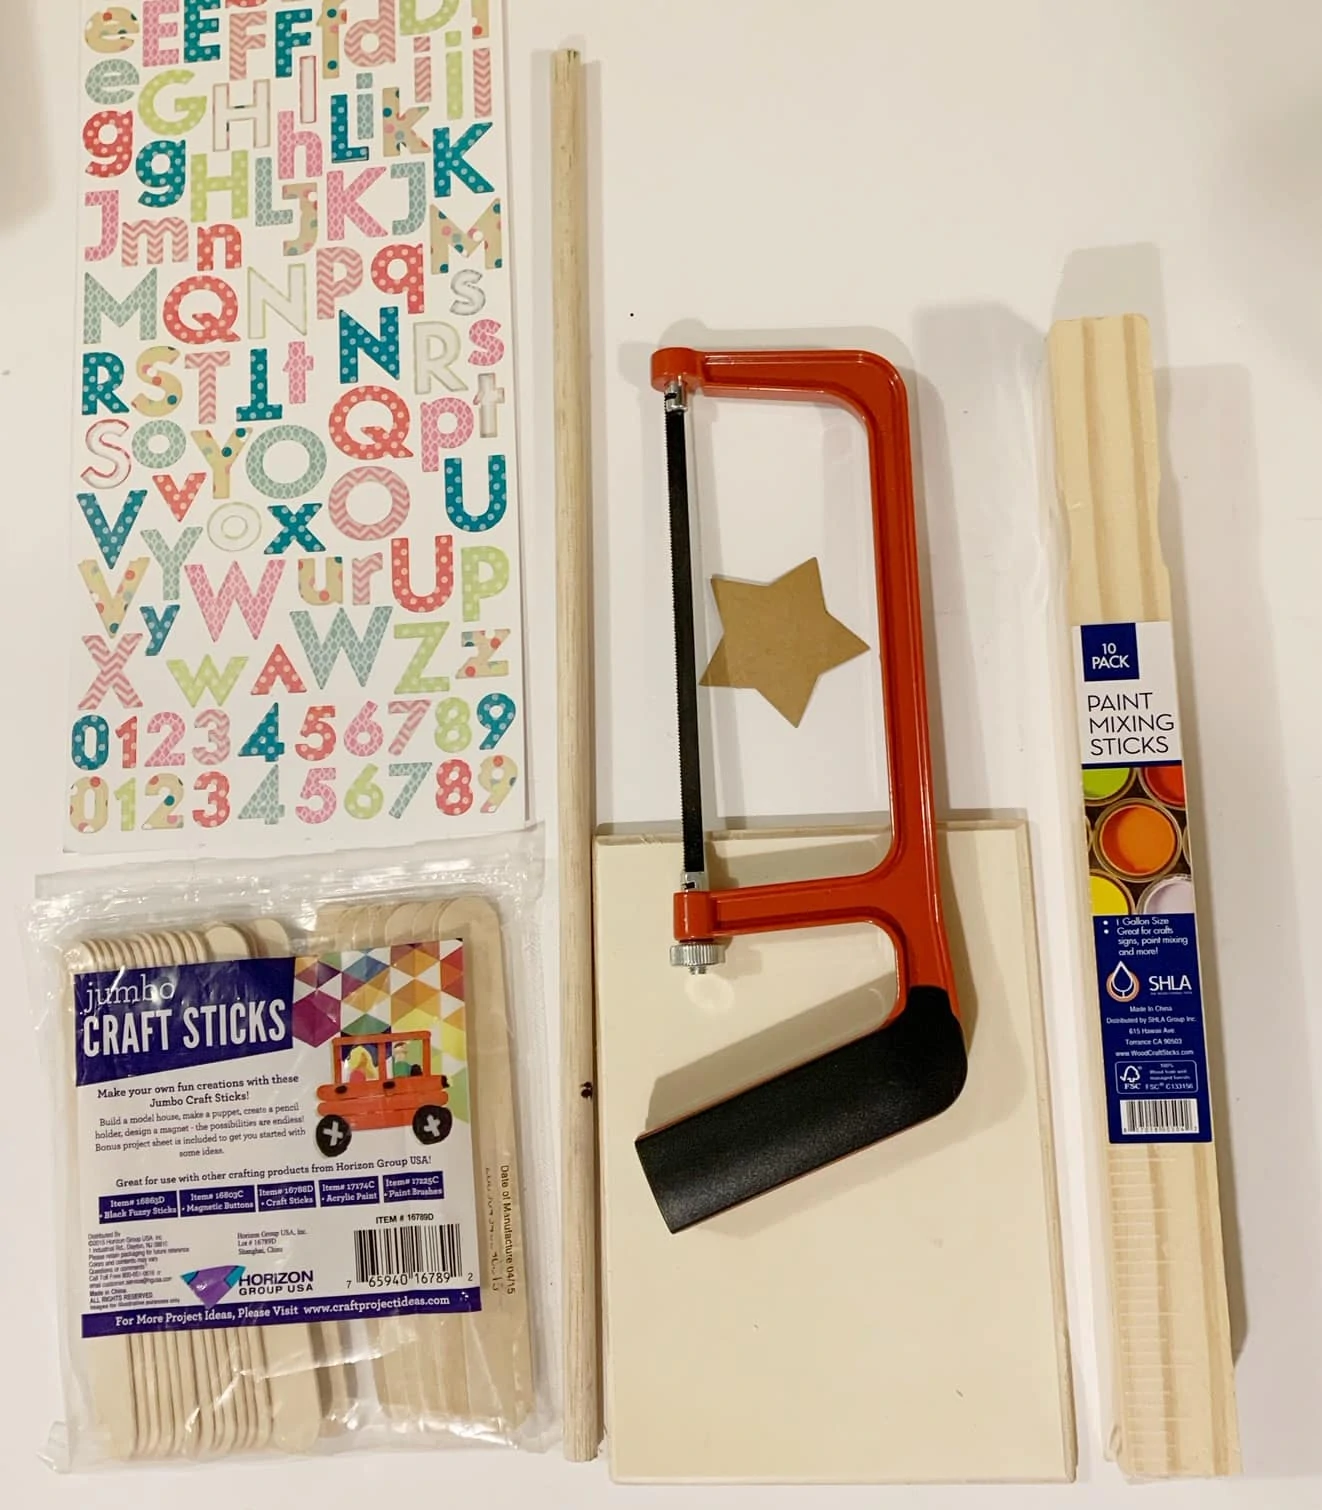
Here is a suggested list of items you will need to make this wood advent tree. There are a few things you can switch up, based on the look you are going for, or what you have on hand, so we note those below too.
Items Needed to Make This Wood Tree Advent Calendar:
- Wood Dowel $1.42 cents at Walmart – this is a 36 inch dowel, and I cut mine down to 18 inches, so one 36 inch dowel will make two – or you can buy a shorter one.
- Five 5 Gallon Paint Stick Pack – $1.48 for a 10 pack here – you could use the paint sticks you can get for under $1 a pack (shown above) for a smaller tree if you prefer. I wanted mine to be larger, so went with the 5 gallon paint sticks. I also find the bigger packs of 7 in store for under $2.
- Rectangle Wood Base $0.97 cents at Walmart
- Mini Wreath (made from keychain and twine – you could use anything round, including wire).
- Pack of Number Stickers (or cut them out on a Cricut or Sillhoutte – this is normally the route I would go, but I wanted to show how you could easily make this project without a cutting machine too).
I had purchased mine awhile back at the Dollar Tree, similar to these ones. If you are using stickers, the important thing to remember is that you will need twelve 1’s, and eight 2’s to get from 1-25 – so be sure to buy a packet that has that many, or enough packets to hit that many. I only had eleven 1’s in my packet, so I improvised by using a lower case “i” without the dot in one spot.
- Pack of paper fasteners – $1 at Dollar Store or on Walmart here for varying prices.
Another idea is to use these wood beads instead. I used the fasteners since I had them on hand and they worked – but they are trickier to glue to the boards then a wood bead would have been.
My initial plan was to use wood tacks, but the paint boards where to hard to easily get those in, so fell back on a plan of using an item I could glue to the boards.
- Hot Glue (plus stronger bonding glue as well – optional – like E600, Epoxy, or Gorilla Glue)
- Saw to cut with (any saw should work for this).
Optional
- Wood Cut out Star for Top – (I got a pack of 6 of them from Walmart for $1.67)
- White Paint (or paint of chose)
- Sheet of Sandpaper to smooth cut sides
If you do not have a saw, or someone who can cut the paint sticks for you, I got a small hacksaw for under $5 at Walmart (and the paint sticks are easy to cut through by hand).
How to Make this Farmhouse Decor Christmas Tree DIY Advent Calendar:
Before you start you will want to make a couple of decisions. Do you want to paint your tree, or leave it the natural wood look. If you plan to leave it with the wood look, you will want to make sure to use the side that does NOT have the numbers on them as the front side.
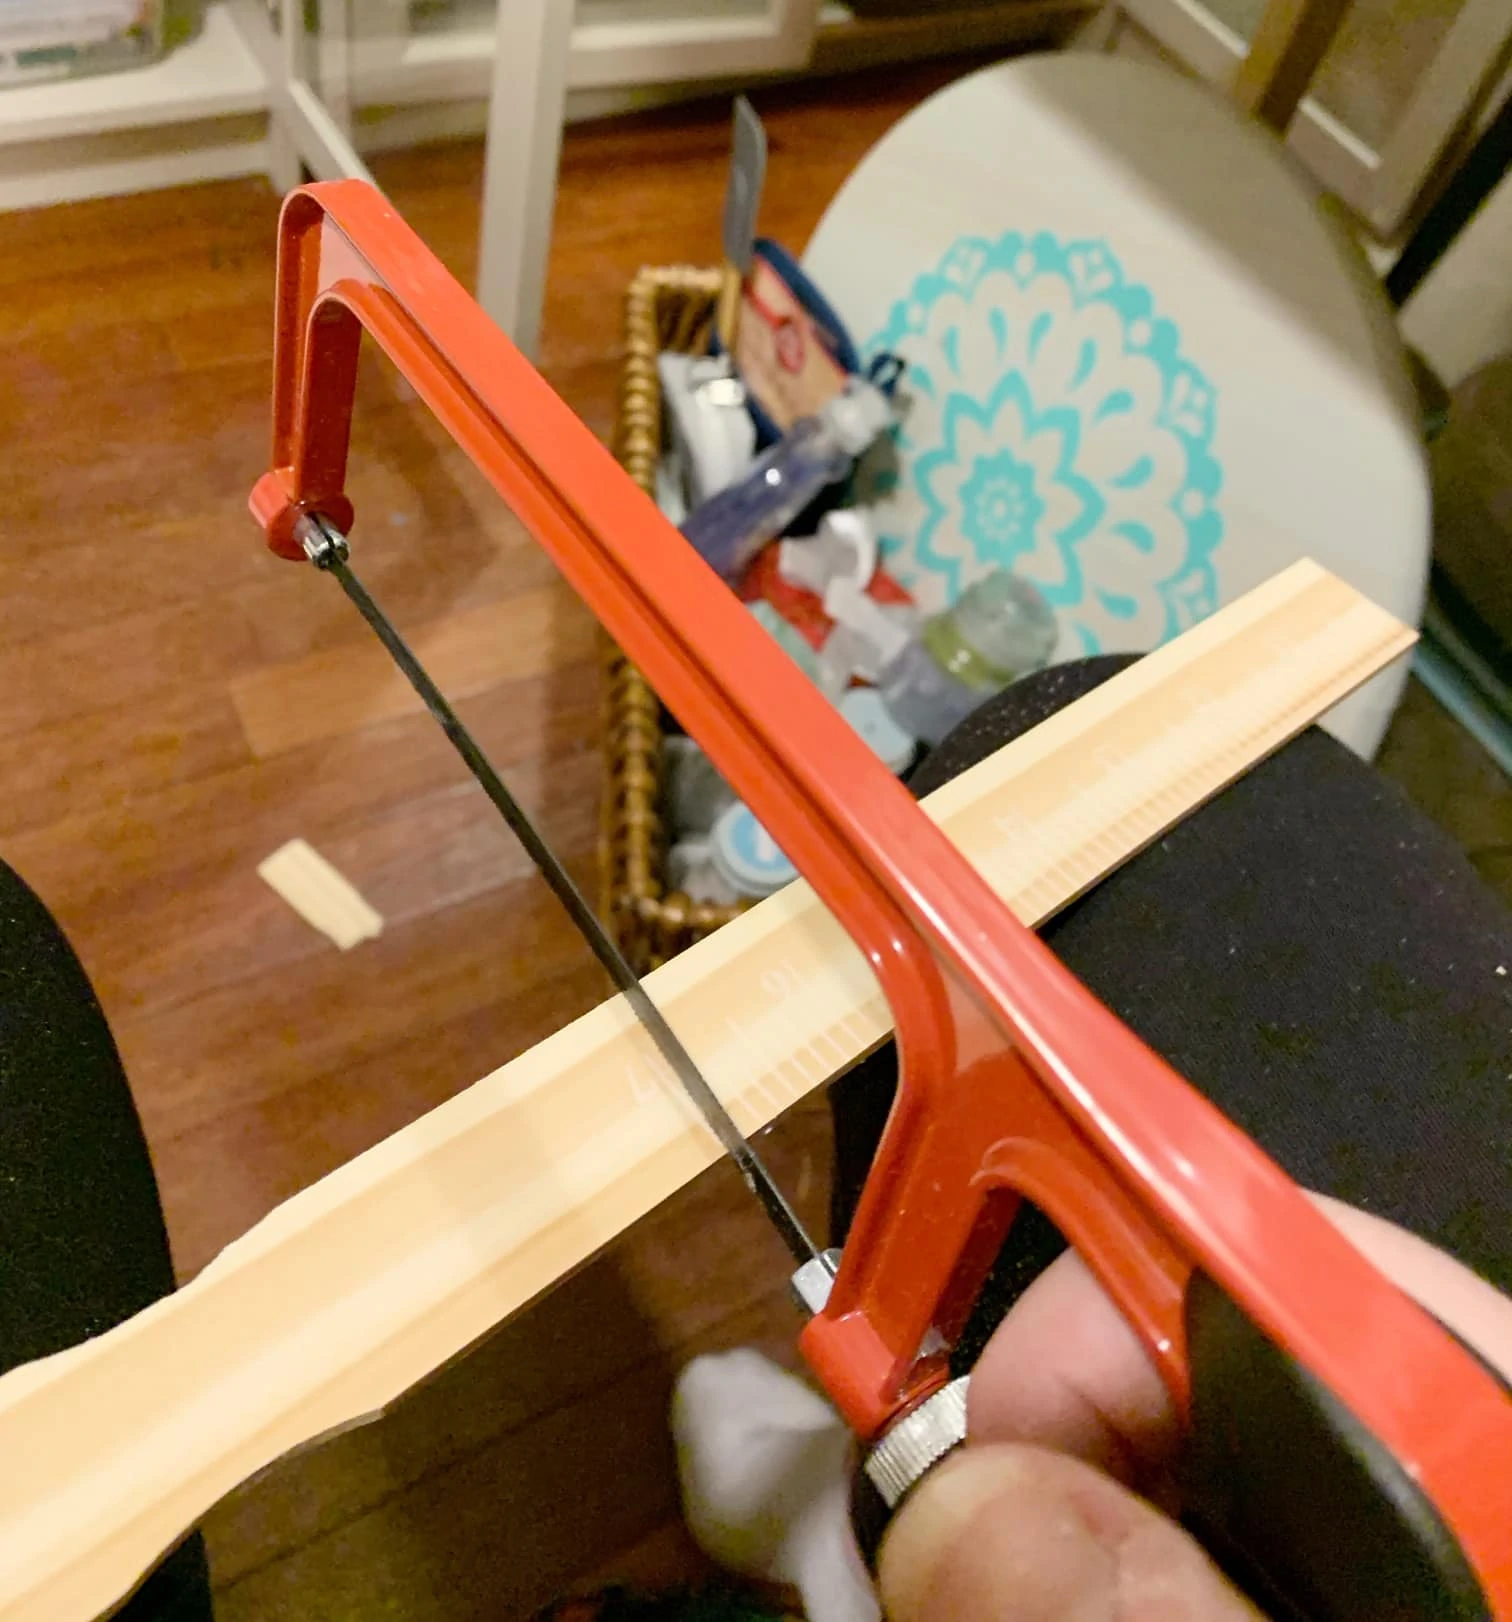
The first thing you will want to do is measure out your pieces, and cut them down to size for your tree. You can make yours any size you wish, but here are the sizes I used for the tree shown above:
- Dowel is 18″
I cut 6 pieces in the following sizes for my tree (you could easily do 5 instead). I only used 5 sticks
- 1 at 9.5 inches
- 1 at 8 inches
- 1 at 7 inches
- 1 at 6.5 inches
- 1 at 5.5 inches
- 1 at 3 inches
Once you have all of your pieces cut, sand down any rough edges, and you are ready to assemble your tree.
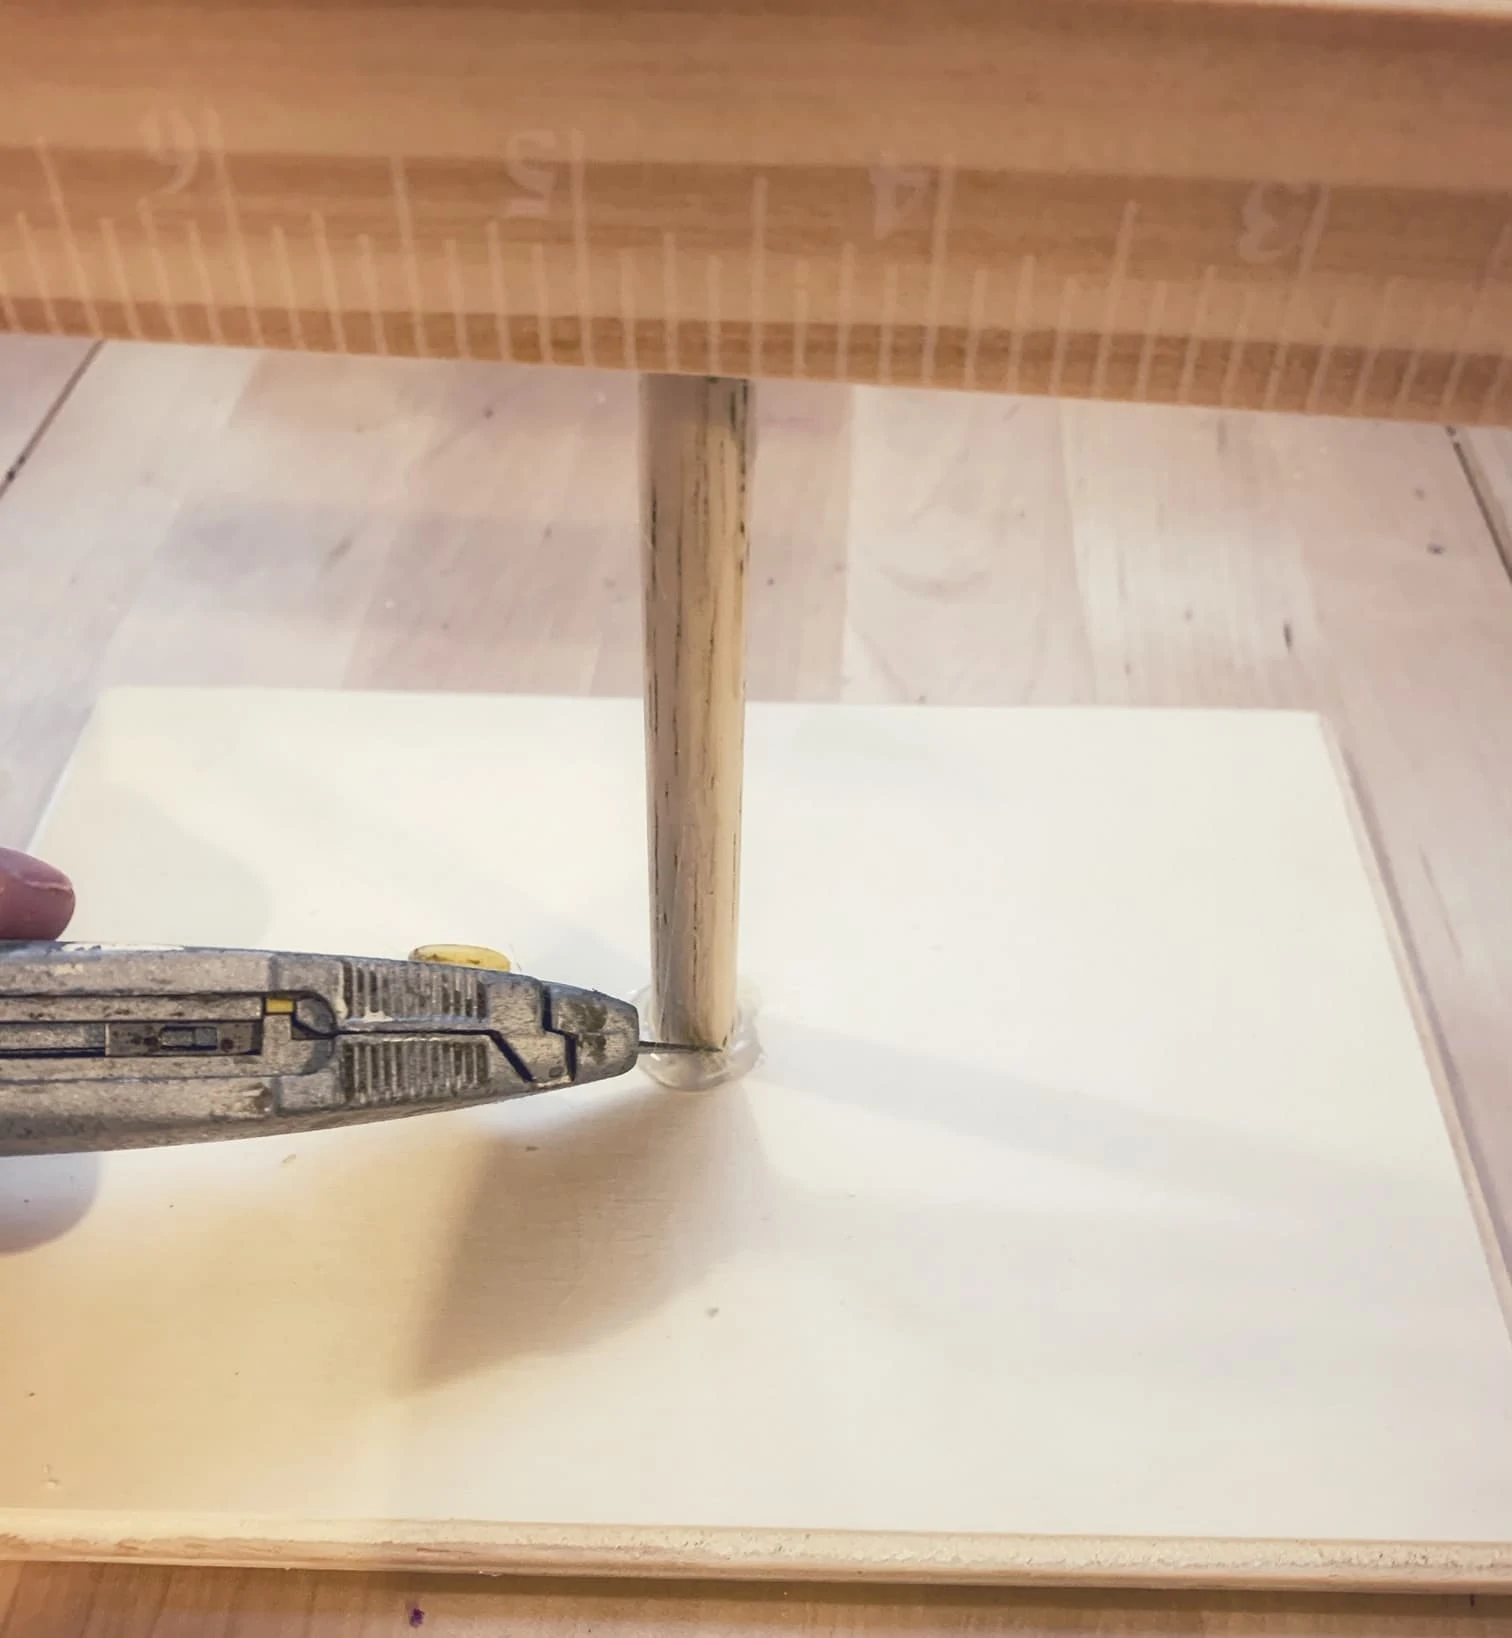
If you have a drill, the best way to do this is to drill a hole in the base large enough to securely insert the dowel into, and then glue your dowel inside that hole. If you do not have a drill to do this step, here is an alternative way to do this (but it will not be as secure as drilling a hole).
Start by measuring out where the center of your bottom rectangle board is, and mark with a dot.
Next, add a dab or gorilla glue where the dot is on the board (or e600 or epoxy), and then put hot glue on the bottom of your dowel, and attach it over the dot you marked, and hold it in place (straight up and down) until the hot glue sets (so it does not move when you let go).
The reason I use both glues, is because the stronger glue will create a stronger bond then just using hot glue. The hot glue however will hold it in place quickly, so it dries where you set it up. You could use just hot glue, but it will not be as strong. Or you could use something like a wood glue, but then you will need clamps to hold it in place while it dries. My hack to this problem is to use both a strong bonding glue, and hot glue – works great for lots of crafting ideas!
Let it dry overnight, if you used a stronger bonding glue with hot glue. If you used only hot glue, you can move onto the next step.
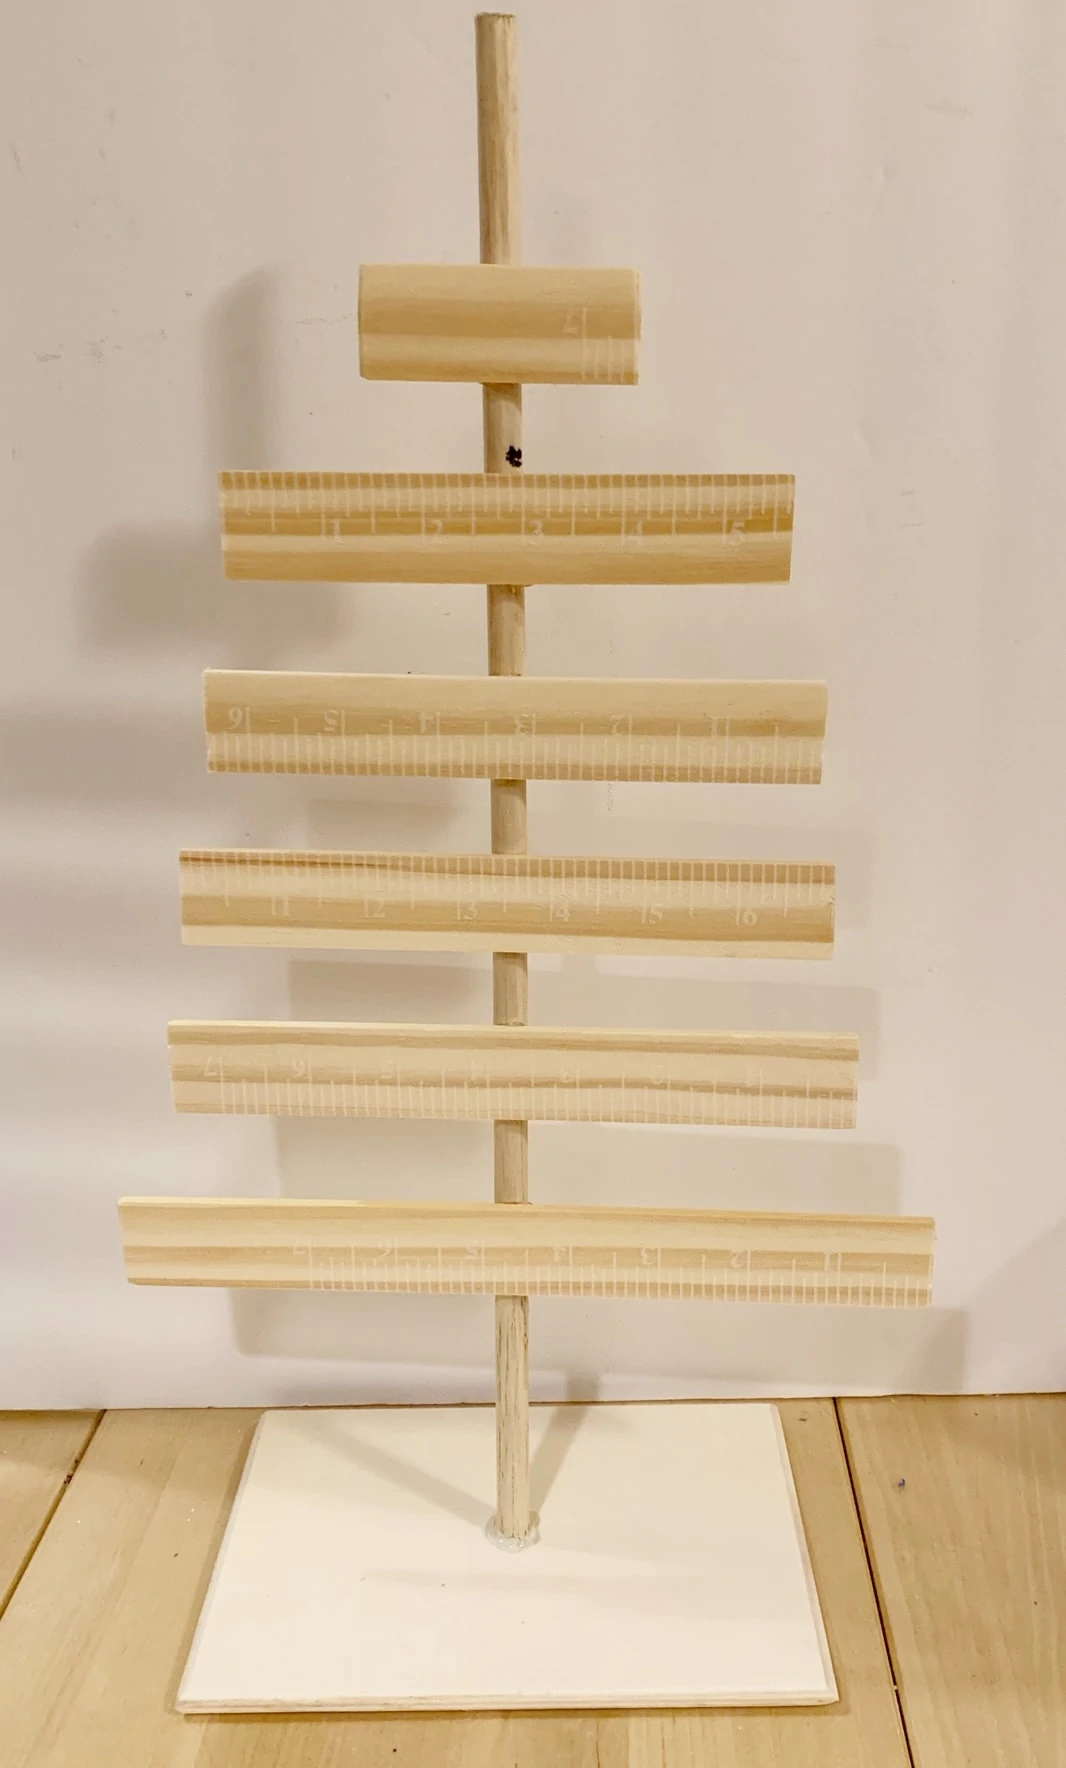
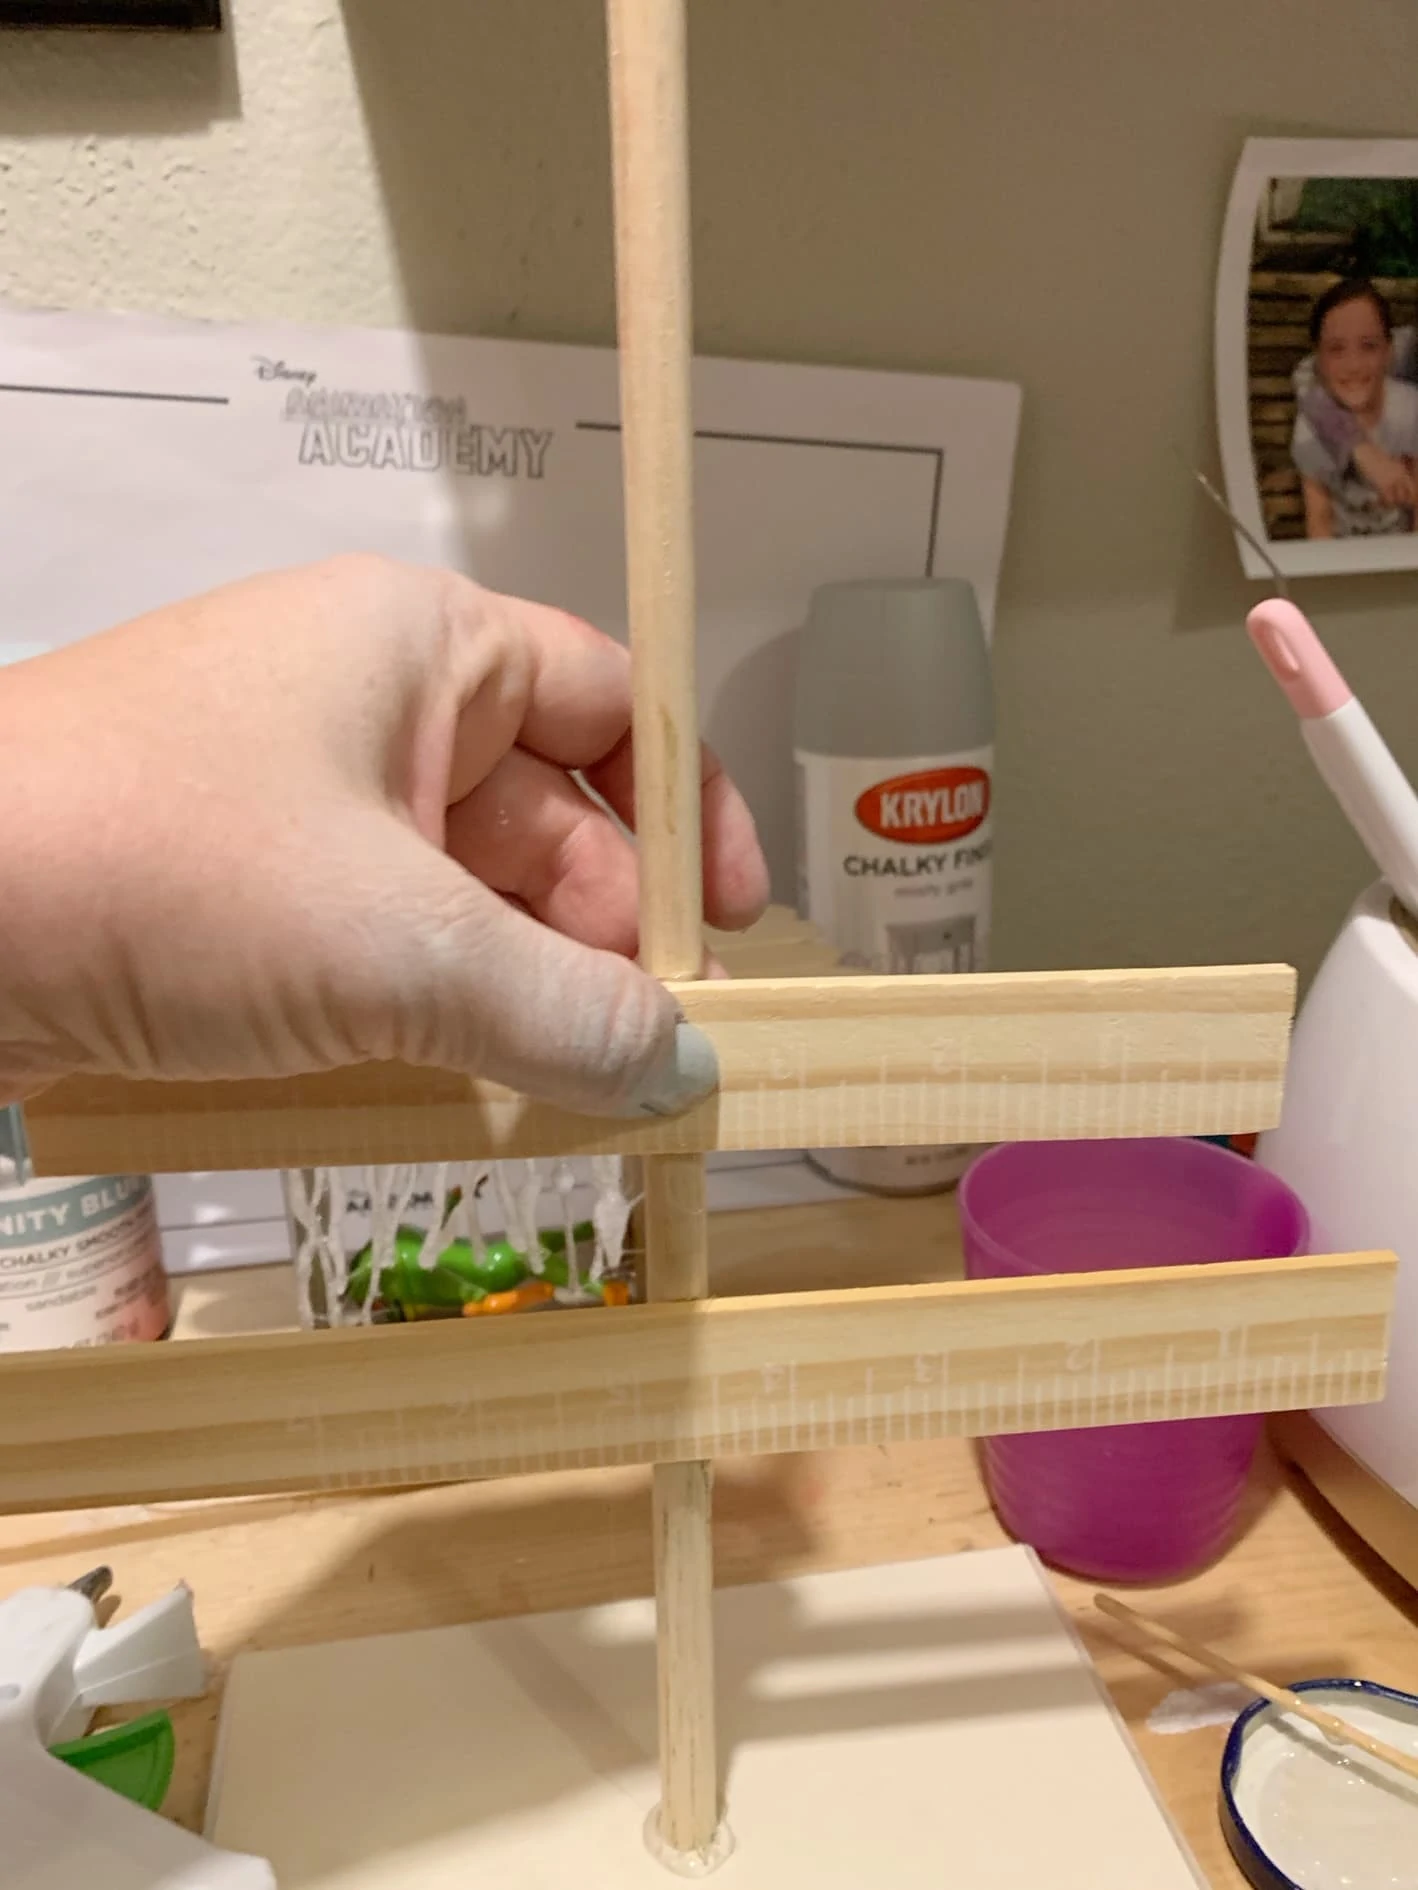
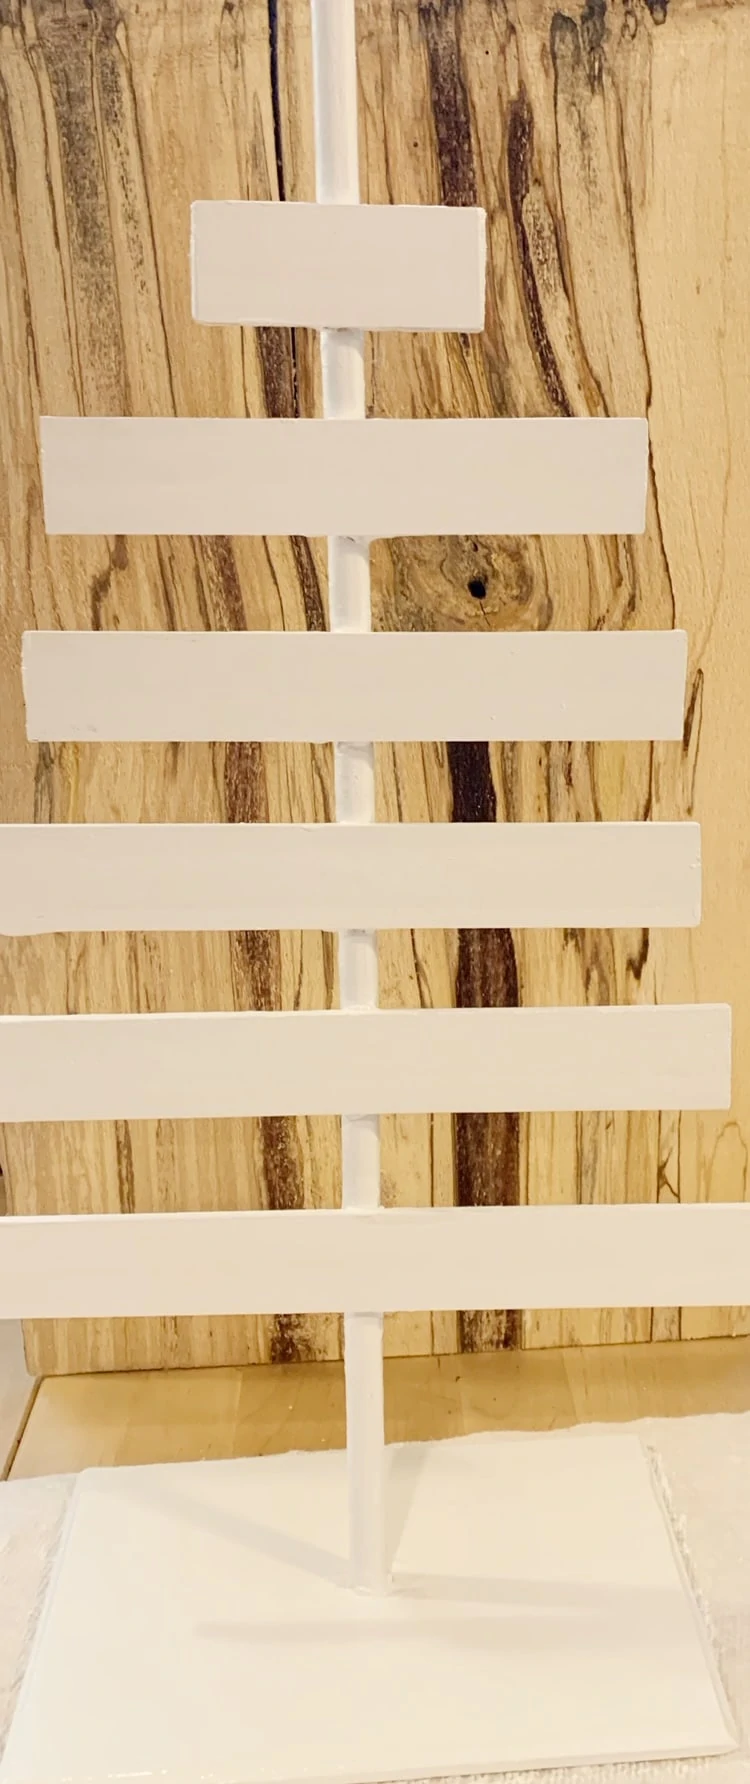
Once your base and dowel are set, you are ready to add in the tree branches, with the 6 pieces you cut from the paint sticks.
Start by laying it out, so you can see how you want to space yours out. I spaced mine 1 inch apart in the tree above.
Mark each spot on the dowel, where you want a tree branch to go with a small dot. Next measure where the middle of each of the tree branches (paint sticks) is, and mark a dot to the back of your stick, so you will know where to attach it on the dowel.
Also, make sure you leave a few inches at the top to attach your star, if you are using one of these.
Remember, if you do not plan to paint your tree, make sure the numbers on are the back side.
Use the same gluing method you used for the base. Add a little of your strong glue to the dowel, and then add hot glue to the back of your paint stick, and attach to dowel where you have marked out that you want each tree branch to be. Hold in place until hot glue sets.
Once you have attached all of the branches (paint sticks) let that set over night too, if you are using the stronger glue. If you used just hot glue, you can move on to next step.
I was generous with my glue for the base, to make sure it was on there strong, so I gently trimmed off the excess glue with a box cutter, after it dried overnight. This step is really not necessary though, as I added some decorative twine to the bottom at the end, so it would have covered this.
Now that you have your tree assembled, it is ready to paint! I painted the star red and the tree white. You can choose any colors or stains you like, or leave it natural.
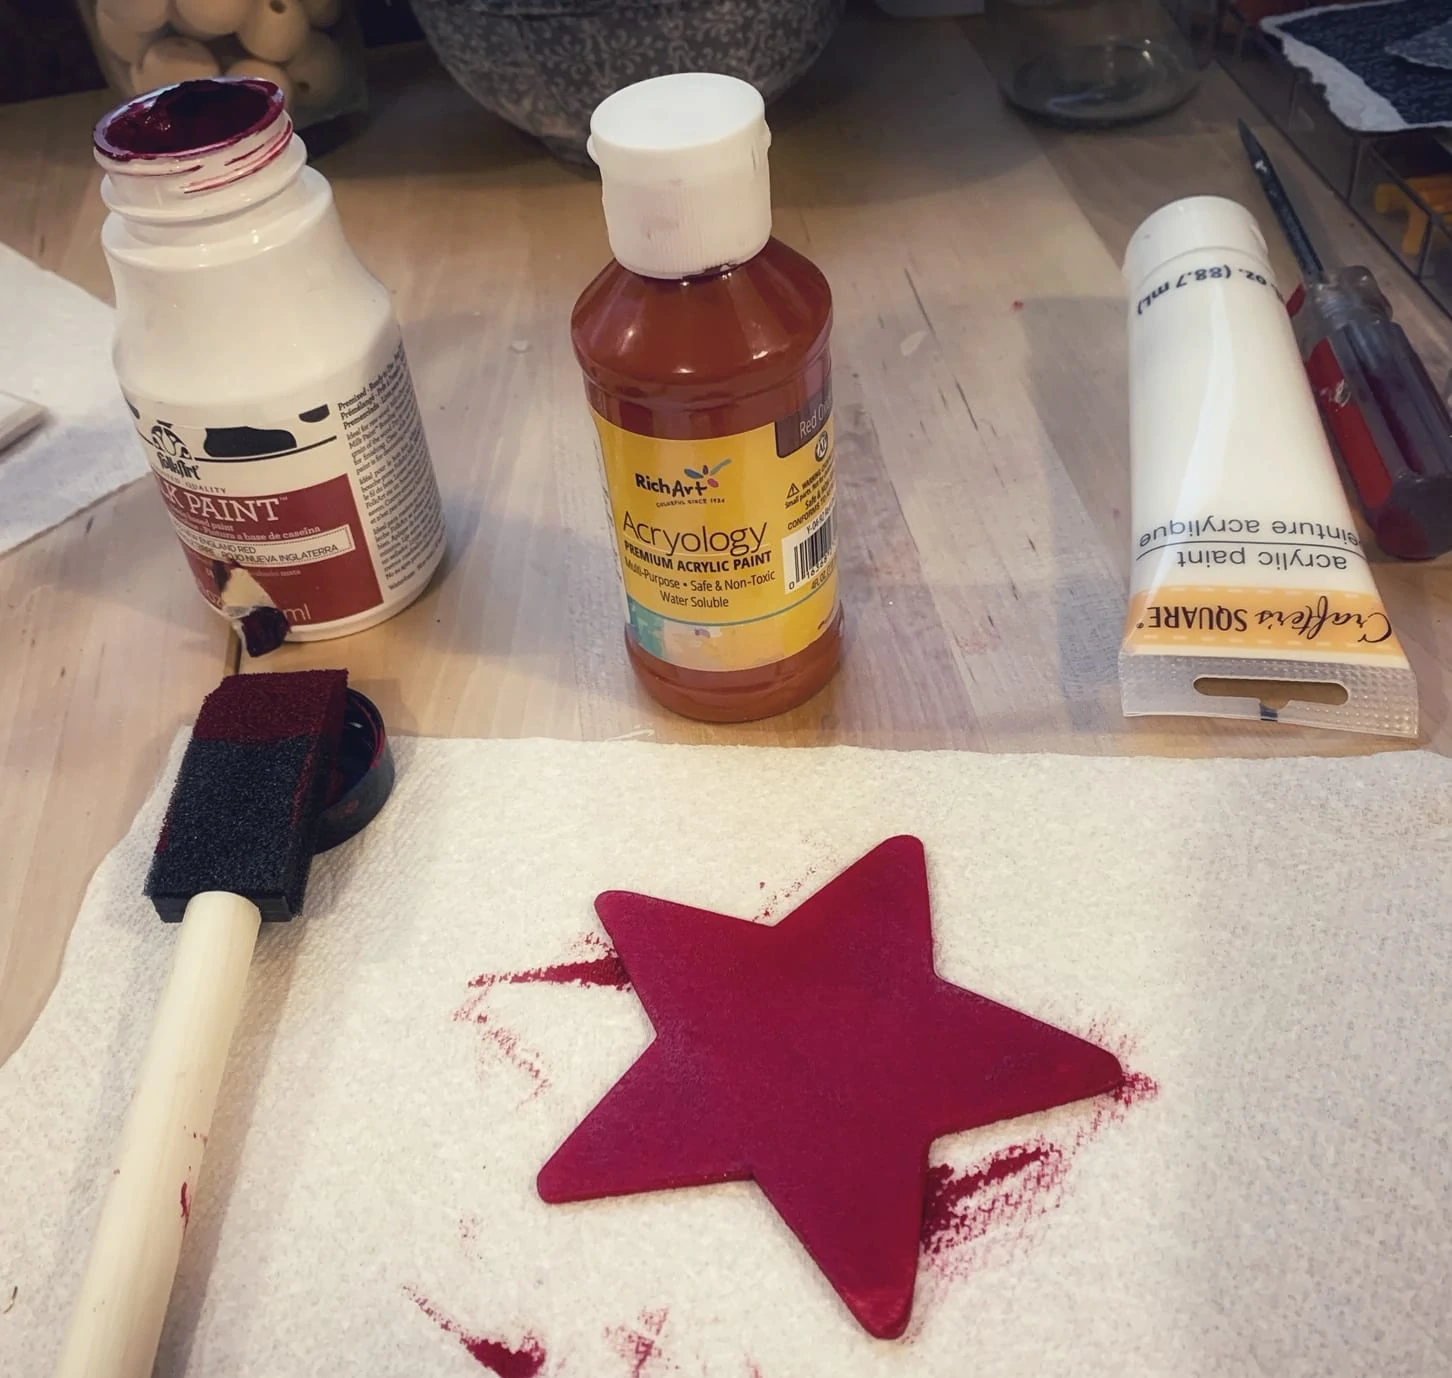
I attached the start to the top of the dowel with hot glue, once the paint had dried. You could use both kinds of glue here too, but I was not as worried about the star coming off.
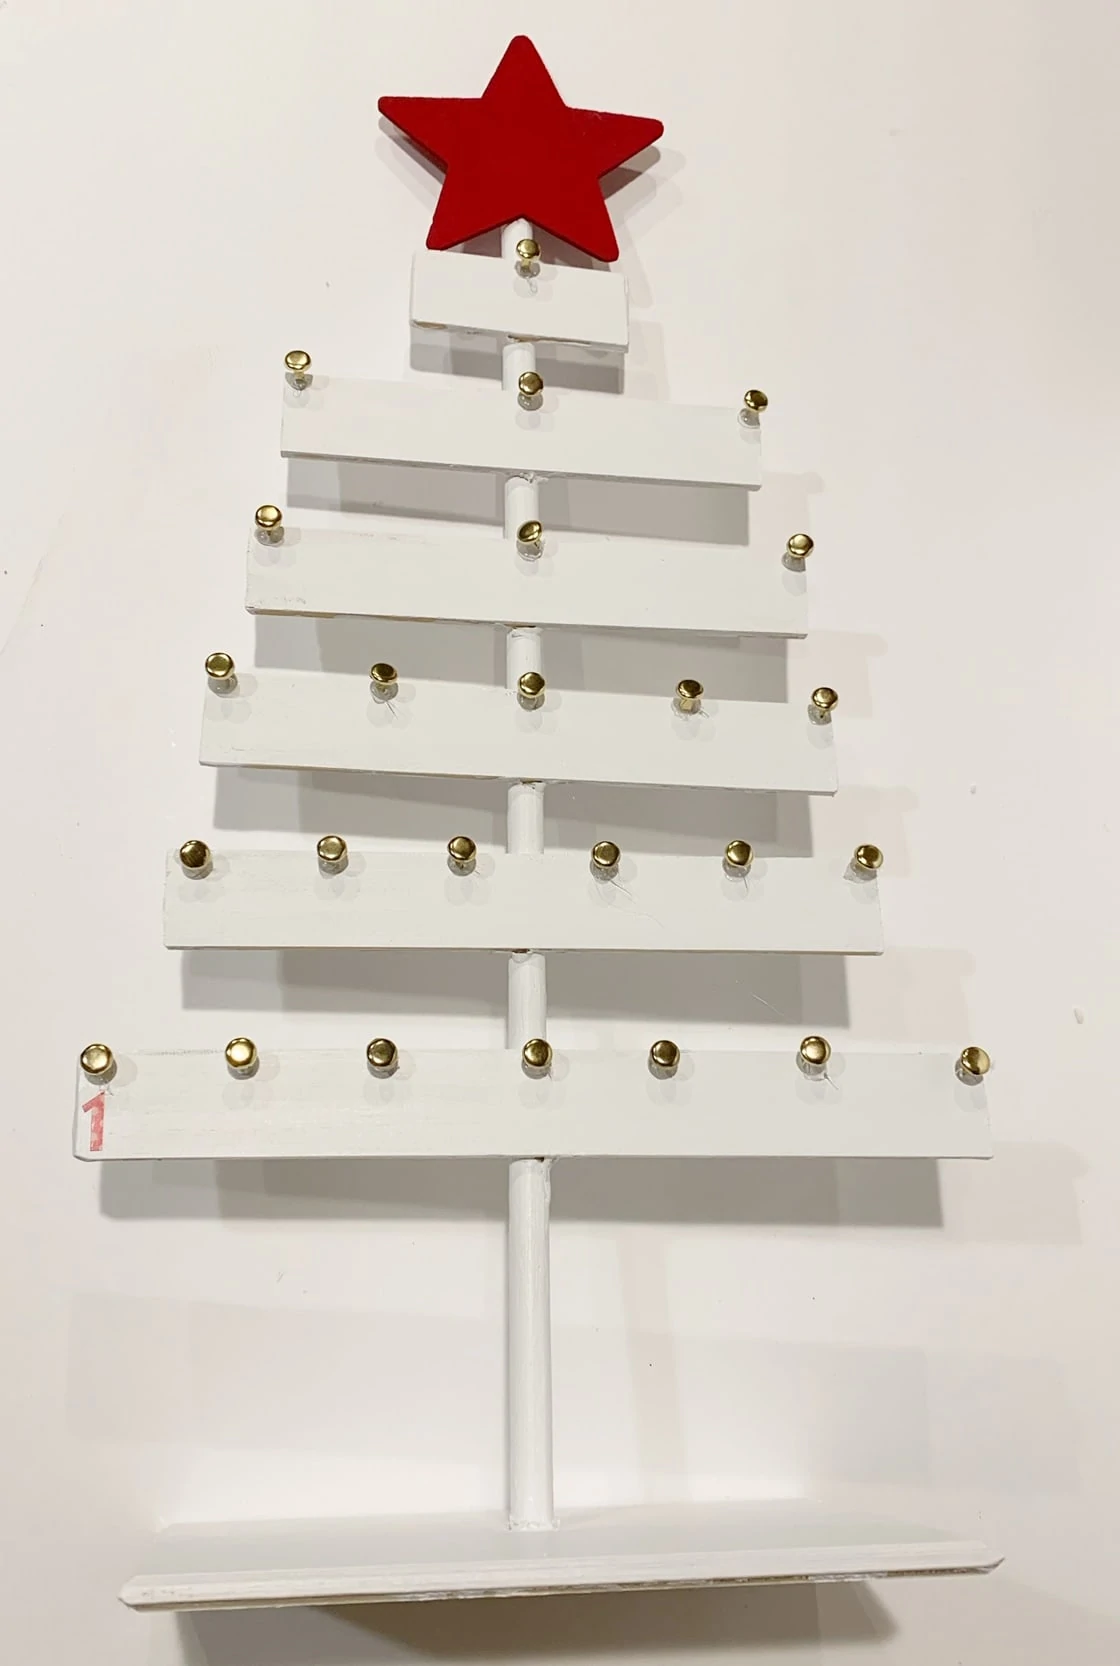
The next step is to attach your paper fasteners (or beads if you are using those), and then your stickers. I laid the board down on my table, and started by figuring out how I wanted to lay out my numbers, and the spacing for each board. You can do this however they fit best on your board, but here is how I did it (note the inspiration one that I found in the store lays them out differently, so look at that closely for another idea) –
(Layout from top board to bottom board)
- Top board was #25
- Second board was #22-#24
- Third board was #19-#21
- Fourth board was #14 – #18
- Fifth board was #8-#13
- Sixth board was #1-7 (I did the most here, as they are single digit numbers, so you can fit more on).
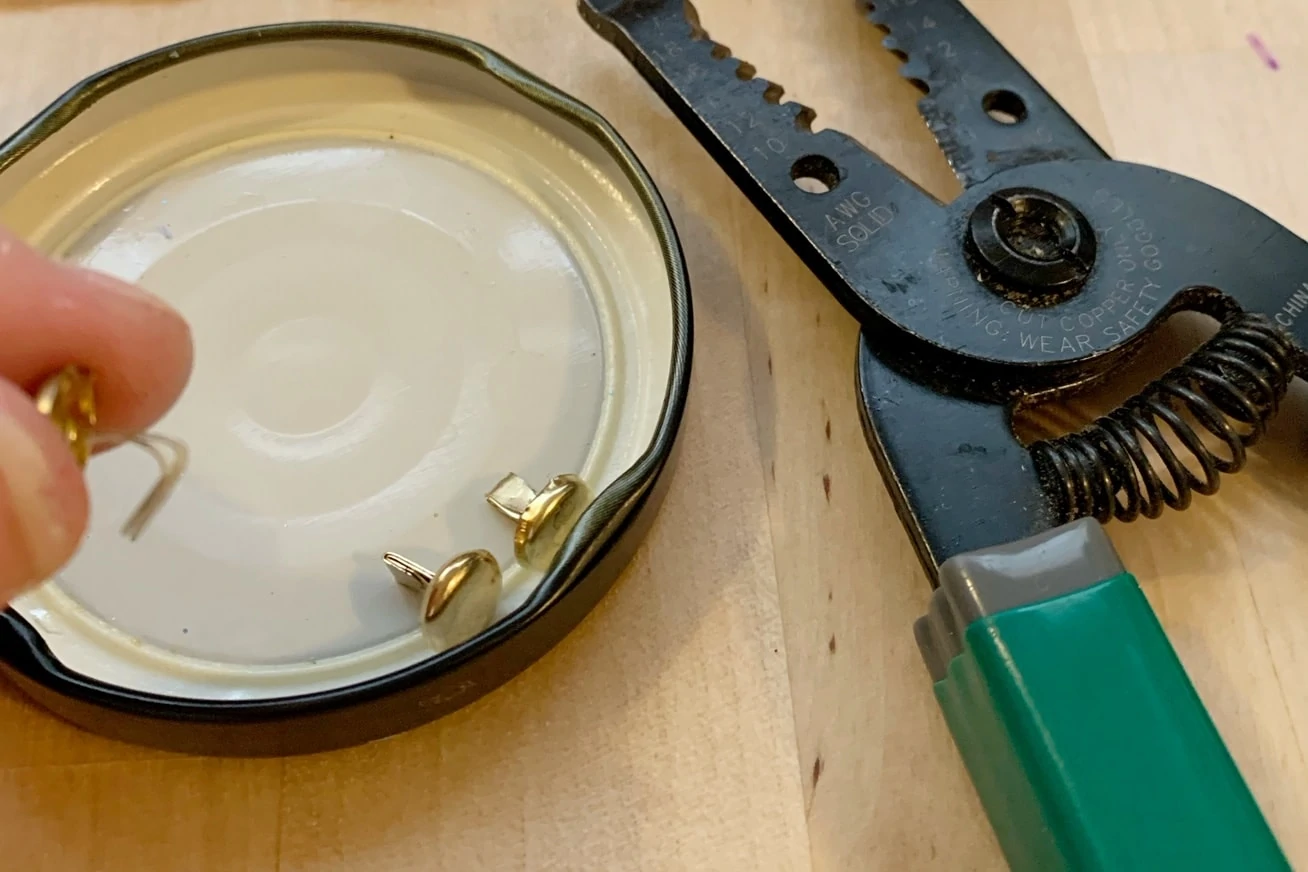
Then I counted out 25 paper fasteners, and folded them in half, to make a sturdier (and shorter) base. My fingers got sore doing this, so I ended up using one of my wire tools to bend them.
Once you have your fasteners ready, apply them according to the number layout you decided to use.
Use the same glue method here (a drop of the strong glue, then a dab of hot glue and hold your fastener in place until the hot glue is set and it will stay). You can see on one of the images above that one of my middle fasteners was crooked. Just make sure to remove the glue before the strong glue sets (peel the hot glue off) and start over in that spot if this happens to you too.
Once all of those are set, start applying your number stickers underneath each fastener, in the layout you decided to use.
These two steps will require the most patience for this project, but it went quicker then I anticipated it would.
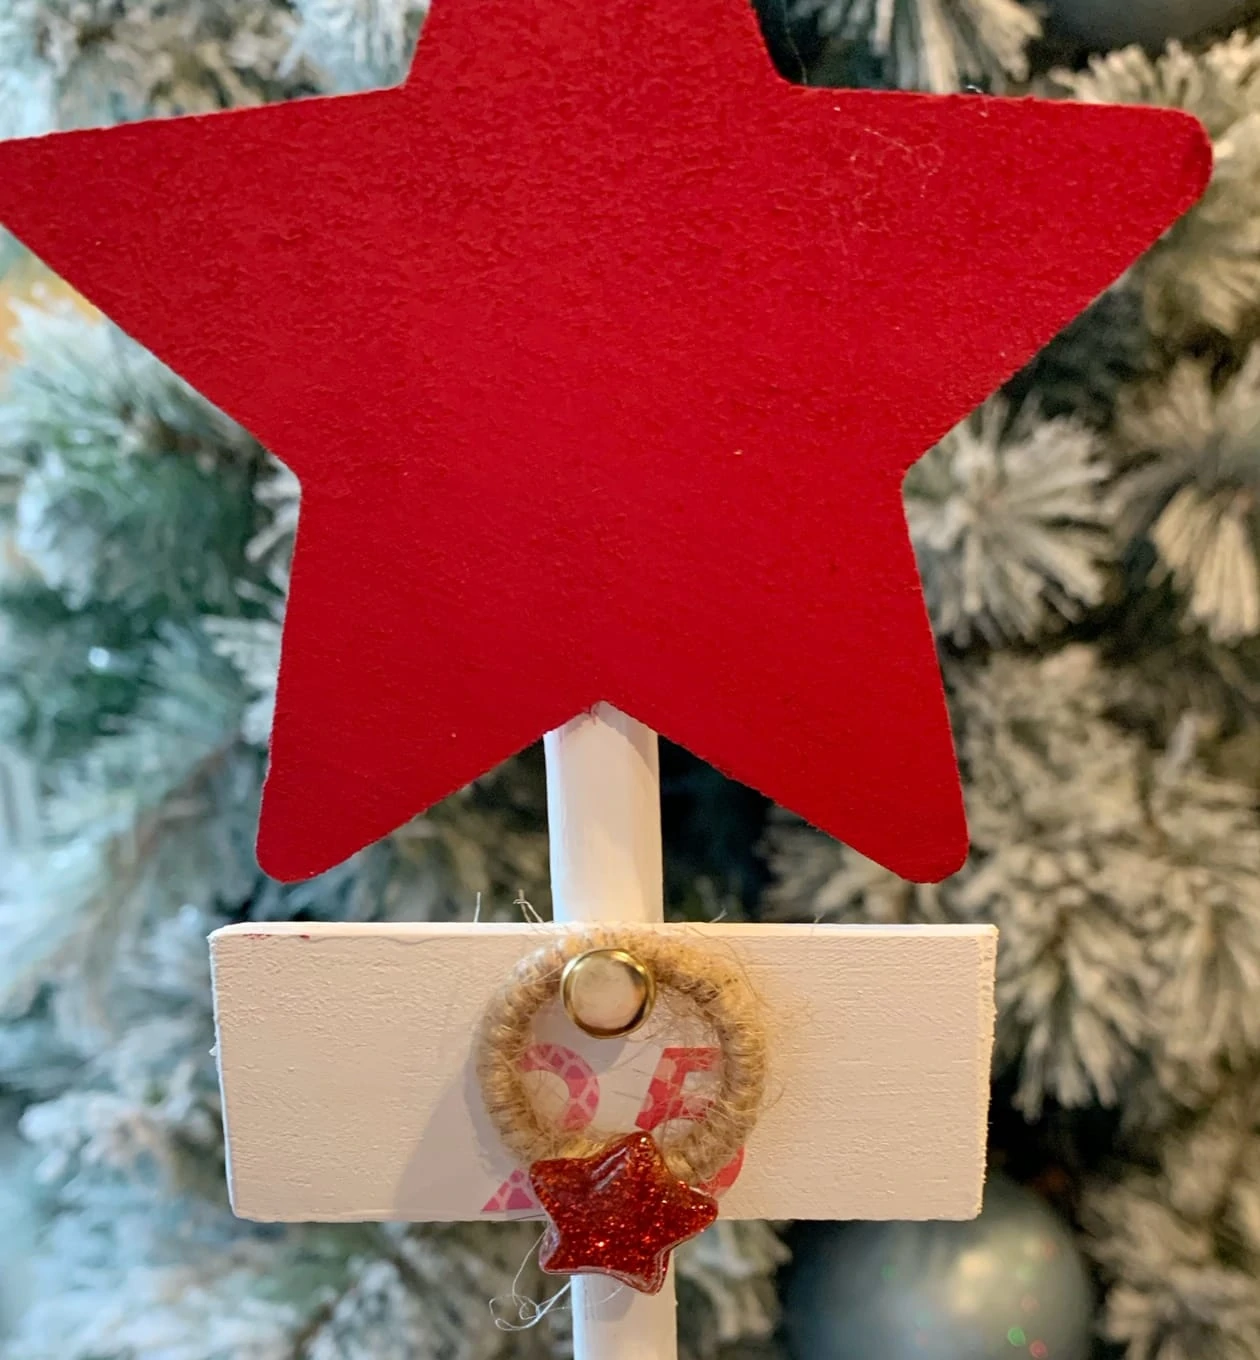
Now you will need to make something that you can use to move around on your calendar to mark the days. I went with a simple wreath, similar to the inspiration calendar I saw in the store.

To Make the Wreath Hanger:
I used a small keychain that I had on hand, and simply wrapped twine around it and tied it off. Then I hot glued on a small acrylic star I had on hand where I tied it off (you could use holly berries from the Dollar store too).

Now let your fasteners dry overnight before hanging your wreath on there, and once they are dry you are all set to display your new advent calendar! I did add some twine to the bottom of mine (by the base), but it is just decorative. You can do that or not – either way looked great.
One note about sealing your project:
Depending on the type of numbers you use, you may or may not want to seal your project (some cheaper stickers will pull up easily, but if you used a Cricut with permanent vinyl it should be just fine. Here are some tips on sealing.
If you plan to seal after using stickers, mod podge is a great option here. Once all the glued parts and paint are dry, and stickers applied, you can do a coat or two of mod podge on top of everything.
If you used vinyl (for Cricut cut numbers) do not seal on top – this causes vinyl to curl or peel up often. If you want to seal it, do that before applying your vinyl, and use permanent vinyl, and it should be fine.
Find more DIY Christmas Projects here too!
More Articles You Might Like
DIY Wood Slice Ornaments using a Cricut + Free Christmas SVG